以前の記事で OpenBlocks IoT BX1 の WebUI から設定を行うことで、 SensorTag のデータ取得を行いました。
SensorTag は BX1 のサポート対象になっているため、 WebUI からの設定のみでセンサーデータを読み取ることができていましたが、サポート対象外の BLE デバイスの場合にはデータを取得するための処理を自前で実装する必要があります。そこで今回は Ruby のスクリプトから SensorTag のデータを読み取ってみたいと思います。
ssh設定
まずは作業を行いやすいように、 BX1 に ssh でログインできるようにします。工場出荷状態から作業をしたとすると、上記の記事の「初期設定」の項目の内容を実施し、 Wi-Fi 経由でアクセスできるようにします。
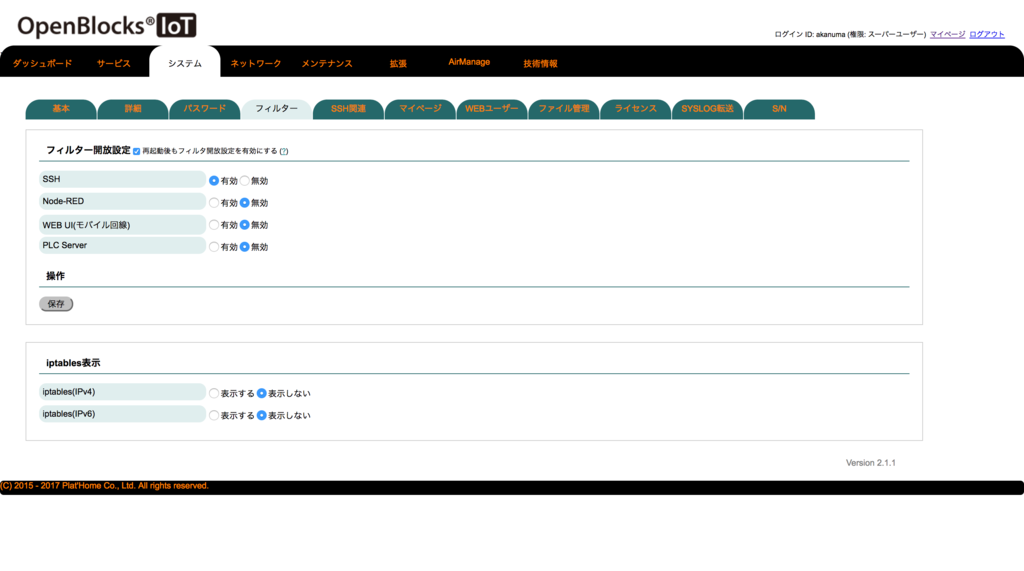
初期設定が終わり再起動が完了したら再び WebUI にアクセスし、「システム」メニューの「フィルター」タブで「SSH」のラジオボタンを「有効」にします。また、再起動後も設定が保持されるように、「再起動後もフィルタ解放設定を有効にする」にチェックを入れて保存します。

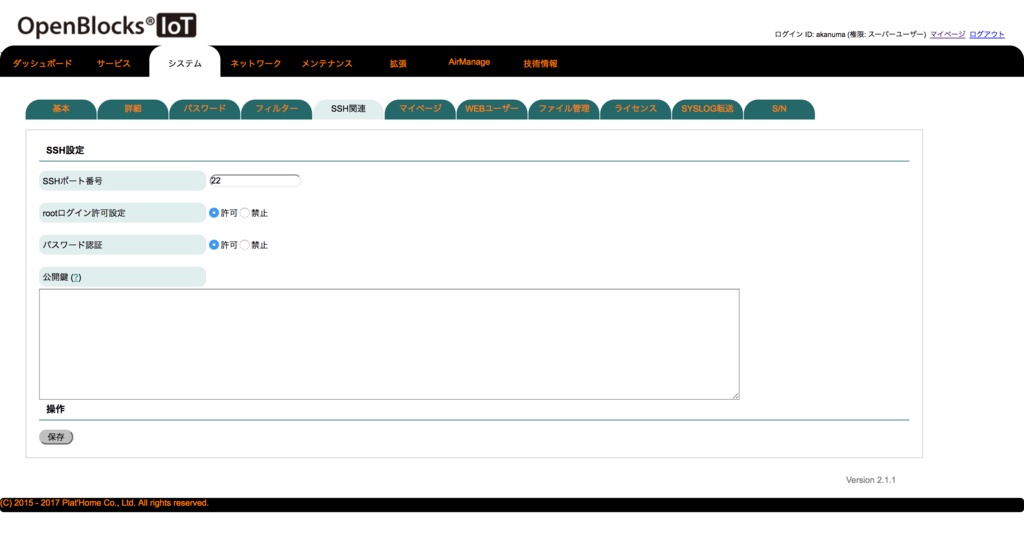
「SSH関連」タブで ssh の詳細設定を行うことができますが、今回はとりあえずのお試しということで、特に設定は変更せず、 root ログインも許可します。実際の本番運用時にはセキュリティ的に問題ないように設定を変更する必要があるかと思います。

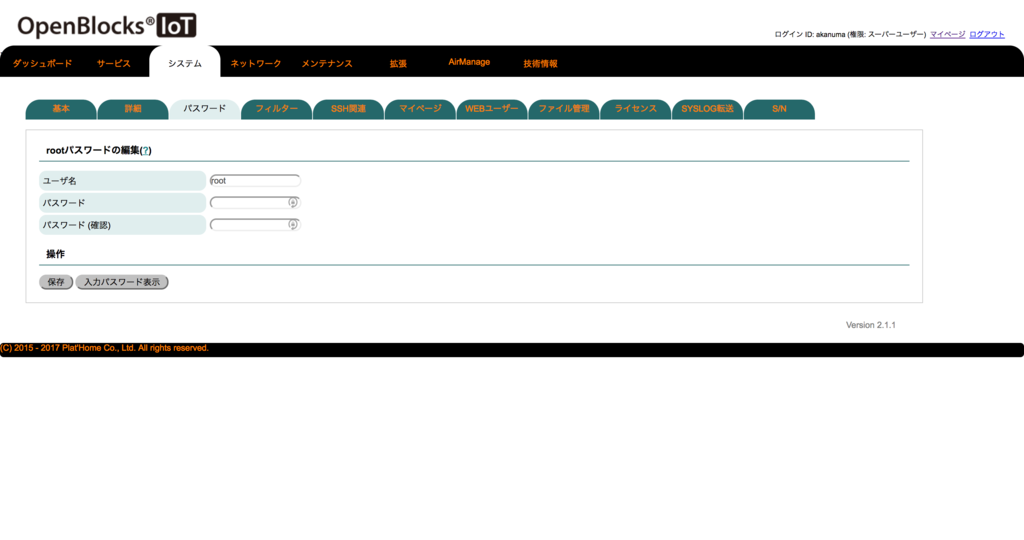
root ユーザのパスワードは「パスワード」タブで設定できます。

これで Wi-Fi 経由で ssh ログインができるようになります。
$ ssh root@192.168.10.100
root@192.168.10.100's password:
Linux obsiot.example.org 3.10.17-poky-edison #1 SMP PREEMPT Thu Jun 1 16:35:38 JST 2017 i686

The programs included with the Debian GNU/Linux system are free software;
the exact distribution terms for each program are described in the
individual files in /usr/share/doc/*/copyright.

Debian GNU/Linux comes with ABSOLUTELY NO WARRANTY, to the extent
permitted by applicable law.
Last login: Sun Sep  3 22:47:04 2017 from 192.168.10.8
デフォルトの BlueZ バージョンでのアクセス確認
BX1 にはデフォルトで BlueZ がインストールされていますが、バージョンは少し古く、 5.23 です。
root@obsiot:~# apt-cache show bluez
Package: bluez
Source: bluez (5.23-2)
Version: 5.23-2+b1
Installed-Size: 3043
Maintainer: Debian Bluetooth Maintainers <pkg-bluetooth-maintainers@lists.alioth.debian.org>
Architecture: i386
Replaces: bluez-audio (<= 3.36-3), bluez-input, bluez-network, bluez-serial, bluez-utils (<= 3.36-3), udev (<< 170-1)
Depends: libc6 (>= 2.15), libdbus-1-3 (>= 1.1.1), libglib2.0-0 (>= 2.28.0), libreadline6 (>= 6.0), libudev1 (>= 196), init-system-helpers (>= 1.18~), kmod, udev (>= 170-1), lsb-base, dbus
Conflicts: bluez-audio (<= 3.36-3), bluez-utils (<= 3.36-3)
Breaks: udev (<< 170-1)
Description-en: Bluetooth tools and daemons
 This package contains tools and system daemons for using Bluetooth devices.
 .
 BlueZ is the official Linux Bluetooth protocol stack. It is an Open Source
 project distributed under GNU General Public License (GPL).
Description-md5: ef25d6a9f4a57e78f32faa7b58ef4e59
Multi-Arch: foreign
Homepage: http://www.bluez.org
Tag: admin::hardware, admin::kernel, hardware::TODO, implemented-in::c,
 protocol::TODO, role::program, use::driver, use::synchronizing
Section: admin
Priority: optional
Filename: pool/main/b/bluez/bluez_5.23-2+b1_i386.deb
Size: 750516
MD5sum: 6f731b661885f89ce75d9204a0ca7a8a
SHA1: 502e7f2d1d99b615313e846fd07177d1cc763e2f
SHA256: 3ab85fc151b51dfe91830dd546554fe739dbd7ac069c091eccb39cce88d9a79f
apt-get でインストールできるのはこれが最新らしいのですが、執筆時の BlueZ の最新バージョンは 5.46 ですので、少し開きがあります。
また、 bluetoothd は –experimental オプションなしで起動しています。
root@obsiot:~# ps aux | grep bluetoothd | grep -v grep
root      1498  0.0  0.1   5236  1804 ?        S    23:03   0:00 /usr/sbin/bluetoothd
–experimental オプション付きで起動するには、 /etc/init.d/bluetooth を編集して、 SSD_OPTIONS の行の内容を下記のように変更します。
SSD_OPTIONS="--oknodo --quiet --exec $DAEMON -- $NOPLUGIN_OPTION"
 ↓
SSD_OPTIONS="--oknodo --quiet --exec $DAEMON -- $NOPLUGIN_OPTION --experimental"
変更したら bluetoothd を再起動すると、 –experimental オプション付きで起動します。
root@obsiot:~# /etc/init.d/bluetooth restart
Stopping bluetooth: /usr/sbin/bluetoothd.
Starting bluetooth: bluetoothd.
root@obsiot:~#
root@obsiot:~# ps aux | grep bluetoothd
root     18692  0.3  0.1   5236  1812 ?        S    23:51   0:00 /usr/sbin/bluetoothd --experimental
root     18710  0.0  0.0   5748   832 pts/1    S+   23:51   0:00 grep bluetoothd
そしてデフォルトでは Bluetooth コントローラは有効になっていません。
root@obsiot:~# rfkill list
0: phy0: Wireless LAN
        Soft blocked: no
        Hard blocked: no
1: brcmfmac-wifi: Wireless LAN
        Soft blocked: no
        Hard blocked: no
2: bcm43xx Bluetooth: Bluetooth
        Soft blocked: yes
        Hard blocked: no
この状態で bluetoothctl を使用しても下記のようにエラーになります。
root@obsiot:~# bluetoothctl
[bluetooth]# power on
No default controller available
有効にするためには下記コマンドを実行します。
root@obsiot:~# bluetooth_rfkill_event &
root@obsiot:~# rfkill unblock bluetooth
実行時の出力は下記のようになります。
root@obsiot:~# bluetooth_rfkill_event &
[1] 3752
root@obsiot:~# 1504361980.098955: idx 2 type 2 op 0 soft 1 hard 0

root@obsiot:~# rfkill unblock bluetooth
1504362012.636847: idx 2 type 2 op 2 soft 0 hard 0
root@obsiot:~# execute brcm_patchram_plus --use_baudrate_for_download --no2bytes --enable_fork --enable_lpm --enable_hci --baudrate 3000000 --patchram /etc/firmware/bcm43341.hcd --bd_addr 98:4F:EE:04:B3:24 --scopcm 1,0,0,0,0,0,0,0,0,0 /dev/ttyMFD0
Done setting line discipline
1504362013.132510: idx 3 type 2 op 0 soft 0 hard 0
rfkill については下記サイトで説明されています。無線デバイスのON/OFFを行うためのコマンドになります。
実行後は下記のように hci0 のブロックが解除されて、使用できるようになっています。
root@obsiot:~# rfkill list
0: phy0: Wireless LAN
        Soft blocked: no
        Hard blocked: no
1: brcmfmac-wifi: Wireless LAN
        Soft blocked: no
        Hard blocked: no
2: bcm43xx Bluetooth: Bluetooth
        Soft blocked: no
        Hard blocked: no
3: hci0: Bluetooth
        Soft blocked: no
        Hard blocked: no
これで bluetoothctl 等で BLE デバイスにアクセスできるようになりますので、 bluetoothctl から SensorTag に接続してみます。
root@obsiot:~# bluetoothctl
[NEW] Controller 98:4F:EE:04:B3:24 BlueZ 5.23 [default]
[NEW] Device CC:78:AB:7F:65:87 CC2650 SensorTag
[bluetooth]# scan on
Discovery started
[CHG] Controller 98:4F:EE:04:B3:24 Discovering: yes
[NEW] Device 62:BA:E7:35:DB:E8 62-BA-E7-35-DB-E8
[NEW] Device 34:36:3B:C7:FB:E9 34-36-3B-C7-FB-E9
[CHG] Device 62:BA:E7:35:DB:E8 RSSI: -41
[CHG] Device CC:78:AB:7F:65:87 RSSI: -46
[bluetooth]# devices
Device CC:78:AB:7F:65:87 CC2650 SensorTag
Device 62:BA:E7:35:DB:E8 62-BA-E7-35-DB-E8
Device 34:36:3B:C7:FB:E9 34-36-3B-C7-FB-E9
[bluetooth]# scan off
[bluetooth]# connect CC:78:AB:7F:65:87
Attempting to connect to CC:78:AB:7F:65:87
[CHG] Device CC:78:AB:7F:65:87 Connected: yes
Connection successful
[CHG] Device CC:78:AB:7F:65:87 UUIDs:
        00001800-0000-1000-8000-00805f9b34fb
        00001801-0000-1000-8000-00805f9b34fb
        0000180a-0000-1000-8000-00805f9b34fb
        0000180f-0000-1000-8000-00805f9b34fb
        0000ffe0-0000-1000-8000-00805f9b34fb
        f000aa00-0451-4000-b000-000000000000
        f000aa20-0451-4000-b000-000000000000
        f000aa40-0451-4000-b000-000000000000
        f000aa64-0451-4000-b000-000000000000
        f000aa70-0451-4000-b000-000000000000
        f000aa80-0451-4000-b000-000000000000
        f000ac00-0451-4000-b000-000000000000
        f000ccc0-0451-4000-b000-000000000000
        f000ffc0-0451-4000-b000-000000000000
[bluetooth]# info CC:78:AB:7F:65:87
Device CC:78:AB:7F:65:87
        Name: CC2650 SensorTag
        Alias: CC2650 SensorTag
        Paired: no
        Trusted: no
        Blocked: no
        Connected: yes
        LegacyPairing: no
        UUID: Generic Access Profile    (00001800-0000-1000-8000-00805f9b34fb)
        UUID: Generic Attribute Profile (00001801-0000-1000-8000-00805f9b34fb)
        UUID: Device Information        (0000180a-0000-1000-8000-00805f9b34fb)
        UUID: Battery Service           (0000180f-0000-1000-8000-00805f9b34fb)
        UUID: Unknown                   (0000ffe0-0000-1000-8000-00805f9b34fb)
        UUID: Vendor specific           (f000aa00-0451-4000-b000-000000000000)
        UUID: Vendor specific           (f000aa20-0451-4000-b000-000000000000)
        UUID: Vendor specific           (f000aa40-0451-4000-b000-000000000000)
        UUID: Vendor specific           (f000aa64-0451-4000-b000-000000000000)
        UUID: Vendor specific           (f000aa70-0451-4000-b000-000000000000)
        UUID: Vendor specific           (f000aa80-0451-4000-b000-000000000000)
        UUID: Vendor specific           (f000ac00-0451-4000-b000-000000000000)
        UUID: Vendor specific           (f000ccc0-0451-4000-b000-000000000000)
        UUID: Vendor specific           (f000ffc0-0451-4000-b000-000000000000)
        Modalias: bluetooth:v000Dp0000d0110
また、 Ruby の環境を構築し、 irb で dbus からアクセスしてみます。Ruby 環境の構築や dbus でのアクセス方法等はこちらをご参照ください。
Raspberry Pi + RubyでLチカ - Tech Blog by Akanuma Hiroaki
Raspberry Pi 3でD-BusからBLEデバイスにアクセスする - Tech Blog by Akanuma Hiroaki
irb(main):038:0* device.GetAll('org.bluez.Device1')
/root/sensortag_sample/vendor/bundle/ruby/2.4.0/gems/ruby-dbus-0.13.0/lib/dbus/message.rb:129: warning: constant ::Fixnum is deprecated
=> [{"Address"=>"CC:78:AB:7F:65:87", "Name"=>"CC2650 SensorTag", "Alias"=>"CC2650 SensorTag", "Paired"=>false, "Trusted"=>false, "Blocked"=>false, "LegacyPairing"=>false, "RSSI"=>-45, "Connected"=>true, "UUIDs"=>["00001800-0000-1000-8000-00805f9b34fb", "00001801-0000-1000-8000-00805f9b34fb", "0000180a-0000-1000-8000-00805f9b34fb", "0000180f-0000-1000-8000-00805f9b34fb", "0000ffe0-0000-1000-8000-00805f9b34fb", "f000aa00-0451-4000-b000-000000000000", "f000aa20-0451-4000-b000-000000000000", "f000aa40-0451-4000-b000-000000000000", "f000aa64-0451-4000-b000-000000000000", "f000aa70-0451-4000-b000-000000000000", "f000aa80-0451-4000-b000-000000000000", "f000ac00-0451-4000-b000-000000000000", "f000ccc0-0451-4000-b000-000000000000", "f000ffc0-0451-4000-b000-000000000000"], "Modalias"=>"bluetooth:v000Dp0000d0110", "Adapter"=>"/org/bluez/hci0"}]
irb(main):039:0>
irb(main):040:0* device.subnodes
=> []
BlueZ のバージョンが古いせいか、もしくは –enable-experimental オプション付きでビルドされていないせいか、 SensorTag 等の BLE デバイスにアクセスしても、接続はできるものの、ServicesResolved プロパティも存在せず、 GATT サービスにアクセスすることができませんでした。そこで、パッケージインストールされているデフォルトの bluez をアンインストールし、ソースからビルドしてインストールすることにします。
BlueZ バージョンアップ
まずはインストール済みの BlueZ をアンインストールします。下記を実行すると openblocks-iot-webui パッケージもアンインストールされ、 WebUI が使えなくなりますのでご注意ください。
root@obsiot:~# sudo apt-get --purge remove bluez
Reading package lists... Done
Building dependency tree
Reading state information... Done
The following packages were automatically installed and are no longer required:
  arping bind9-host bluez-hcidump cu curl dns-root-data dnsmasq dnsmasq-base dnsutils expect git git-man hostapd iotop isc-dhcp-server libapparmor1 libb-hooks-endofscope-perl libbind9-90 libbluetooth3 libc-ares2 libclass-load-perl
  libclass-singleton-perl libcurl3 libcurl3-gnutls libdatetime-locale-perl libdatetime-perl libdatetime-timezone-perl libdns100 libdrm-intel1 libdrm-nouveau2 libdrm-radeon1 libdrm2 libelf1 libelfg0 liberror-perl libfontenc1 libgc1c2
  libgl1-mesa-dri libgl1-mesa-glx libglapi-mesa libglib2.0-bin libglib2.0-dev libice6 libisc95 libisccc90 libisccfg90 libjansson4 libjson-c-dev libjson0 libjson0-dev liblist-allutils-perl liblist-moreutils-perl libllvm3.5
  liblockfile-bin liblockfile1 liblua5.1-0 liblua5.1-0-dev liblwres90 libmodule-implementation-perl libmodule-runtime-perl libmysqlclient18 libnamespace-clean-perl libnet1 libnetfilter-conntrack3 libnl-route-3-200 libonig2
  libpackage-stash-perl libpackage-stash-xs-perl libparams-classify-perl libparams-validate-perl libpciaccess0 libpcre3-dev libpcrecpp0 libperl4-corelibs-perl libpq5 libpython-stdlib libpython2.7-minimal libpython2.7-stdlib libqdbm14
  librtmp1 libsm6 libsqlite3-0 libssh2-1 libsub-exporter-progressive-perl libsub-identify-perl libsub-name-perl libtcl8.6 libtk8.6 libtool-bin libtry-tiny-perl libtxc-dxtn-s2tc0 libutempter0 libv8-3.14.5 libvariable-magic-perl
  libx11-xcb1 libxaw7 libxcb-dri2-0 libxcb-dri3-0 libxcb-glx0 libxcb-present0 libxcb-shape0 libxcb-sync1 libxcomposite1 libxdamage1 libxext6 libxfixes3 libxft2 libxi6 libxinerama1 libxmu6 libxmuu1 libxrandr2 libxrender1 libxshmfence1
  libxss1 libxt6 libxtst6 libxv1 libxxf86dga1 libxxf86vm1 lockfile-progs lrzsz lsof lua-json lua-lpeg lua5.1 minicom mysql-common nginx nkf nodejs nodejs-legacy ntpdate openblocks-iot-wstunnel pd-adder pd-emitter-lite pd-handler-ble
  pd-handler-conf pd-handler-plc pd-handler-uart pd-subscriber ph-nodered-packs ph-supervisor-nodered php-auth-sasl php-gettext php-http-request php-mail php-mail-mime php-net-dime php-net-smtp php-net-socket php-net-url php-pear
  php-screw php-soap php5-cgi php5-cli php5-common php5-fpm php5-json php5-readline pkg-config pppconfig python python-meld3 python-messaging python-minimal python-nose python-pkg-resources python-serial python-six python2.7
  python2.7-minimal rsync shellinabox spp-assist sqlite3 sshpass sudo supervisor tcl-expect tcl8.6 tk8.6 x11-common x11-utils xbitmaps xterm
Use 'apt-get autoremove' to remove them.
The following packages will be REMOVED:
  bluez* openblocks-iot-webui*
0 upgraded, 0 newly installed, 2 to remove and 90 not upgraded.
After this operation, 3982 kB disk space will be freed.
Do you want to continue? [Y/n] Y
(Reading database ... 45677 files and directories currently installed.)
Removing openblocks-iot-webui (2.1.1-10) ...
Purging configuration files for openblocks-iot-webui (2.1.1-10) ...
dpkg: warning: while removing openblocks-iot-webui, directory '/var/webui/docroot' not empty so not removed
dpkg: warning: while removing openblocks-iot-webui, directory '/var/webui/config' not empty so not removed
dpkg: warning: while removing openblocks-iot-webui, directory '/var/webui/sound' not empty so not removed
Removing bluez (5.23-2+b1) ...
Stopping bluetooth: /usr/sbin/bluetoothd.
Purging configuration files for bluez (5.23-2+b1) ...
Processing triggers for dbus (1.8.20-0+deb8u1) ...
Processing triggers for man-db (2.7.0.2-5) ...
下記コマンドで BlueZ のビルドに必要なライブラリをインストールします。
root@obsiot:~# apt-get install libdbus-1-dev libdbus-glib-1-dev libglib2.0-dev libical-dev libreadline-dev libudev-dev libusb-dev
BlueZ のソースを取得して展開します。
root@obsiot:~# wget http://www.kernel.org/pub/linux/bluetooth/bluez-5.46.tar.xz
root@obsiot:~# xz -dv bluez-5.46.tar.xz
root@obsiot:~# tar -xf bluez-5.46.tar
root@obsiot:~# cd bluez-5.46
そして下記コマンドでビルドしてインストールします。
root@obsiot:~/bluez-5.46# ./configure --enable-experimental --disable-systemd
root@obsiot:~/bluez-5.46# make
root@obsiot:~/bluez-5.46# make install
インストールが終了したら一度 BX1 を再起動し、とりあえず手動で bluetoothd を起動してみます。
root@obsiot:~# /usr/local/libexec/bluetooth/bluetoothd --experimental &
[1] 1657
そして bluetoothctl で接続してみます。
root@obsiot:~# bluetoothctl
[NEW] Controller 98:4F:EE:04:B3:24 BlueZ 5.46 [default]
[NEW] Device CC:78:AB:7F:65:87 CC2650 SensorTag
Agent registered
[bluetooth]# connect CC:78:AB:7F:65:87
Attempting to connect to CC:78:AB:7F:65:87
[CHG] Device CC:78:AB:7F:65:87 Connected: yes
Connection successful
[NEW] Primary Service
        /org/bluez/hci0/dev_CC_78_AB_7F_65_87/service0008
        00001801-0000-1000-8000-00805f9b34fb
        Generic Attribute Profile
[NEW] Primary Service
        /org/bluez/hci0/dev_CC_78_AB_7F_65_87/service0009
        0000180a-0000-1000-8000-00805f9b34fb
        Device Information
[NEW] Characteristic
        /org/bluez/hci0/dev_CC_78_AB_7F_65_87/service0009/char000a
        00002a23-0000-1000-8000-00805f9b34fb
        System ID
〜〜〜中略〜〜〜
[NEW] Characteristic
        /org/bluez/hci0/dev_CC_78_AB_7F_65_87/service0063/char006f
        f000ffc4-0451-4000-b000-000000000000
        Vendor specific
[NEW] Descriptor
        /org/bluez/hci0/dev_CC_78_AB_7F_65_87/service0063/char006f/desc0071
        00002902-0000-1000-8000-00805f9b34fb
        Client Characteristic Configuration
[NEW] Descriptor
        /org/bluez/hci0/dev_CC_78_AB_7F_65_87/service0063/char006f/desc0072
        00002901-0000-1000-8000-00805f9b34fb
        Characteristic User Description
[CHG] Device CC:78:AB:7F:65:87 ServicesResolved: yes
[CHG] Device CC:78:AB:7F:65:87 Name: SensorTag 2.0
[CHG] Device CC:78:AB:7F:65:87 Alias: SensorTag 2.0
[CC2650 SensorTag]#
バージョンアップ前とは違って、サービスの内容まで取得でき、 ServicesResolved プロパティも表示され、 yes となっています。
irb からアクセスしてみても下記のようにサービスが取得できるようになっています。
irb(main):024:0* device.GetAll('org.bluez.Device1')
/root/sensortag_sample/vendor/bundle/ruby/2.4.0/gems/ruby-dbus-0.13.0/lib/dbus/message.rb:129: warning: constant ::Fixnum is deprecated
=> [{"Address"=>"CC:78:AB:7F:65:87", "Name"=>"SensorTag 2.0", "Alias"=>"SensorTag 2.0", "Paired"=>false, "Trusted"=>false, "Blocked"=>false, "LegacyPairing"=>false, "Connected"=>true, "UUIDs"=>["00001800-0000-1000-8000-00805f9b34fb", "00001801-0000-1000-8000-00805f9b34fb", "0000180a-0000-1000-8000-00805f9b34fb", "0000180f-0000-1000-8000-00805f9b34fb", "0000ffe0-0000-1000-8000-00805f9b34fb", "f000aa00-0451-4000-b000-000000000000", "f000aa20-0451-4000-b000-000000000000", "f000aa40-0451-4000-b000-000000000000", "f000aa64-0451-4000-b000-000000000000", "f000aa70-0451-4000-b000-000000000000", "f000aa80-0451-4000-b000-000000000000", "f000ac00-0451-4000-b000-000000000000", "f000ccc0-0451-4000-b000-000000000000", "f000ffc0-0451-4000-b000-000000000000"], "Modalias"=>"bluetooth:v000Dp0000d0110", "Adapter"=>"/org/bluez/hci0", "ServicesResolved"=>true}]
irb(main):025:0>
irb(main):026:0* device.subnodes
=> ["service0008", "service0009", "service001c", "service0022", "service002a", "service0032", "service003a", "service0042", "service004a", "service004f", "service0054", "service005b", "service0063"]
irb(main):027:0>
Ruby スクリプトからのアクセス
以前 Raspberry Pi からの SensorTag のデータ取得について書いた時に作成した Ruby のスクリプトを使ってデータを取得してみたいと思います。
コードはこちらにも公開しています。
sensortag.rb を実行すると、各センサーのデータをそれぞれログファイルに出力します。
root@obsiot:~/sensortag_sample# bundle exec ruby sensortag.rb
下記は温度と湿度のセンサーデータの例です。
root@obsiot:~/sensortag_sample# tail -f logs/humidity.log
I, [2017-09-04T02:11:52.410172 #1787]  INFO -- : temp: 32.1875 hum: 57.23876953125
I, [2017-09-04T02:11:53.422242 #1787]  INFO -- : temp: 32.1875 hum: 57.23876953125
I, [2017-09-04T02:11:54.435289 #1787]  INFO -- : temp: 32.19757080078125 hum: 57.16552734375
I, [2017-09-04T02:11:55.447590 #1787]  INFO -- : temp: 32.19757080078125 hum: 57.16552734375
I, [2017-09-04T02:11:56.460004 #1787]  INFO -- : temp: 32.2076416015625 hum: 57.16552734375
I, [2017-09-04T02:11:57.472740 #1787]  INFO -- : temp: 32.2076416015625 hum: 57.16552734375
I, [2017-09-04T02:11:58.417763 #1787]  INFO -- : temp: 32.2076416015625 hum: 57.16552734375
I, [2017-09-04T02:11:59.430025 #1787]  INFO -- : temp: 32.2076416015625 hum: 57.16552734375
I, [2017-09-04T02:12:00.442741 #1787]  INFO -- : temp: 32.227783203125 hum: 57.16552734375
I, [2017-09-04T02:12:01.455942 #1787]  INFO -- : temp: 32.227783203125 hum: 57.16552734375
I, [2017-09-04T02:12:02.467395 #1787]  INFO -- : temp: 32.227783203125 hum: 57.16552734375
これで Ruby のスクリプトからでも BLE デバイスのセンサーデータが取得できるようになりました。
ファクトリーリセット
色々と試行錯誤する中で、何度か工場出荷状態に戻したいということがあり、はじめは結構手こずったので、参考までにファクトリーリセットの手順を紹介しておきます。ベースは下記製品サイトに掲載されている手順になります。
この手順のままやると、ストレージ併用モードを解除して再起動した段階でネットワーク接続等の情報も消えてしまいますので、無線LAN環境で使っている場合にはその設定を行う手順が必要になってきます。
まずは手順通りにストレージ併用モードを解除して再起動します。
root@obsiot:~# e2label /dev/mmcblk0p10 ""
root@obsiot:~# reboot
私の環境はバージョン8 (jessie / FW 2.x系)モデルだったので、下記コマンドでファイルシステムを構築します。
root@obsiot:~# yes | mkfs -t ext4 -L DEBIAN /dev/mmcblk0p10
構築したファイルシステムをマウントします。
root@obsiot:~# mount /dev/mmcblk0p10 /mnt
そしてここで工場出荷用データを取得できるように、Wi-Fiの設定を行います。
root@obsiot:~# wpa_passphrase MY_AP_SSID MY_AP_PASSWORD >> /etc/wpa_supplicant/wpa_supplicant.conf
root@obsiot:~# chmod 600 /etc/wpa_supplicant/wpa_supplicant.conf
/etc/network/interface のWi-Fiインタフェース設定を下記のように設定します。 BX1 からインターネットにアクセスできれば良いので、 DHCP でIPアドレスを取得し、 Wi-Fi アクセス設定は先ほどの設定ファイル wpa_supplicant.conf から読み込む形です。
auto wlan0
iface wlan0 inet dhcp
wpa-conf /etc/wpa_supplicant/wpa_supplicant.conf

#auto wlan0
#iface wlan0 inet static
#     address 192.168.1.17
#     network 192.168.1.0
#     netmask 255.255.255.0
#     broadcast 192.168.1.255
#     gateway 192.168.1.1
設定を有効にするため一旦 Wi-Fi のネットワークインタフェースを停止し、再度起動します。
root@obsiot:~# ifdown wlan0
root@obsiot:~# ifup wlan0
設定が正しいのに IP アドレスが正しく取得できていない場合は、再度停止・起動を行ってみると正しく取得できることがあります。
ネットワーク接続が有効になったら下記コマンドで工場出荷用データを取得します。執筆時の最新バージョンは Kernel 3.10.17-101対応 Ver.2.1.1-10 でした。
root@obsiot:~# wget http://ftp.plathome.co.jp/pub/BX1/jessie/3.10.17-101/obsiot_userland_2.1.1-10_20170602.tgz
そしてデータを展開して再起動します。
root@obsiot:~# tar xzf /root/obsiot_userland_2.1.1-10_20170602.tgz -C /mnt 2> /dev/null
root@obsiot:~# umount /mnt
root@obsiot:~# reboot
すると工場出荷時の状態で起動し、Wi-Fiインタフェースもアクセスポイントモードで起動してきますので、 iotfamily_シリアル番号 という SSID でアクセスできるようになります。
下記サイトも参考にさせていただきました。
まとめ
IoT ゲートウェイはそれぞれの製品によって特徴があり、採用されているOSによっても違いが出て来ます。また、Raspberry Pi などとは違った癖があるように思いますし、情報もあまり多くはないと思いますので、細かいことは色々と調べる必要があります。 BX1 のように WebUI から設定できるようになっている場合でも、サポートされていないデバイスを使おうと思うと Linux 上で動く BLE アプリを自前開発する必要がありますので、結構ハードルは高いように感じています。そして今回はとりあえず BLE デバイスのデータを取得するところまでということで、 WebUI も使えないままにしてしまっていますし、さらに最終的にはデータをどこかに送信しないと意味がないので、 その辺りも今後やってみたいと思います。
今回はこちらも参考にさせていただきました。