前回は Voice Kit と Web カメラで簡単な対話を行う処理を実装してみましたが、単語での回答に対してテキストマッチングするだけのものだったので、今回はもっと対話的な処理を行えるよう、 Dialogflow と組み合わせて会社の受付システムを想定したものを実装してみたいと思います。
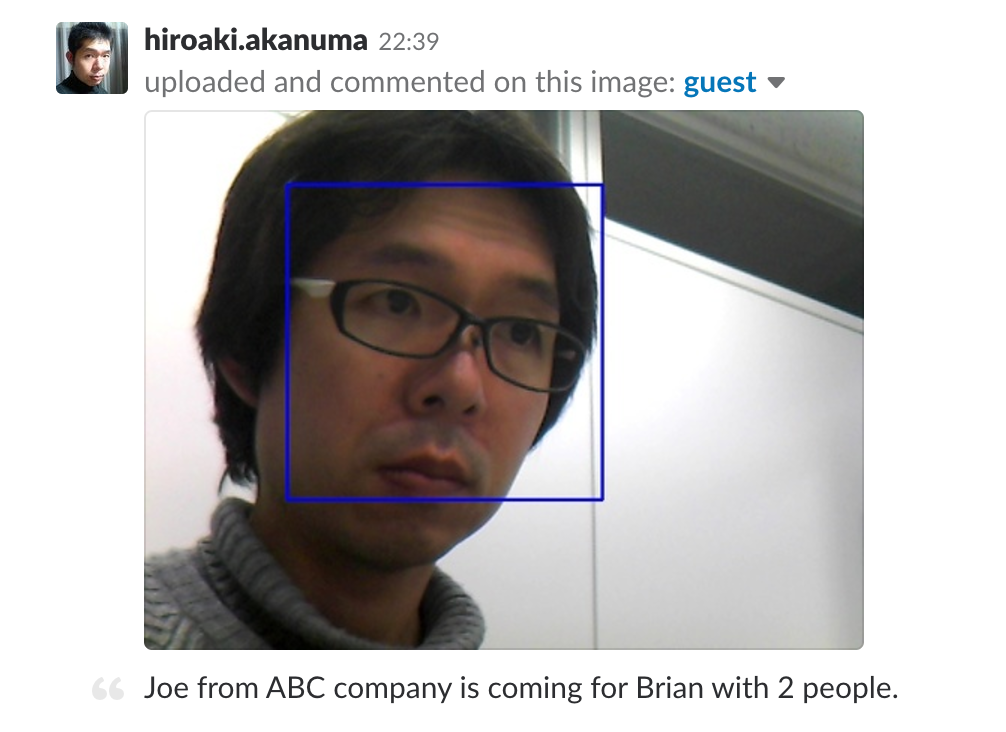
実装する処理としては、Webカメラで来客を検知したら、名前と社名、誰とのアポイントメントか、人数は何人かを聞いて、 Slack で画像をポストするというものです。

Dialogflow API 利用設定
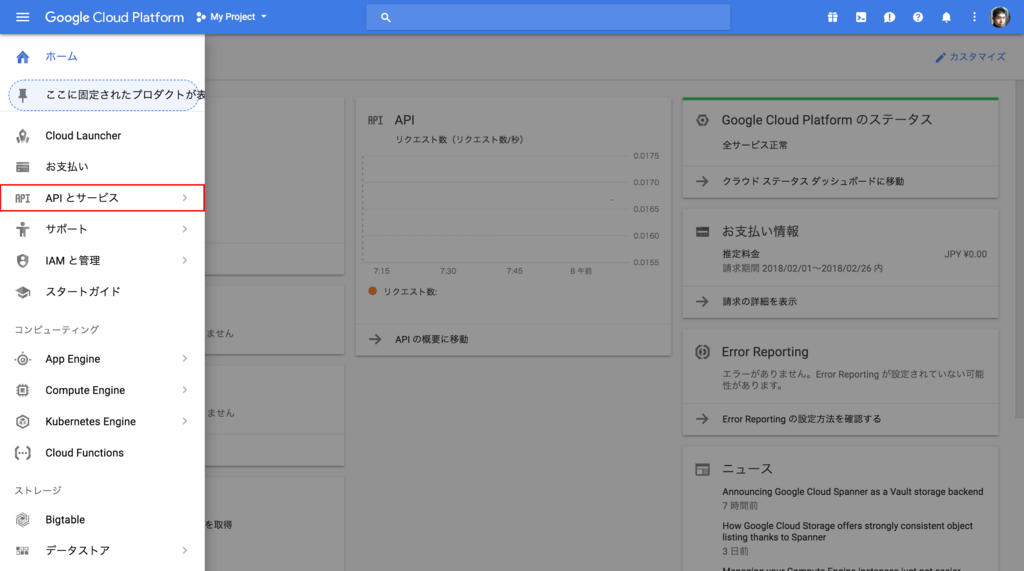
Dialogflow の API を初めて使う時は、利用を許可するための設定が必要になります。 GCP のコンソールのメニューから APIとサービス をクリックします。
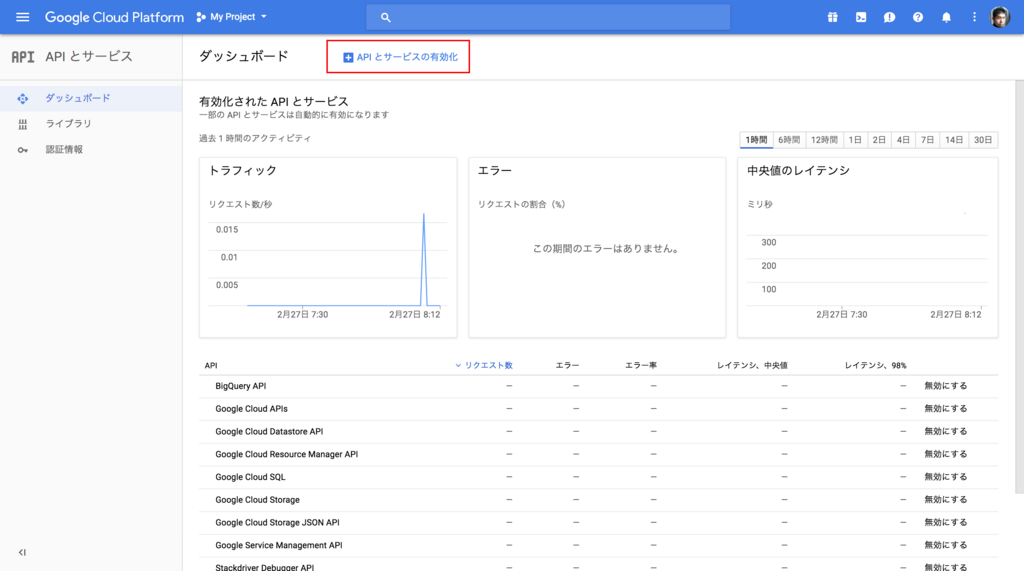
次に画面上部の API とサービスの有効化 をクリックします。
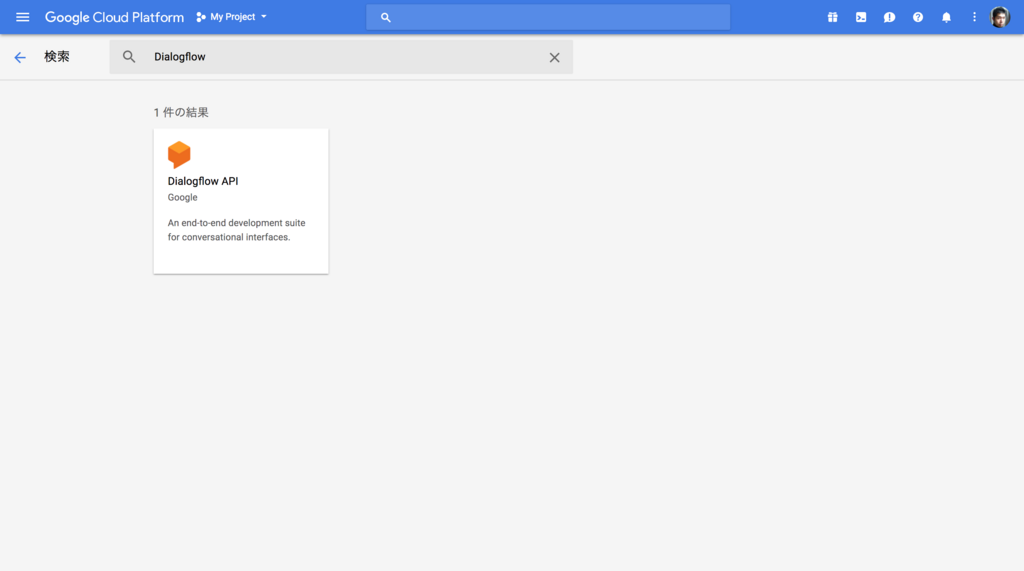
API のリストの中から Dialogflow を検索してクリックします。
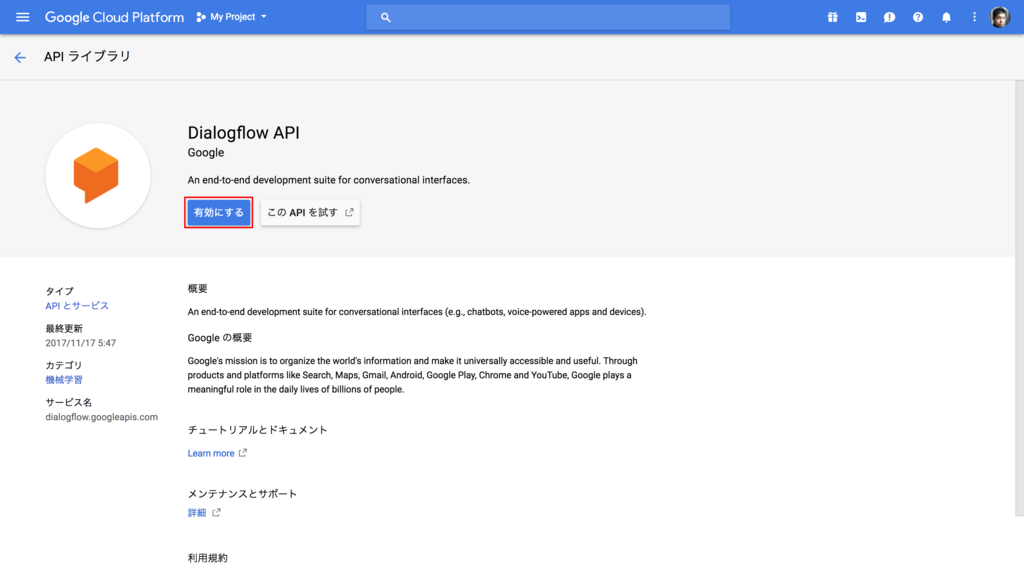
API の詳細画面で 有効にする をクリックして API を有効化します。
次に認証キーを作成する必要がありますので、メニューから 認証情報 をクリックします。
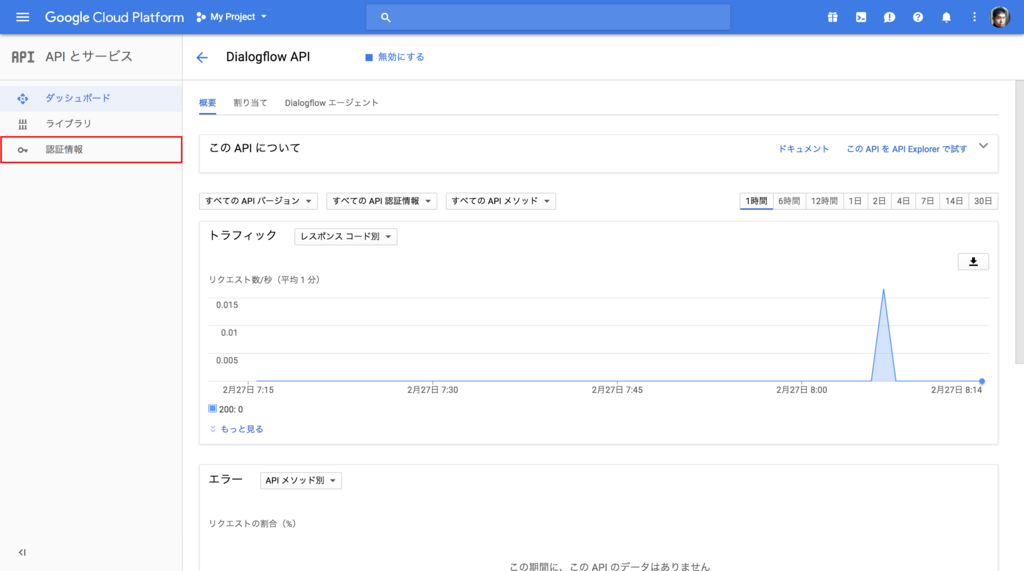
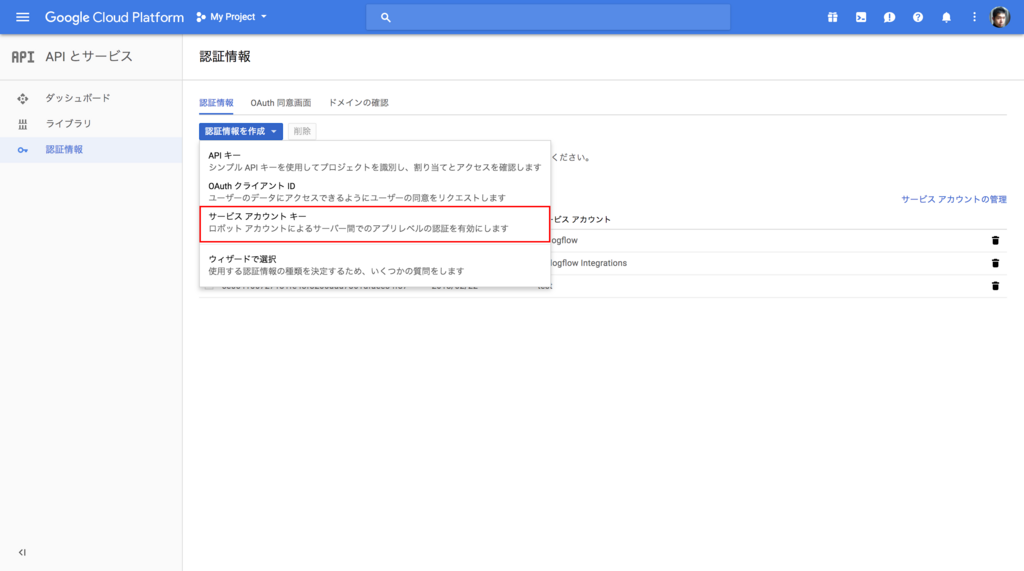
認証情報を作成 プルダウンから、 サービスアカウントキー を選択します。
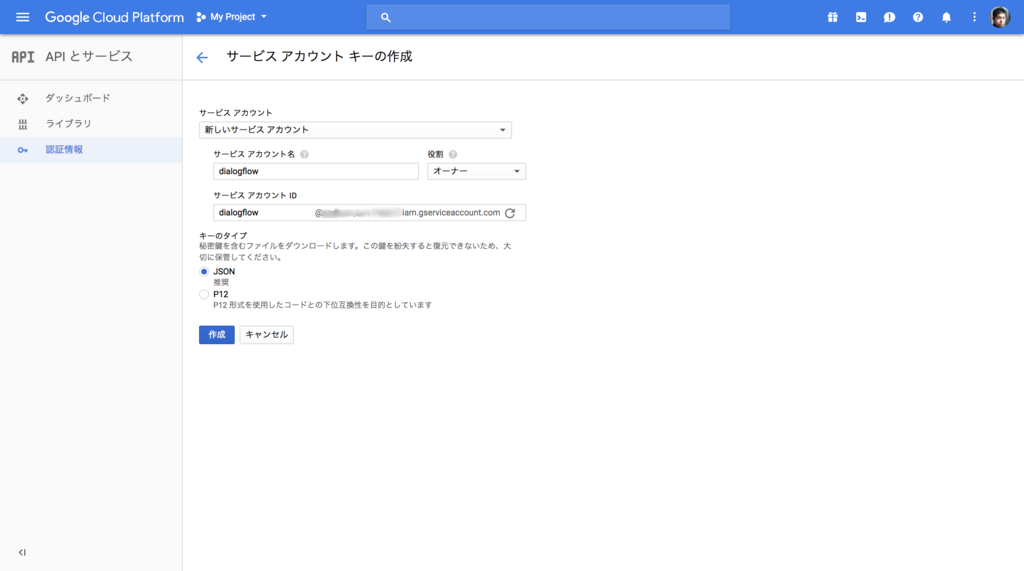
下記のスクリーンショットのように情報を入力して 作成 をクリックします。すると認証情報の json ファイルがダウンロードされますので、ダウンロードして Voice Kit(Raspberry Pi)上に配置しておきます。
以上で Dialogflow の API の有効化は完了です。
Dialogflow API の Python クライアント インストール
今回は Dialogflow の API を Python スクリプトから使用します。 Python 用のクライアントが提供されていますので、こちらをインストールします。ちなみに Dialogflow の API には Version 1 と 2 があり、今回は 2 を使用します。
ドキュメントはこちらにあります。
Dialogflow: Python Client — dialogflow 0.1.0 documentation
AIY プロジェクトのスクリプト実行用のシェルを起動して、 pip でインストールします。
$ bin/AIY-projects-shell.sh
$ pip3 install dialogflow
Dialogflow の Agent 作成
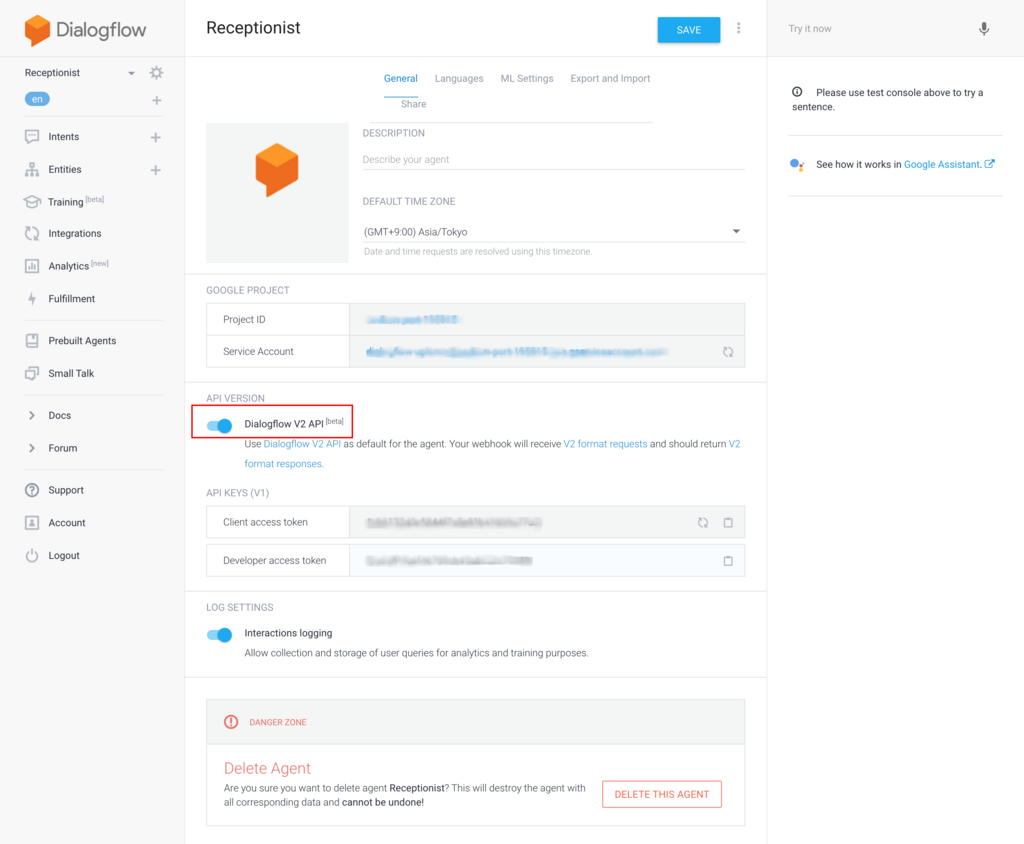
それでは発話内容に対応して対話を行うための Dialogflow の設定をします。 Dialogflowコンソールから Agent を新規に作成します。作成した Agent の情報は下記のようになります。 API の Version は 2 を使うように設定しておきます。
次に各発話に対応する Intent を作成していきます。今回はひとまず最低限の内容を実装して動作させてみたいと思います。まずは WelcomeIntent は下記のように設定します。単純に来訪者に名前を言ってもらえるように促しているだけになります。
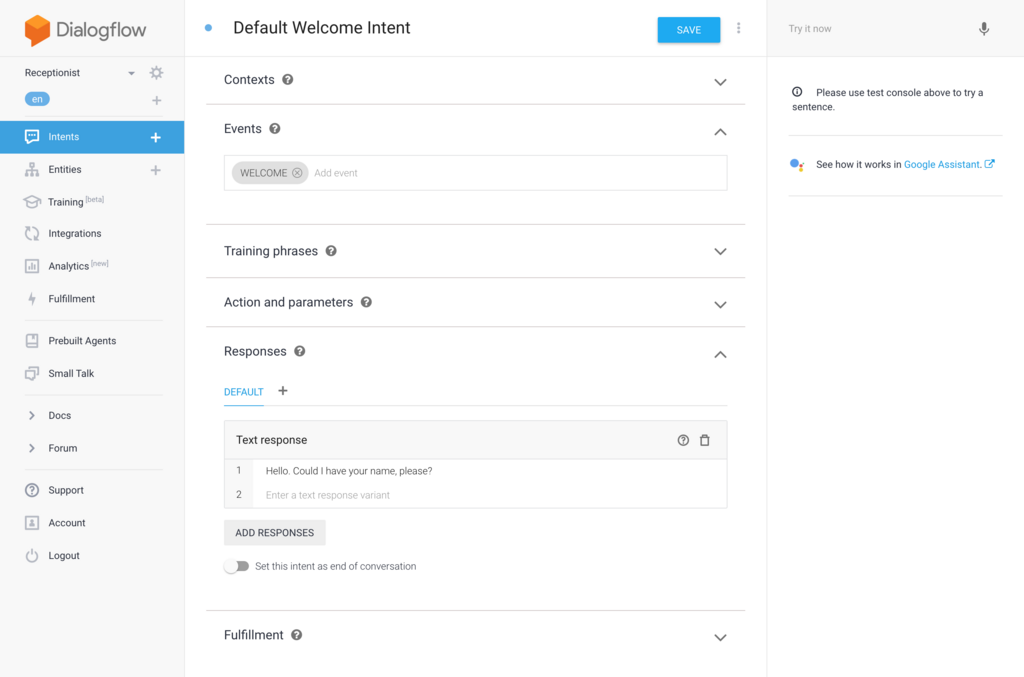
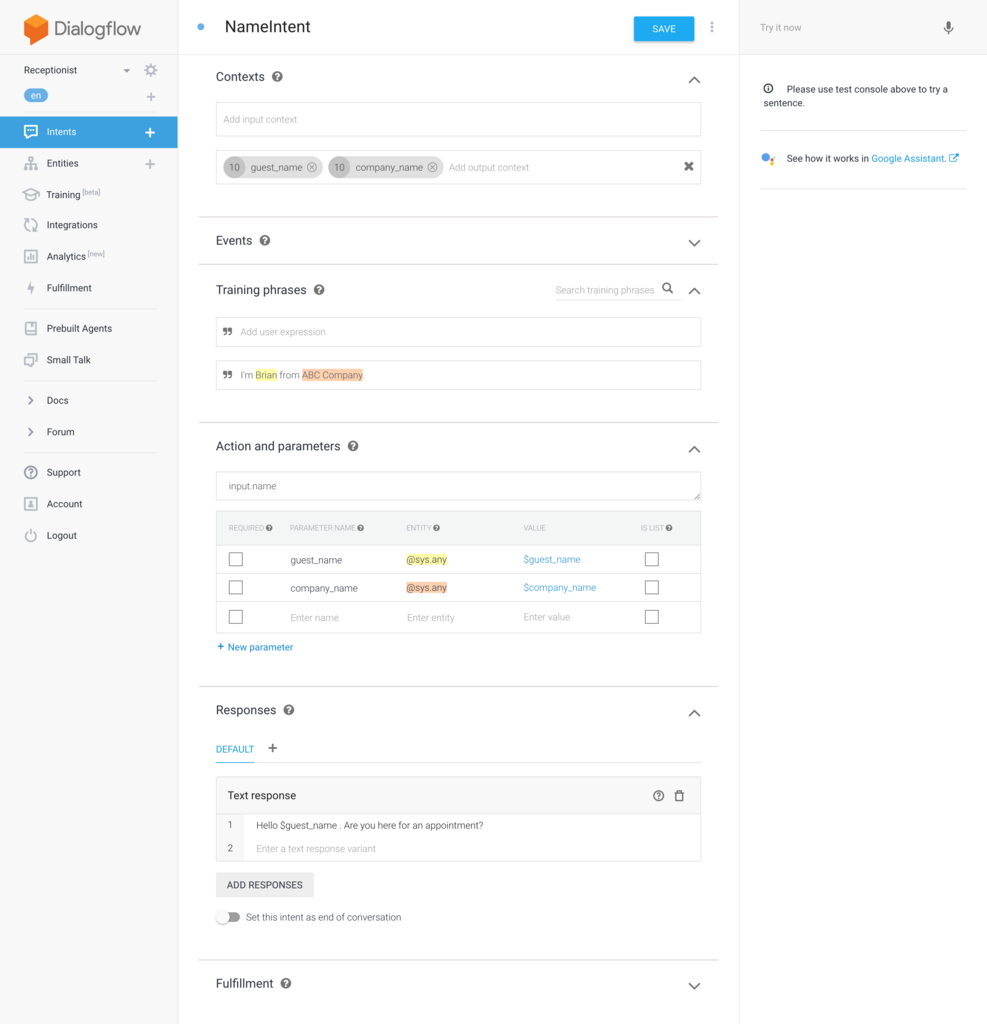
名前と社名を言ってもらった場合に対応するための NameIntent を作成します。実際は様々なパターンの発話を考慮すべきですが、今回はとりあえず1パターンだけ用意してみます。ゲストの名前と会社名は対話後にも使用したいので Output Context にパラメータを追加して、他の Intent と共有されるようにしておきます。そしてレスポンスで誰とのアポイントメントなのかを言ってもらえるように促します。
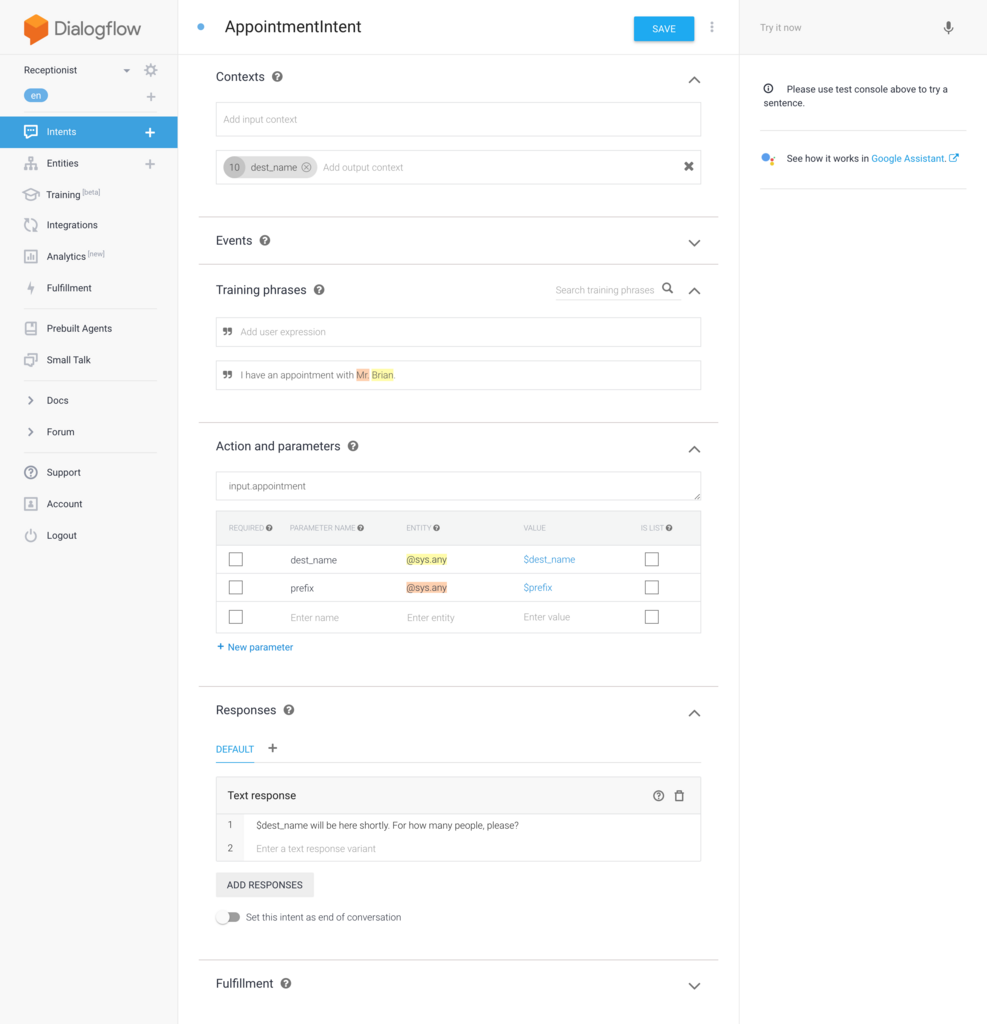
誰とのアポイントメントなのかを言ってもらった場合に対応するための AppointmentIntent を作成します。こちらもとりあえず1パターンの発話だけ対応させておきます。 Output Context には訪問先の社員名を保存しておきます。
最後に人数は何名かを言ってもらった場合の PeopleCountIntent を作成します。人数情報は Output Context に保存します。そしてこの Intent のレスポンスで対話は終了する想定なので、 Set this intent as end of confersation にチェックを入れておきます。
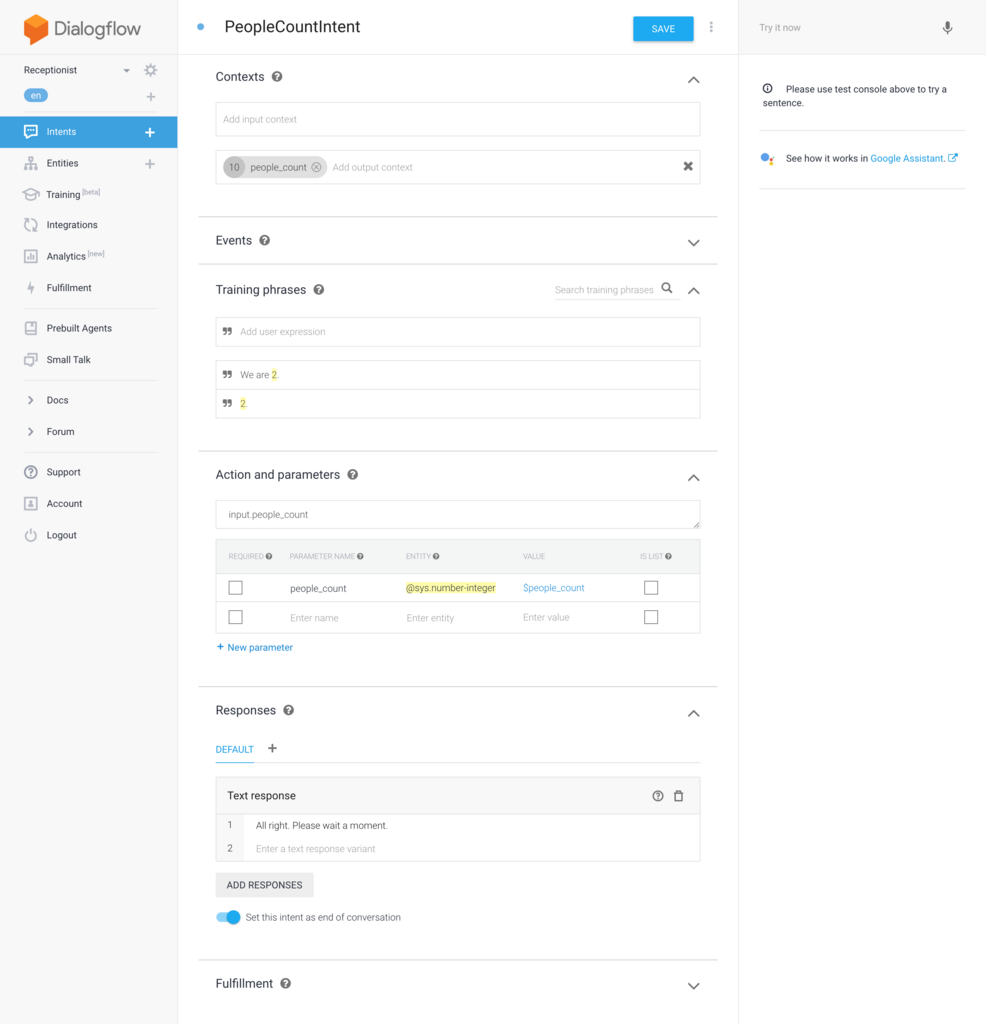
以上が最低限の Intent の実装となります。
Voice Kit 上の Python スクリプトの実装
上記で作成した Dialogflow の Agent に対応する Python スクリプトを実装します。まずはコード全体を掲載しておきます。
#!/usr/bin/env python3

import sys
import uuid
import cv2
import dialogflow
import aiy.audio
import aiy.cloudspeech
import aiy.voicehat
from slackclient import SlackClient

class Receptionist:
    def __init__(self):
        self.project_id = 'xxxxxx-xxxx-xxxxxx'
        self.client_access_token = 'xxxxxxxxxxxxxxxxxxxxxxxxxxxxxxxx'
        self.language_code = 'en'
        self.session_client = dialogflow.SessionsClient()
        self.final_intent_name = 'PeopleCountIntent'

        self.face_cascade = cv2.CascadeClassifier('/home/pi/AIY-projects-python/src/examples/voice/haarcascade_frontalface_default.xml')
        self.guest_image_file = 'guest.jpg'

        self.recognizer = aiy.cloudspeech.get_recognizer()
        aiy.audio.get_recorder().start()

        self.status_ui = aiy.voicehat.get_status_ui()

        slack_token = 'xxxx-xxxxxxxxxx-xxxxxxxxxx-xxxxxxxxxxx-xxxxxxxxxx'
        self.slack_client = SlackClient(slack_token)

    def send_welcome_request(self, session):
        event_input = dialogflow.types.EventInput(name = 'WELCOME', language_code = self.language_code)
        query_input = dialogflow.types.QueryInput(event = event_input)
        return self.send_request(session, query_input)

    def send_text_request(self, session, text):
        text_input = dialogflow.types.TextInput(text = text, language_code = self.language_code)
        query_input = dialogflow.types.QueryInput(text = text_input)
        return self.send_request(session, query_input)

    def send_request(self, session, query_input):
        response = self.session_client.detect_intent(session = session, query_input = query_input)

        print('=' * 20)
        print('Query text: {}'.format(response.query_result.query_text))
        print('Detected intent: {} (confidence: {})'.format(
            response.query_result.intent.display_name,
            response.query_result.intent_detection_confidence))
        print('Fulfillment text: {}'.format(response.query_result.fulfillment_text))
        print('-' * 20)

        return response

    def detect_face(self, cap):
        self.status_ui.status('ready')
        while(True):
            ret, frame = cap.read()
            gray = cv2.cvtColor(frame, cv2.COLOR_BGR2GRAY)
            faces = self.face_cascade.detectMultiScale(gray, 1.3, 5)
            for (x, y, w, h) in faces:
                frame = cv2.rectangle(frame, (x, y), (x+w, y+h), (255, 0, 0), 2)
            cv2.imshow('frame', frame)
            if cv2.waitKey(1) & 0xff == ord('q'):
                cap.release()
                cv2.destroyAllWindows()
                sys.exit(1)
            if len(faces) > 0:
                cv2.imwrite(self.guest_image_file, frame)
                break

    def post_to_slack(self, response):
        output_contexts = response.query_result.output_contexts[0]
        guest_name = output_contexts.parameters['guest_name']
        company_name = output_contexts.parameters['company_name']
        dest_name = output_contexts.parameters['dest_name']
        people_count = output_contexts.parameters['people_count']
        comment = '%s from %s is coming for %s with %d people.' % (guest_name, company_name, dest_name, int(people_count))

        with open(self.guest_image_file, 'rb') as guest_image:
            self.slack_client.api_call(
                'files.upload',
                channels = '#akanuma_private',
                file = guest_image,
                filetype = 'jpg',
                filename = self.guest_image_file,
                initial_comment = comment
            )


    def main(self):
        while(True):
            cap = cv2.VideoCapture(0)
            self.detect_face(cap)

            session_id = uuid.uuid4().hex
            session = self.session_client.session_path(self.project_id, session_id)
            response = self.send_welcome_request(session)
            aiy.audio.say(response.query_result.fulfillment_text)

            while(True):
                self.status_ui.status('listening')
                text = self.recognizer.recognize()
                if not text:
                    aiy.audio.say('Sorry, I did not hear you.')
                    continue

                print('You said: %s' % text)
                response = self.send_text_request(session, text)
                aiy.audio.say(response.query_result.fulfillment_text)

                if response.query_result.intent.display_name == self.final_intent_name:
                    break

            self.post_to_slack(response)

            cv2.waitKey(3000)
            cap.release()

if __name__ == '__main__':
    receptionist = Receptionist()
    receptionist.main()
まずコンストラクタでは各種トークン情報の保持や Dialogflow クライアントのインスタンス、顔認識用の検出器のインスタンス、 Slack のクライアントのインスタンスの作成などをしています。本当は各種トークンはコード内にハードコードすべきではありませんが、今回はとりあえず簡単に試すためにハードコードしてしまっています。
def __init__(self):
    self.project_id = 'xxxxxx-xxxx-xxxxxx'
    self.client_access_token = 'xxxxxxxxxxxxxxxxxxxxxxxxxxxxxxxx'
    self.language_code = 'en'
    self.session_client = dialogflow.SessionsClient()
    self.final_intent_name = 'PeopleCountIntent'

    self.face_cascade = cv2.CascadeClassifier('/home/pi/AIY-projects-python/src/examples/voice/haarcascade_frontalface_default.xml')
    self.guest_image_file = 'guest.jpg'

    self.recognizer = aiy.cloudspeech.get_recognizer()
    aiy.audio.get_recorder().start()

    self.status_ui = aiy.voicehat.get_status_ui()

    slack_token = 'xxxx-xxxxxxxxxx-xxxxxxxxxx-xxxxxxxxxxx-xxxxxxxxxx'
    self.slack_client = SlackClient(slack_token)
以降は main() メソッドの処理の順番に沿って説明します。まずは顔検出処理を実行し、受付にゲストが来て顔が検出されたらその時の画像を保存して、後続の処理に移ります。顔検出処理の内容については前回までとほぼ同様ですので、詳細は割愛します。
def detect_face(self, cap):
    self.status_ui.status('ready')
    while(True):
        ret, frame = cap.read()
        gray = cv2.cvtColor(frame, cv2.COLOR_BGR2GRAY)
        faces = self.face_cascade.detectMultiScale(gray, 1.3, 5)
        for (x, y, w, h) in faces:
            frame = cv2.rectangle(frame, (x, y), (x+w, y+h), (255, 0, 0), 2)
        cv2.imshow('frame', frame)
        if cv2.waitKey(1) & 0xff == ord('q'):
            cap.release()
            cv2.destroyAllWindows()
            sys.exit(1)
        if len(faces) > 0:
            cv2.imwrite(self.guest_image_file, frame)
            break
顔が検出されたら対話処理を開始するために、 Dialogflow の WelcomeIntent へのリクエストを送信します。 WelcomeIntent のトリガーは他の Intent と違って発話ではないので、 WELCOME イベントで処理を開始するため、 EventInput のインスタンスを作成し、 QueryInput に渡します。
def send_welcome_request(self, session):
    event_input = dialogflow.types.EventInput(name = 'WELCOME', language_code = self.language_code)
    query_input = dialogflow.types.QueryInput(event = event_input)
    return self.send_request(session, query_input)
そして Query の内容で Intent を判定する detect_intent() メソッドを実行してレスポンスを取得します。
def send_request(self, session, query_input):
    response = self.session_client.detect_intent(session = session, query_input = query_input)
発話に応じたリクエストを投げる場合は EventInput の代わりに TextInput を使用します。それ以外の流れはイベントをトリガーする場合と同様です。
def send_text_request(self, session, text):
    text_input = dialogflow.types.TextInput(text = text, language_code = self.language_code)
    query_input = dialogflow.types.QueryInput(text = text_input)
    return self.send_request(session, query_input)
発話に対応する処理は複数回になるため、ゲストからの発話を受け取ったら CloudSpeech API によってテキスト化し、 Dialogflow へのリクエスト送信、レスポンスとして受け取ったメッセージを発話するという流れをループで繰り返します。対話の終了判定は処理を返した Intent が最後の Intent (今回は PeopleCountIntent) だったらループを抜けるという処理にしています。対話の終了はレスポンスからもっとスマートに判断できないものかと思ったのですが、今回は判定方法がみつけられませんでした。
while(True):
    self.status_ui.status('listening')
    text = self.recognizer.recognize()
    if not text:
        aiy.audio.say('Sorry, I did not hear you.')
        continue

    print('You said: %s' % text)
    response = self.send_text_request(session, text)
    aiy.audio.say(response.query_result.fulfillment_text)

    if response.query_result.intent.display_name == self.final_intent_name:
        break
対話が終了したらレスポンスに含まれる Output Context からゲストの名前、会社名、訪問先社員名、人数の情報を取得し、 Slack にポストするメッセージを作成します。そして顔検出時に保存しておいた画像をメッセージとともに Slack にアップロードします。
def post_to_slack(self, response):
    output_contexts = response.query_result.output_contexts[0]
    guest_name = output_contexts.parameters['guest_name']
    company_name = output_contexts.parameters['company_name']
    dest_name = output_contexts.parameters['dest_name']
    people_count = output_contexts.parameters['people_count']
    comment = '%s from %s is coming for %s with %d people.' % (guest_name, company_name, dest_name, int(people_count))

    with open(self.guest_image_file, 'rb') as guest_image:
        self.slack_client.api_call(
            'files.upload',
            channels = '#akanuma_private',
            file = guest_image,
            filetype = 'jpg',
            filename = self.guest_image_file,
            initial_comment = comment
        )
Output Context についてはこちらに説明があります。
Types for Dialogflow API Client — dialogflow 0.1.0 documentation
また、今回 Slack への Post にはこちらを使用しています。
スクリプトの実行
ここまでで一通りの準備が終わったので、スクリプトを実行してみます。 GCP の API を使用するには認証を通す必要があります。認証については下記に説明があります。
Getting Started with Authentication | Documentation | Google Cloud Platform
認証情報を含む json ファイルのパスを環境変数 GOOGLE_APPLICATION_CREDENTIALS に設定しておくことで認証情報が参照されますので、今回の冒頭でダウンロードした認証情報の json ファイルのパスを指定しておきます。
$ export GOOGLE_APPLICATION_CREDENTIALS="/home/pi/AIY-projects-python/src/examples/voice/service-account-file.json"
そして下記のようにスクリプトを実行します。
$ src/examples/voice/receptionist.py
実行した様子は下記の動画のようになります。ひとまず顔検出をトリガーにして想定した対話処理が行われているようです。
また、 Slack には下記のように画像がアップロードされました。
まとめ
今回は Dialogflow 側は最低限の設定しかしていないので、ほぼ決まった形での発話にしか対応できていませんが、 Dialogflow 側を作り込むことで様々な発話に柔軟に対応して対話することができるようになるかと思います。Slack とも連携できたので実用度もそれなりにありそうな気はしていますが、考えてみるとだいたい同じようなことはスマートフォンアプリでもできてしまうように思いますので、実際にはやはり Voice Kit のベースの Raspberry Pi の GPIO 等を活かした他のセンサーデバイス等との連携によって差別化できるのかなと思いました。とりあえず実験的に色々触ってみるのは面白いので、もう少し作り込めたら実際に会社の受付で試してみられると良いなと思っています。