電子工作でセンサー等を使って何かを検知する仕組みを作った時に、結果を Slack に通知するなどはよくやるのですが、それ以外にも何か通知する手段を使いたいなと思い、アンプボードと小型スピーカーで音を鳴らせるようにしてみました。今回使ったアンプボードはスイッチサイエンスで販売されていた、 Adafruit の D級アンプボードです。
これを同じくスイッチサイエンスで販売されていた薄型スピーカーと組み合わせて使ってみました。
アンプボードのチュートリアルは Adafruit の製品ページで公開されています。 Raspberry Pi 向けのサンプルになっているので、今回は基本的にこのチュートリアルに従って試してみます。
https://learn.adafruit.com/adafruit-max98357-i2s-class-d-mono-amp
ピンヘッダ実装 & 回路図
購入時はピンヘッダなどが実装されていないので、まず下記写真のように半田付けします。

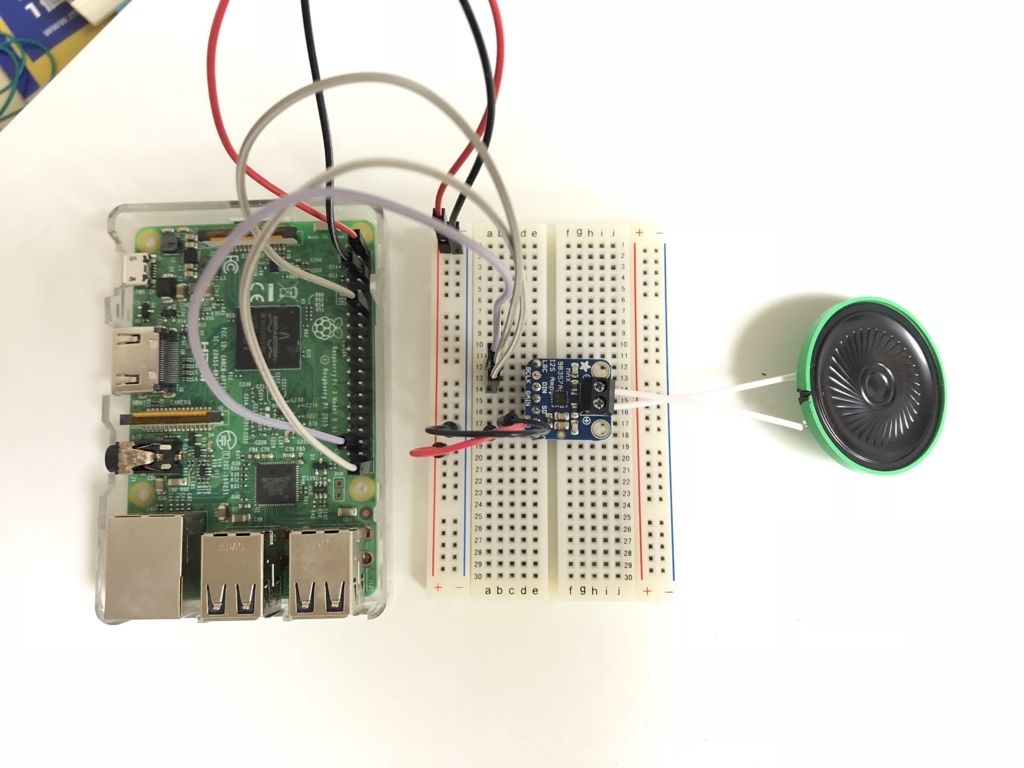
そして下記回路図のように配線します。
アンプ側 - Raspberry Pi 側
VIN - 5V
GND - GND
DIN - GPIO 21
BCLK - GPIO 18
LRCLK - GPIO 19

実際に配線してみたものは下記の様になりました。

セットアップ
Raspberry Pi でのセットアップについてはスクリプトが提供されているので、それを実行するだけでセットアップできます。 Raspberry Pi 上で下記のようにスクリプトを実行します。
$ curl -sS https://raw.githubusercontent.com/adafruit/Raspberry-Pi-Installer-Scripts/master/i2samp.sh | bash
Support for your operating system is experimental. Please visit
forums.adafruit.com if you experience issues with this product.


This script will install everything needed to use
i2s amplifier

--- Warning ---

Always be careful when running scripts and commands
copied from the internet. Ensure they are from a
trusted source.

If you want to see what this script does before
running it, you should run:
    \curl -sS github.com/adafruit/Raspberry-Pi-Installer-Scripts/i2samp

Do you wish to continue? [y/N] y

Checking hardware requirements...

Adding Device Tree Entry to /boot/config.txt
dtoverlay=hifiberry-dac
dtoverlay=i2s-mmap

Commenting out Blacklist entry in
/etc/modprobe.d/raspi-blacklist.conf

Disabling default sound driver
Configuring sound output

All done!

Enjoy your new i2s amplifier!

Some changes made to your system require
your computer to reboot to take effect.

Would you like to reboot now? [y/N]
スクリプトを実行したら一度 Raspberry Pi を再起動します。再起動後に再度同じスクリプトを実行すると、サウンドテストが実行されます。これで音が鳴ればとりあえず問題ありません。
pi@raspberrypi:~ $ curl -sS https://raw.githubusercontent.com/adafruit/Raspberry-Pi-Installer-Scripts/master/i2samp.sh | bash
Support for your operating system is experimental. Please visit
forums.adafruit.com if you experience issues with this product.


This script will install everything needed to use
i2s amplifier

--- Warning ---

Always be careful when running scripts and commands
copied from the internet. Ensure they are from a
trusted source.

If you want to see what this script does before
running it, you should run:
    \curl -sS github.com/adafruit/Raspberry-Pi-Installer-Scripts/i2samp

Do you wish to continue? [y/N] y

Checking hardware requirements...

Adding Device Tree Entry to /boot/config.txt
dtoverlay already active
i2s mmap dtoverlay already active

Commenting out Blacklist entry in
/etc/modprobe.d/raspi-blacklist.conf

Default sound driver currently not loaded
Configuring sound output

We can now test your i2s amplifier
Set your speakers at a low volume if possible!
Do you wish to test your system now? [y/N] y
Testing...

speaker-test 1.1.3

Playback device is default
Stream parameters are 48000Hz, S16_LE, 2 channels
WAV file(s)
Rate set to 48000Hz (requested 48000Hz)
Buffer size range from 2229 to 8916
Period size range from 1114 to 1115
Using max buffer size 8916
Periods = 4
was set period_size = 1114
was set buffer_size = 8916
 0 - Front Left
 1 - Front Right
Time per period = 2.854479
 0 - Front Left
 1 - Front Right
Time per period = 2.996463
 0 - Front Left
 1 - Front Right
Time per period = 3.018638
 0 - Front Left
 1 - Front Right
Time per period = 3.017745
 0 - Front Left
 1 - Front Right
Time per period = 2.996523

All done!

Enjoy your new i2s amplifier!
スピーカーテスト
改めてスピーカーテストを実行してみます。下記の様に speaker-test コマンドを実行すると、ホワイトノイズでスピーカーテストが実行されます。
$ speaker-test -c2

speaker-test 1.1.3

Playback device is default
Stream parameters are 48000Hz, S16_LE, 2 channels
Using 16 octaves of pink noise
Rate set to 48000Hz (requested 48000Hz)
Buffer size range from 2229 to 8916
Period size range from 1114 to 1115
Using max buffer size 8916
Periods = 4
was set period_size = 1114
was set buffer_size = 8916
 0 - Front Left
 1 - Front Right
Time per period = 5.823784
 0 - Front Left
 1 - Front Right
Time per period = 5.990661
 0 - Front Left
 1 - Front Right
Time per period = 5.990672
 0 - Front Left
 1 - Front Right
さらに下記のように wav ファイルを指定すると wav ファイルを再生する形でテストが実行されます。
$ speaker-test -c2 --test=wav -w /usr/share/sounds/alsa/Front_Center.wav

speaker-test 1.1.3

Playback device is default
Stream parameters are 48000Hz, S16_LE, 2 channels
WAV file(s)
Rate set to 48000Hz (requested 48000Hz)
Buffer size range from 2229 to 8916
Period size range from 1114 to 1115
Using max buffer size 8916
Periods = 4
was set period_size = 1114
was set buffer_size = 8916
 0 - Front Left
 1 - Front Right
Time per period = 2.684377
 0 - Front Left
 1 - Front Right
Time per period = 2.856224
 0 - Front Left
 1 - Front Right
Time per period = 2.856005
 0 - Front Left
 1 - Front Right
Time per period = 2.855911
mp3 の再生
先ほどのテストでは wav ファイルを再生しましたが、次は mp3 を再生してみます。再生するためのアプリケーションとして mpg123 を使用します。
mpg123, Fast MP3 Player for Linux and UNIX systems
まず apt-get で mpg123 をインストールします。
$ sudo apt-get install -y mpg123
あとは mpg123 コマンドで対象を指定すれば mp3 が再生されます。下記の例では mp3 のストリーミングの URL を指定してそのまま再生しています。
$ mpg123 http://ice1.somafm.com/u80s-128-mp3
High Performance MPEG 1.0/2.0/2.5 Audio Player for Layers 1, 2 and 3
        version 1.23.8; written and copyright by Michael Hipp and others
        free software (LGPL) without any warranty but with best wishes

Directory: http://ice1.somafm.com/

Terminal control enabled, press 'h' for listing of keys and functions.

Playing MPEG stream 1 of 1: u80s-128-mp3 ...
ICY-NAME: Underground Eighties: UK Synthpop and a bit of New Wave. [SomaFM]
ICY-URL: http://somafm.com

MPEG 1.0 L III cbr128 44100 stereo

ICY-META: StreamTitle='Comsat Angels - As Above So Below';StreamUrl='';

ICY-META: StreamTitle='Heaven 17 - Crushed By The Wheels Of Industry [(Parts One And Two) Uninterr';StreamUrl='';
音量調整
再生用アプリケーション側でも音量調整機能を持っていることもありますが、コマンドラインから alsamixer を実行することで音量を調整することができます。
$ alsamixer
実行すると下記のような画面が表示されますので、音量を指定し、 ESC で終了します。

Python スクリプトからの実行
コマンドラインからではなくプログラム内から音声を再生する方法は色々ありますが、ここでは Python スクリプトの中から音声を再生するために PyGame を使ってみます。インストールは apt-get install を実行するだけです。
$ sudo apt-get install python-pygame
Adafruit から PyGame のサンプルも提供されていますので、こちらを使ってみます。ダウンロードして解凍します。
$ wget https://cdn-learn.adafruit.com/assets/assets/000/041/506/original/pygame_example.zip
$ unzip pygame_example.zip
$ cd pygame_example/
サンプルスクリプトを実行してみます。このスクリプトは同じディレクトリにある全ての mp3 を再生します。引数にはボリュームの大きさを指定します。
$ python pygameMP3.py 0.75
Playing at volume: 0.75

['HiTomSamp.mp3', 'SnareSamp.mp3', 'FloorTomSamp.mp3', 'CrashSamp.mp3']
Music file HiTomSamp.mp3 loaded!
Music file SnareSamp.mp3 loaded!
Music file FloorTomSamp.mp3 loaded!
Music file CrashSamp.mp3 loaded!
まとめ
Raspberry Pi 向けにはセットアップ用のスクリプトやサンプルが用意されているので、とても簡単に音を鳴らすところまでいけてしまいましたが、 Arduino 等で使用する場合にはセットアップ内容を理解して進めないといけないので、少し時間はかかりそうです。ただ今回使ったアンプとスピーカーは両方で1,000円程度でしたが、通知用等で使うには十分だったので、今後何か作ろうとした時にも気軽に取り入れられそうです。