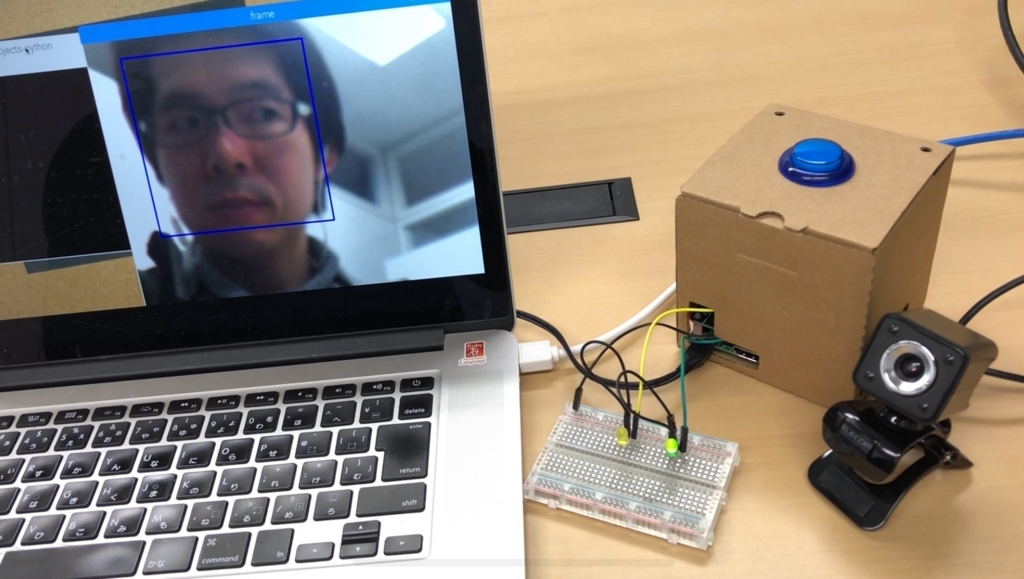
前回は Voice Kit + Web カメラで画像を表示しつつ、音声で写真を撮るということをやってみました。今回は Web カメラで撮っている画像の中に人がいるかどうかを顔認識によって判定してみたいと思います。
実装内容
今回の実装内容としては、スクリプトを実行すると Web カメラ画像の表示を開始し、 "OK Google, is anyone there?"(そこに誰かいる?)と発話すると、画像内に人の顔があるかを検出し、顔があった場合は "Yes, someone is there." と言って画像内で検出された顔を枠で囲み、緑色のLEDを点灯させます。顔がない場合は "No one is there." と言って黄色のLEDを点灯させます。

OpenCV で顔検出
今回顔検出には OpenCV を使用します。下記チュートリアルを参考にしました。
Haar Cascadesを使った顔検出 — OpenCV-Python Tutorials 1 documentation
OpenCV のインストールは前回までで実施済みで使えるようになっていますが、 検出器を使うために github からリポジトリを clone します。検出アルゴリズムについては上記チュートリアルで詳しく紹介されていますので、ここでは割愛します。
pi@raspberrypi:~ $ git clone https://github.com/opencv/opencv.git
Cloning into 'opencv'...
remote: Counting objects: 221908, done.
remote: Compressing objects: 100% (5/5), done.
remote: Total 221908 (delta 0), reused 0 (delta 0), pack-reused 221903
Receiving objects: 100% (221908/221908), 438.92 MiB | 1.57 MiB/s, done.
Resolving deltas: 100% (154066/154066), done.
Checking out files: 100% (5734/5734), done.
検出器は opencv/data/haarcascades に格納されています。
pi@raspberrypi:~ $ ls -l opencv/data/haarcascades
合計 9568
-rw-r--r-- 1 pi pi  341406  2月  6 07:59 haarcascade_eye.xml
-rw-r--r-- 1 pi pi  601661  2月  6 07:59 haarcascade_eye_tree_eyeglasses.xml
-rwxr-xr-x 1 pi pi  411388  2月  6 07:59 haarcascade_frontalcatface.xml
-rwxr-xr-x 1 pi pi  382918  2月  6 07:59 haarcascade_frontalcatface_extended.xml
-rw-r--r-- 1 pi pi  676709  2月  6 07:59 haarcascade_frontalface_alt.xml
-rw-r--r-- 1 pi pi  540616  2月  6 07:59 haarcascade_frontalface_alt2.xml
-rw-r--r-- 1 pi pi 2689040  2月  6 07:59 haarcascade_frontalface_alt_tree.xml
-rw-r--r-- 1 pi pi  930127  2月  6 07:59 haarcascade_frontalface_default.xml
-rw-r--r-- 1 pi pi  476825  2月  6 07:59 haarcascade_fullbody.xml
-rw-r--r-- 1 pi pi  195369  2月  6 07:59 haarcascade_lefteye_2splits.xml
-rw-r--r-- 1 pi pi   47775  2月  6 07:59 haarcascade_licence_plate_rus_16stages.xml
-rw-r--r-- 1 pi pi  395320  2月  6 07:59 haarcascade_lowerbody.xml
-rw-r--r-- 1 pi pi  828514  2月  6 07:59 haarcascade_profileface.xml
-rw-r--r-- 1 pi pi  196170  2月  6 07:59 haarcascade_righteye_2splits.xml
-rw-r--r-- 1 pi pi   75482  2月  6 07:59 haarcascade_russian_plate_number.xml
-rw-r--r-- 1 pi pi  188506  2月  6 07:59 haarcascade_smile.xml
-rw-r--r-- 1 pi pi  785817  2月  6 07:59 haarcascade_upperbody.xml
今回はこの中から一番ベーシックな、 haarcascade_frontalface_default.xml を使用しますので、任意のディレクトリにコピーしておきます。
それではコードを実装します。今回の主な変更としては、カメラ画像の表示を更新している無限ループの中に、下記の処理を追加しています。 "OK Google, is anyone there?" という発話を検知したら self.face_detection フラグを True にすることでこの処理が実行されます。
elif self.face_detection:
    faces = None
    for i in range(0, 30):
        ret, frame = cap.read()
        cv2.imshow('frame', frame)
        gray = cv2.cvtColor(frame, cv2.COLOR_BGR2GRAY)
        faces = self.face_cascade.detectMultiScale(gray, 1.3, 5)
        if len(faces) != 0:
            break
        cv2.waitKey(1)

    if len(faces) == 0:
        GPIO.output(MyAssistant.GPIO_LED_YELLOW, GPIO.HIGH)
        self.print_and_say('No one is there.')
    else:
        for (x, y, w, h) in faces:
            frame = cv2.rectangle(frame, (x, y), (x+w, y+h), (255, 0, 0), 2)
        cv2.imshow('frame', frame)
        GPIO.output(MyAssistant.GPIO_LED_GREEN, GPIO.HIGH)
        self.print_and_say('Yes, someone is there.')
        cv2.waitKey(5000)

    self.face_detection = False
    GPIO.output(MyAssistant.GPIO_LED_GREEN, GPIO.LOW)
    GPIO.output(MyAssistant.GPIO_LED_YELLOW, GPIO.LOW)
顔検出処理はキャプチャした画像に対して detectMultiScale() メソッドを実行することで行いますが、一回の処理だけだと発話直後の1フレームに対してのみの検出になるので、少し幅を持たせるために30回処理を行い、その間に顔が検出されればそこに人がいるものとしています。また、グレースケール画像に対して行った方が早いようなので、カメラ画像をグレースケール画像に変換し手から detectMultiScale() メソッドを実行しています。
for i in range(0, 30):
    ret, frame = cap.read()
    cv2.imshow('frame', frame)
    gray = cv2.cvtColor(frame, cv2.COLOR_BGR2GRAY)
    faces = self.face_cascade.detectMultiScale(gray, 1.3, 5)
    if len(faces) != 0:
        break
    cv2.waitKey(1)
そして顔が検出された場合は検出された部分を青い枠で囲って表示し、緑色のLEDを点灯させます。 cv2.rectangle() メソッドでは矩形の領域の2点の座標を引数に指定しますが、 detectMultiScale() メソッドの戻り値は1点の座標と横幅、高さなので、1点の座標に横幅と高さを加えたものをもう1点の座標として指定しています。
for (x, y, w, h) in faces:
    frame = cv2.rectangle(frame, (x, y), (x+w, y+h), (255, 0, 0), 2)
cv2.imshow('frame', frame)
GPIO.output(MyAssistant.GPIO_LED_GREEN, GPIO.HIGH)
処理が終わったらフラグを False に戻して LED も消灯しておきます。
self.face_detection = False
GPIO.output(MyAssistant.GPIO_LED_GREEN, GPIO.LOW)
GPIO.output(MyAssistant.GPIO_LED_YELLOW, GPIO.LOW)
上記コードを含むスクリプト全体を下記に記載しておきます。
#!/usr/bin/env python3

import sys
import time
import cv2
import threading
from datetime import datetime

import aiy.assistant.auth_helpers
import aiy.audio
import aiy.voicehat
from google.assistant.library import Assistant
from google.assistant.library.event import EventType

import RPi.GPIO as GPIO

class MyAssistant:
    GPIO_LED_GREEN = 2
    GPIO_LED_YELLOW = 3

    def __init__(self):
        self.credentials = aiy.assistant.auth_helpers.get_assistant_credentials()
        self.status_ui = aiy.voicehat.get_status_ui()

        GPIO.setmode(GPIO.BCM)
        GPIO.setup(MyAssistant.GPIO_LED_GREEN, GPIO.OUT)
        GPIO.setup(MyAssistant.GPIO_LED_YELLOW, GPIO.OUT)

        self._run_event_task = threading.Thread(target = self._run_event)
        self._show_video_task = threading.Thread(target = self._show_video)

        self.face_cascade = cv2.CascadeClassifier('/home/pi/AIY-projects-python/src/examples/voice/haarcascade_frontalface_default.xml')
        self.take_photo = False
        self.face_detection = False
        self.stop = False

    def print_and_say(self, text):
        print(text)
        aiy.audio.say(text)

    def start(self):
        self._show_video_task.start()
        self._run_event_task.start()

    def _show_video(self):
        cap = cv2.VideoCapture(0)

        while(True):
            ret, frame = cap.read()

            cv2.imshow('frame', frame)
            if self.take_photo:
                now = datetime.now()
                filename = 'capture_%s.jpg' % now.strftime('%Y%m%d_%H%M%S')

                if cv2.imwrite(filename, frame):
                    self.print_and_say('I took nice one.')
                    print('Captured Image: %s' % filename)
                    time.sleep(5)
                else:
                    self.print_and_say("I couldn't take a picture.")

                self.take_photo = False

            elif self.face_detection:
                faces = None
                for i in range(0, 30):
                    ret, frame = cap.read()
                    cv2.imshow('frame', frame)
                    gray = cv2.cvtColor(frame, cv2.COLOR_BGR2GRAY)
                    faces = self.face_cascade.detectMultiScale(gray, 1.3, 5)
                    if len(faces) != 0:
                        break
                    cv2.waitKey(1)

                if len(faces) == 0:
                    GPIO.output(MyAssistant.GPIO_LED_YELLOW, GPIO.HIGH)
                    self.print_and_say('No one is there.')
                else:
                    for (x, y, w, h) in faces:
                        frame = cv2.rectangle(frame, (x, y), (x+w, y+h), (255, 0, 0), 2)
                    cv2.imshow('frame', frame)
                    GPIO.output(MyAssistant.GPIO_LED_GREEN, GPIO.HIGH)
                    self.print_and_say('Yes, someone is there.')
                    cv2.waitKey(5000)

                self.face_detection = False
                GPIO.output(MyAssistant.GPIO_LED_GREEN, GPIO.LOW)
                GPIO.output(MyAssistant.GPIO_LED_YELLOW, GPIO.LOW)

            cv2.waitKey(1)

            if self.stop:
                break

        cap.release()
        cv2.destroyAllWindows()
        print('Stop showing video.')

    def _run_event(self):
        with Assistant(self.credentials) as assistant:
            self._assistant = assistant
            for event in assistant.start():
                self._process_event(event)

    def _process_event(self, event):
        if event.type == EventType.ON_START_FINISHED:
            self.status_ui.status('ready')
            aiy.audio.say("OK, I'm ready.")
            if sys.stdout.isatty():
                print('Say "OK, Google" then speak.')

        elif event.type == EventType.ON_RECOGNIZING_SPEECH_FINISHED and event.args:
            print('You said: %s' % event.args['text'])
            text = event.args['text'].lower()

            if text == 'take a picture':
                self._assistant.stop_conversation()
                GPIO.output(MyAssistant.GPIO_LED_GREEN, GPIO.LOW)
                GPIO.output(MyAssistant.GPIO_LED_YELLOW, GPIO.LOW)

                aiy.audio.say('OK, 3')
                GPIO.output(MyAssistant.GPIO_LED_GREEN, GPIO.HIGH)
                time.sleep(1)

                aiy.audio.say('2')
                GPIO.output(MyAssistant.GPIO_LED_GREEN, GPIO.LOW)
                GPIO.output(MyAssistant.GPIO_LED_YELLOW, GPIO.HIGH)
                time.sleep(1)

                aiy.audio.say('1')
                GPIO.output(MyAssistant.GPIO_LED_GREEN, GPIO.HIGH)
                time.sleep(1)

                self.take_photo = True

                GPIO.output(MyAssistant.GPIO_LED_GREEN, GPIO.LOW)
                GPIO.output(MyAssistant.GPIO_LED_YELLOW, GPIO.LOW)

            elif text == 'is anyone there':
                self._assistant.stop_conversation()
                self.face_detection = True

            elif text == 'goodbye':
                self.status_ui.status('stopping')
                self._assistant.stop_conversation()
                self.stop = True
                aiy.audio.say('Goodbye. See you again.')
                print('Stop processing event.')
                sys.exit()

        elif event.type == EventType.ON_CONVERSATION_TURN_STARTED:
            self.status_ui.status('listening')
        elif event.type == EventType.ON_END_OF_UTTERANCE:
            self.status_ui.status('thinking')
        elif event.type == EventType.ON_CONVERSATION_TURN_FINISHED:
            self.status_ui.status('ready')
        elif event.type == EventType.ON_ASSISTANT_ERROR and event.args and event.args['is_fatal']:
            sys.exit(1)

    def main(self):
        self.status_ui.status('starting')
        self.start()

if __name__ == '__main__':
    sample = MyAssistant()
    sample.main()
動作確認
それでは動作確認をしてみます。下記の動画のようにだいたい想定した通りに動作してくれました。
まとめ
今回は OpenCV を使うことで簡単に顔認識を行うことができました。調べてみると OpenCV 以外にも最近は dlib を使う方が精度が高くて良いようなのですが、 Raspberry Pi 3 Model B の環境で試した限りでは OpenCV と比べて処理が遅く、リアルタイムの顔認識には使えませんでした。ただパフォーマンスの改善についてはまだあまり調べられていないので、ビルドの仕方などによって改善する可能性はあるかと思います。顔認識では精度とパフォーマンスの両方が重要になってくると思いますので、もう少し dlib についても調べてみたいと思います。また、 OpenCV についても各検出器の処理内容や、元画像とグレースケール変換画像への処理によるパフォーマンスの違いなども気になるところではあるので、気が向いたら調べてみようと思います。