前回はとりあえずサンプルコードで BLE Nano を iBeacon として動かしましたが、今回は Peripheral として Advertisement を送信する例と、カスタムサービスを定義して Central との通信を行う例を実装してみたいと思います。
Advertisement 送信
まずは Advertisement に独自の情報を載せて送信してみます。下記サンプルコードをベースにしています。
BLE_GAP_Example - a mercurial repository | Mbed
ただ上記サンプルを mbed import でインポートしてビルドしたところエラーになってしまったので、新規にプロジェクトを作って実装してみることにしました。
まずは mbed new でプロジェクトを作成します。デフォルトだと mbed os 5 向けとして作成されますが、 BLE Nano では mbed os 5 に対応していないようなので、 mbed os 2 向けとして作成するために、 --mbedlib オプションをつけて作成します。
[vagrant@localhost vagrant]$ mbed new BLE_GAP_EXAMPLE --mbedlib
[mbed] Creating new program "BLE_GAP_EXAMPLE" (git)
[mbed] Adding library "mbed" from "https://mbed.org/users/mbed_official/code/mbed/builds" at latest revision in the current branch
[mbed] Updating reference "mbed" -> "https://mbed.org/users/mbed_official/code/mbed/builds/tip"
[mbed] Couldn't find build tools in your program. Downloading the mbed 2.0 SDK tools...
[vagrant@localhost vagrant]$
[vagrant@localhost vagrant]$ cd BLE_GAP_EXAMPLE/
[vagrant@localhost BLE_GAP_EXAMPLE]$
[vagrant@localhost BLE_GAP_EXAMPLE]$ ls
mbed  mbed.bld  mbed_settings.py
とりあえず toolchain と target を指定しておきます。
[vagrant@localhost BLE_GAP_EXAMPLE]$ mbed detect

[mbed] Detected RBLAB_BLENANO, port /dev/ttyACM0, mounted /run/media/vagrant/DAPLINK
[mbed] Supported toolchains for RBLAB_BLENANO
+--------+-----------+-----------+-----+---------+-----+
| Target | mbed OS 2 | mbed OS 5 | ARM | GCC_ARM | IAR |
+--------+-----------+-----------+-----+---------+-----+
+--------+-----------+-----------+-----+---------+-----+
Supported targets: 0

[vagrant@localhost BLE_GAP_EXAMPLE]$
[vagrant@localhost BLE_GAP_EXAMPLE]$ mbed toolchain GCC_ARM
[mbed] GCC_ARM now set as default toolchain in program "BLE_GAP_EXAMPLE"
[vagrant@localhost BLE_GAP_EXAMPLE]$ mbed target RBLAB_BLENANO
[mbed] RBLAB_BLENANO now set as default target in program "BLE_GAP_EXAMPLE"
ライブラリを更新します。
[vagrant@localhost BLE_GAP_EXAMPLE]$ mbed deploy
[mbed] Updating library "mbed" to branch tip
[mbed] Downloading library build "675da3299148" (might take a minute)
[mbed] Unpacking library build "675da3299148" in "/vagrant/BLE_GAP_EXAMPLE/mbed"
[mbed] Updating the mbed 2.0 SDK tools...
BLE の Firmware 開発をするには mbed の BLE API が必要なので、 mbed add でライブラリを追加します。
[vagrant@localhost BLE_GAP_EXAMPLE]$ mbed add http://mbed.org/teams/Bluetooth-Low-Energy/code/BLE_API/
[mbed] Adding library "BLE_API" from "https://mbed.org/teams/Bluetooth-Low-Energy/code/BLE_API" at latest revision in the current branch
[mbed] Updating reference "BLE_API" -> "https://mbed.org/teams/Bluetooth-Low-Energy/code/BLE_API/#65474dc93927"
nRF51822 のライブラリも必要なので mbed add しておきます。
[vagrant@localhost BLE_GAP_EXAMPLE]$ mbed add https://mbed.org/teams/Nordic-Semiconductor/code/nRF51822/
[mbed] Adding library "nRF51822" from "https://mbed.org/teams/Nordic-Semiconductor/code/nRF51822" at latest revision in the current branch
[mbed] Updating reference "nRF51822" -> "https://mbed.org/teams/Nordic-Semiconductor/code/nRF51822/#c90ae1400bf2"
そして main.cpp はサンプルコードを参考に下記のように実装します。
#include "mbed.h"
#include "ble/BLE.h"

BLE ble;

const static char DEVICE_NAME[] = "SampleDevice";
const static uint8_t AdvData[] = {"SampleAdvertisement"};

void disconnectionCallback(const Gap::DisconnectionCallbackParams_t *params)
{
  BLE::Instance().gap().startAdvertising();
}

void onBleInitError(BLE &ble, ble_error_t error)
{
  (void) ble;
  (void) error;
}

void bleInitComplete(BLE::InitializationCompleteCallbackContext *params)
{
  BLE &ble          = params->ble;
  ble_error_t error = params->error;

  if (error != BLE_ERROR_NONE) {
    onBleInitError(ble, error);
    return;
  }

  if (ble.getInstanceID() != BLE::DEFAULT_INSTANCE) {
    return;
  }

  ble.gap().setDeviceName((const uint8_t *) DEVICE_NAME);
  ble.gap().onDisconnection(disconnectionCallback);

  ble.gap().accumulateAdvertisingPayload(GapAdvertisingData::BREDR_NOT_SUPPORTED | GapAdvertisingData::LE_GENERAL_DISCOVERABLE);
  ble.gap().setAdvertisingType(GapAdvertisingParams::ADV_CONNECTABLE_UNDIRECTED);

  ble.gap().accumulateAdvertisingPayload(GapAdvertisingData::MANUFACTURER_SPECIFIC_DATA, AdvData, sizeof(AdvData));
  ble.gap().accumulateAdvertisingPayload(GapAdvertisingData::COMPLETE_LOCAL_NAME, (uint8_t *) DEVICE_NAME, sizeof(DEVICE_NAME));

  ble.gap().setAdvertisingInterval(100);
  ble.gap().startAdvertising();
}

int main(void)
{
  ble.init(bleInitComplete);

  while (true) {
    ble.waitForEvent();
  }
}
今回独自のデータとして使用するのは下記のデバイス名とアドバタイズデータです。
const static char DEVICE_NAME[] = "SampleDevice";
const static uint8_t AdvData[] = {"SampleAdvertisement"};
bleInitComplete() の中で上記データを Advertisement に設定しています。
  ble.gap().accumulateAdvertisingPayload(GapAdvertisingData::MANUFACTURER_SPECIFIC_DATA, AdvData, sizeof(AdvData));
  ble.gap().accumulateAdvertisingPayload(GapAdvertisingData::COMPLETE_LOCAL_NAME, (uint8_t *) DEVICE_NAME, sizeof(DEVICE_NAME));
これをコンパイルして BLE Nano にコピーします。
[vagrant@localhost BLE_GAP_EXAMPLE]$ mbed compile
Building project BLE_GAP_EXAMPLE (RBLAB_BLENANO, GCC_ARM)
Scan: .
Scan: env
Scan: mbed
Compile [100.0%]: main.cpp
Link: BLE_GAP_EXAMPLE
Elf2Bin: BLE_GAP_EXAMPLE
+-----------+-------+-------+------+
| Module    | .text | .data | .bss |
+-----------+-------+-------+------+
| Fill      |   112 |     3 |   31 |
| Misc      | 33115 |   141 | 1189 |
| Subtotals | 33227 |   144 | 1220 |
+-----------+-------+-------+------+
Allocated Heap: 2728 bytes
Allocated Stack: 2048 bytes
Total Static RAM memory (data + bss): 1364 bytes
Total RAM memory (data + bss + heap + stack): 6140 bytes
Total Flash memory (text + data + misc): 33371 bytes

Image: ./BUILD/RBLAB_BLENANO/GCC_ARM/BLE_GAP_EXAMPLE.hex
[vagrant@localhost BLE_GAP_EXAMPLE]$
[vagrant@localhost BLE_GAP_EXAMPLE]$ cp ./BUILD/RBLAB_BLENANO/GCC_ARM/BLE_GAP_EXAMPLE.hex /run/media/vagrant/DAPLINK/
[vagrant@localhost BLE_GAP_EXAMPLE]$
すると Advertisement の送信が始まりますので、 iOS アプリの LightBlue などで確認すると、下記のように表示されます。
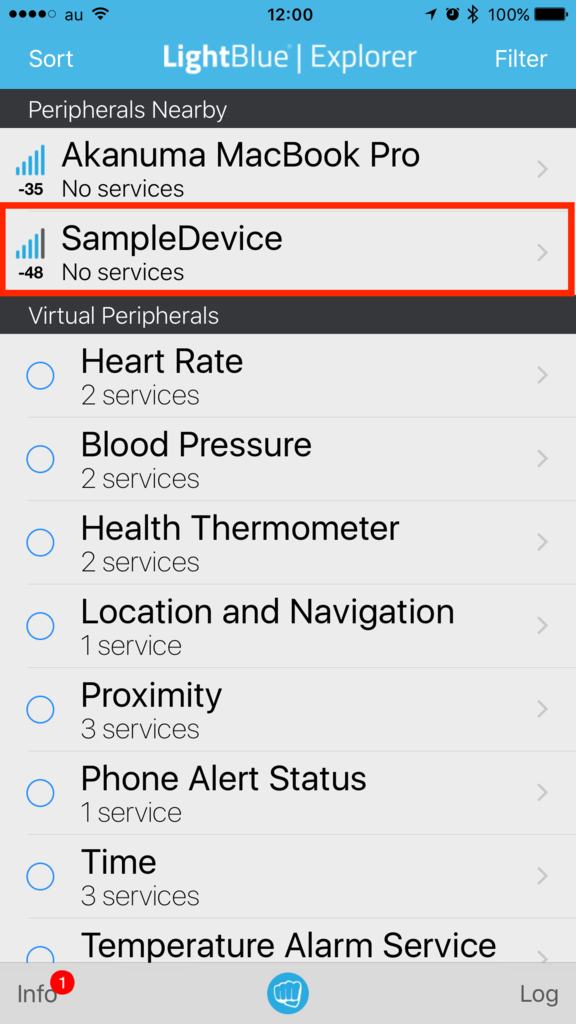
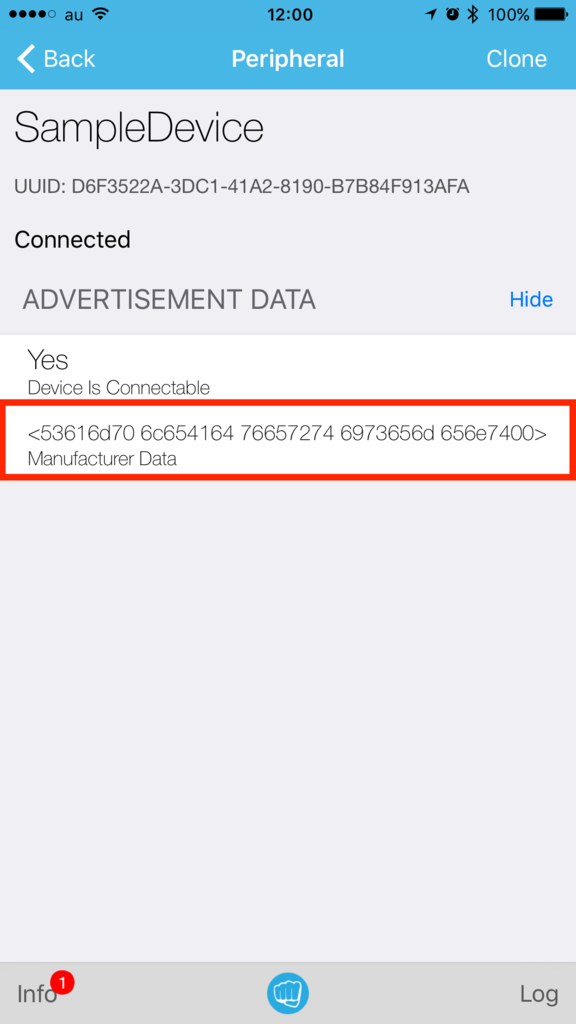
Manufacturer Data には “SampleAdvertisement” という文字列が16進数変換されたものが表示されています。
独自サービス実装
mbed の BLE API では下記ページに記載されている BLE Service はサポートされていますので、すぐに利用することができます。
BLE services supported on mbed - | Mbed
例えば Heart Rate Service を使うサンプルに下記のようなものがあります。
BLE_HeartRate - a mercurial repository | Mbed
また、カスタムのサービスを実装している例として下記のようなサンプルがあります。
BLE_Button - a mercurial repository | Mbed
これらを参考にしてカスタムサービスを使う例を実装してみました。照度センサーからの値を扱うケースを想定して、 LuxService を実装して利用する例です。まず LuxService.h を下記のような内容で実装します。
#ifndef __BLE_LUX_SERVICE_H__
#define __BLE_LUX_SERVICE_H__

class LuxService {
public:
  const static uint16_t LUX_SERVICE_UUID = 0xA000;
  const static uint16_t LUX_VALUE_CHARACTERISTIC_UUID = 0xA001;

  LuxService(BLE &_ble, uint16_t initialValueForLUXCharacteristic) :
    ble(_ble), luxValue(LUX_VALUE_CHARACTERISTIC_UUID, &initialValueForLUXCharacteristic, GattCharacteristic::BLE_GATT_CHAR_PROPERTIES_NOTIFY)
  {
    GattCharacteristic *charTable[] = {&luxValue};
    GattService luxService(LUX_SERVICE_UUID, charTable, sizeof(charTable) / sizeof(GattCharacteristic *));
    ble.gattServer().addService(luxService);
  }

  void updateLuxValue(uint16_t newValue) {
    ble.gattServer().write(luxValue.getValueHandle(), (uint8_t *)&newValue, sizeof(bool));
  }

private:
  BLE &ble;
  ReadOnlyGattCharacteristic<uint16_t> luxValue;
};

#endif
照度の値を扱うため、 private の変数として読み取り専用の Characteristic を luxValue として定義します。
private:
  BLE &ble;
  ReadOnlyGattCharacteristic<uint16_t> luxValue;
コンストラクタでその Characteristic を初期化します。 Characteristic の値が更新された時に Notification を送れるように、初期化時に GattCharacteristic::BLE_GATT_CHAR_PROPERTIES_NOTIFY を渡しています。そして Service 初期化時に Characteristic を登録します。 最後に Service を GATT Server に登録します。
  LuxService(BLE &_ble, uint16_t initialValueForLUXCharacteristic) :
    ble(_ble), luxValue(LUX_VALUE_CHARACTERISTIC_UUID, &initialValueForLUXCharacteristic, GattCharacteristic::BLE_GATT_CHAR_PROPERTIES_NOTIFY)
  {
    GattCharacteristic *charTable[] = {&luxValue};
    GattService luxService(LUX_SERVICE_UUID, charTable, sizeof(charTable) / sizeof(GattCharacteristic *));
    ble.gattServer().addService(luxService);
  }
さらに照度の値の更新用のメソッドとして void updateLuxValue(uint16_t newValue) を実装しておきます。
  void updateLuxValue(uint16_t newValue) {
    ble.gattServer().write(luxValue.getValueHandle(), (uint8_t *)&newValue, sizeof(bool));
  }
では LuxService を利用する main.cpp の実装です。コード全体は下記のようになります。
#include "mbed.h"
#include "ble/BLE.h"
#include "LuxService.h"

DigitalOut led(LED1, 0);

const static char DEVICE_NAME[] = "LUXSample";
static const uint16_t uuid16_list[] = {LuxService::LUX_SERVICE_UUID};

static volatile bool triggerSensorPolling = false;

uint16_t luxValue = 100;
static volatile bool riseValue = true;

LuxService *luxServicePtr;

Ticker ticker;

BLE ble;

void disconnectionCallback(const Gap::DisconnectionCallbackParams_t *params)
{
  BLE::Instance().gap().startAdvertising();
}

void periodicCallback(void)
{
  led = !led;
  triggerSensorPolling = true;
}

void onBleInitError(BLE &ble, ble_error_t error)
{
}

void bleInitComplete(BLE::InitializationCompleteCallbackContext *params)
{
  BLE& ble = params->ble;
  ble_error_t error = params->error;

  if (error != BLE_ERROR_NONE) {
    onBleInitError(ble, error);
    return;
  }

  if (ble.getInstanceID() != BLE::DEFAULT_INSTANCE) {
    return;
  }

  ble.gap().setDeviceName((const uint8_t *) DEVICE_NAME);
  ble.gap().onDisconnection(disconnectionCallback);

  uint16_t initialValueForLUXCharacteristic = 100;
  luxServicePtr = new LuxService(ble, initialValueForLUXCharacteristic);

  ble.gap().accumulateAdvertisingPayload(GapAdvertisingData::BREDR_NOT_SUPPORTED | GapAdvertisingData::LE_GENERAL_DISCOVERABLE);
  ble.gap().accumulateAdvertisingPayload(GapAdvertisingData::COMPLETE_LIST_16BIT_SERVICE_IDS, (uint8_t *)uuid16_list, sizeof(uuid16_list));
  ble.gap().accumulateAdvertisingPayload(GapAdvertisingData::COMPLETE_LOCAL_NAME, (uint8_t *)DEVICE_NAME, sizeof(DEVICE_NAME));
  ble.gap().setAdvertisingType(GapAdvertisingParams::ADV_CONNECTABLE_UNDIRECTED);
  ble.gap().setAdvertisingInterval(1000);
  ble.gap().startAdvertising();
}

int main(void)
{
  ticker.attach(periodicCallback, 1);

  ble.init(bleInitComplete);

  while (ble.hasInitialized() == false) { /* spin loop */ }

  while (true) {
    if (triggerSensorPolling && ble.getGapState().connected) {
      triggerSensorPolling = false;

      if (riseValue) {
        luxValue++;
      } else {
        luxValue--;
      }

      if (luxValue == 200) {
        riseValue = false;
      } else if (luxValue == 100) {
        riseValue = true;
      }

      luxServicePtr->updateLuxValue(luxValue);
    } else {
      ble.waitForEvent();
    }
  }
}
カスタムサービスに関連するところをピックアップして簡単に説明します。まずは先ほど実装した LuxService を include します。
#include "LuxService.h"
UUID のリストは LuxService で定義されている UUID を使用して作成します。
static const uint16_t uuid16_list[] = {LuxService::LUX_SERVICE_UUID};
bleInitComplete の中で LuxService を初期化します。
  uint16_t initialValueForLUXCharacteristic = 100;
  luxServicePtr = new LuxService(ble, initialValueForLUXCharacteristic);
あとは main() の中で、センサーから取得した値(今回は擬似的に変化させている値)で LuxService の値を更新します。
luxServicePtr->updateLuxValue(luxValue);
そしてコンパイルして BLE Nano に hex ファイルをコピーし、動作を確認してみます。 LightBlue で確認すると下記のようにデバイスがリストに表示されます。
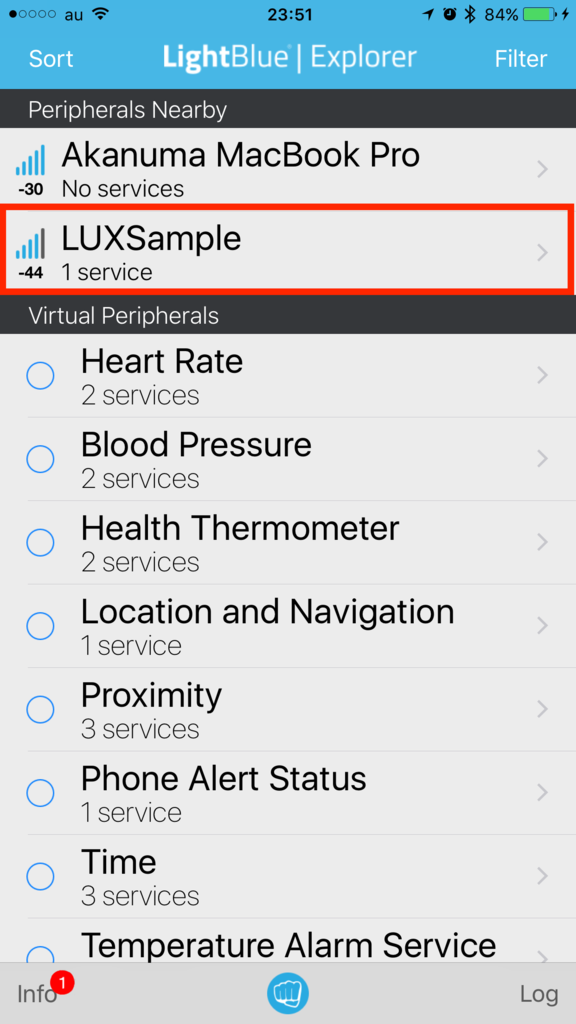
デバイスを選択して接続すると、プロパティに Read と Notify が表示されています。
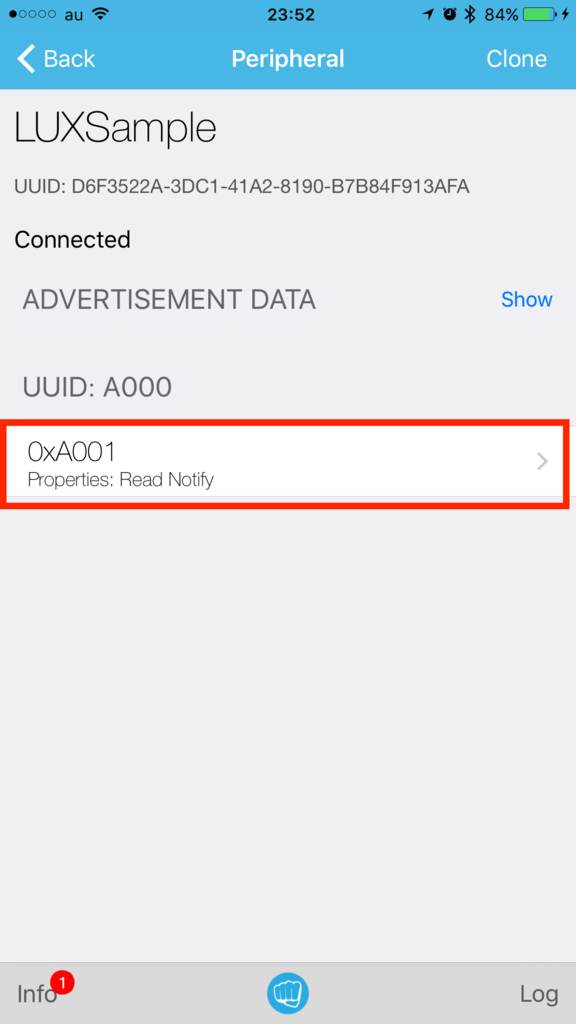
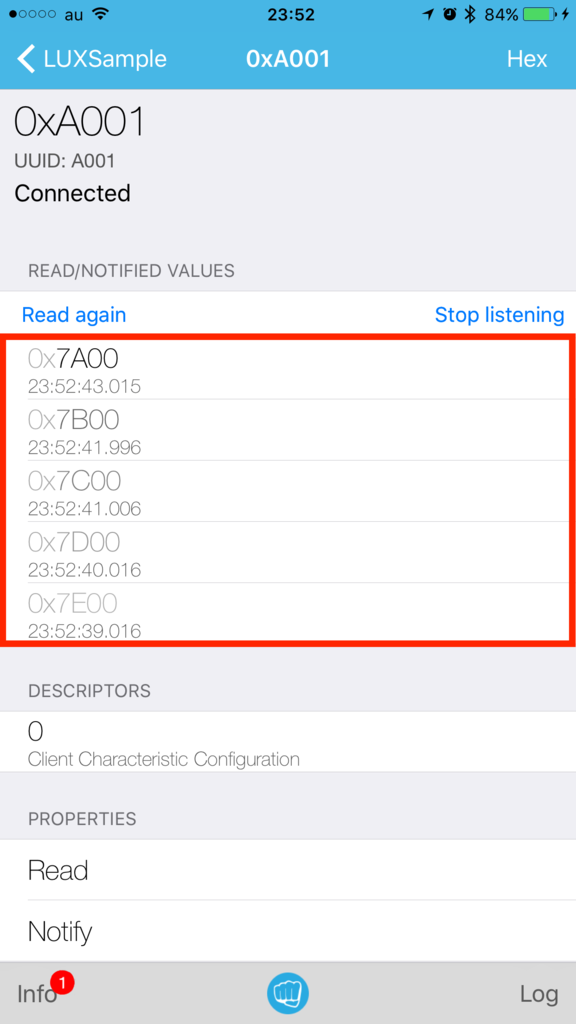
Characteristic を選択して Notification の Listen を開始すると、毎秒照度の値が更新される度に値が表示されていきます。
まとめ
ひとまずサンプルコードを頼りに見よう見まねで Advertisement の送信と、カスタムサービスを利用する例を実装してみました。細かいところはまだ理解できていないですが、とりあえず動かせるということはわかったので、詳細は順次確認しつつ、実際にセンサーと組み合わせて処理ができるようにしてみたいと思います。