Arduino Cloud に Raspberry Pi を接続して Lチカ

 Arduino ではオンライン上でのオールインワンの開発プラットフォームとして Arduino Create というものを提供しています。

create.arduino.cc

f:id:akanuma-hiroaki:20180322081919p:plain

 以前の記事で使った Arduino Web Editor も Arduino Create で提供されているサービスです。そのほかのサービスとして Arduino Cloud という、 Arduino を簡単にインターネットに接続したり、ほかの Arduino と相互に接続したり、デバイスを管理したりできるサービスを提供しています。現在 Arduino Cloud の対応デバイスはまだ少なく、 YUN SHIELD、 MKR1000、 WIFI SHIELD 101 の3つのようで、いずれも技適を通っていないため日本ではまだ Arduino Cloud に対応している Arduino 端末はないようです。前回の記事で使用した WROOM-32 も Arduino 互換なので、なんとか接続できないかと色々試してみたのですが、今のところまだ接続できていません。

f:id:akanuma-hiroaki:20180321202749p:plain

 とりあえず対応している Arduino 端末が日本でも使えるようになるのを待ちたいと思いますが、 Arduino Cloud では Arduino 以外にも、 Raspberry Pi や BeagleBone などの Linux 端末も接続することができるので、今回は Raspberry Pi を接続してみたいと思います。

Arduino Cloud に Raspberry Pi を登録

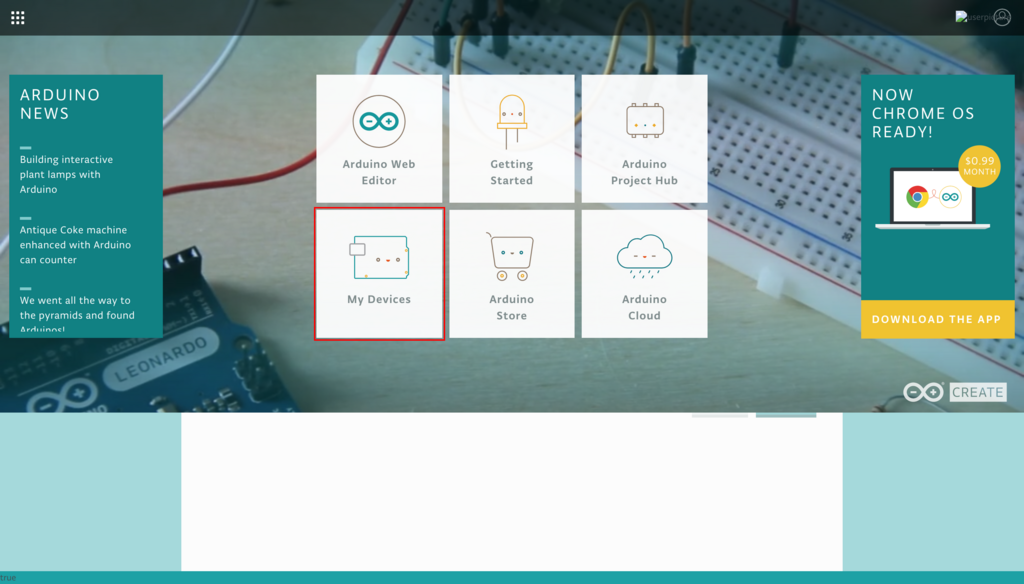
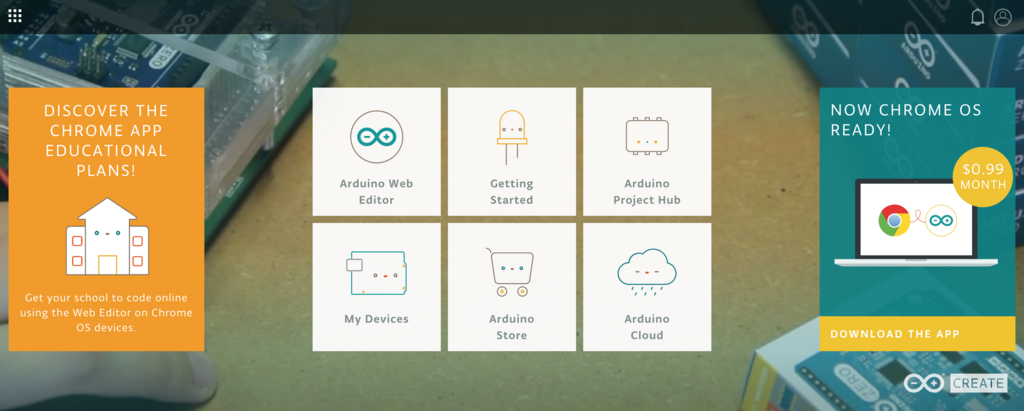
 まずは Arduino Cloud に Raspberry Pi をデバイスとして登録します。Raspberry Pi の通常の初期セットアップは事前に終わらせておき、ネットワークに接続されている状態にしておきます。 Arduino Cloud にアクセスすると下記のようなメニュー画面になります。 Arduino Cloud 対応の Arduinoボードを登録する場合には右下の Arduino Cloud を選択すれば良いのですが、 Raspberry Pi などの Linux 端末を登録する場合には、左下の My Devices を選択します。

f:id:akanuma-hiroaki:20180321163526p:plain

 デバイスを登録するとできるようになることなどの説明が表示されるので、 ADD NEW DEVICE をクリックします。

f:id:akanuma-hiroaki:20180321163445p:plain

 登録するデバイスを選択する画面になりますので、今回は Set up a Raspberry Pi を選択します。

f:id:akanuma-hiroaki:20180321163507p:plain

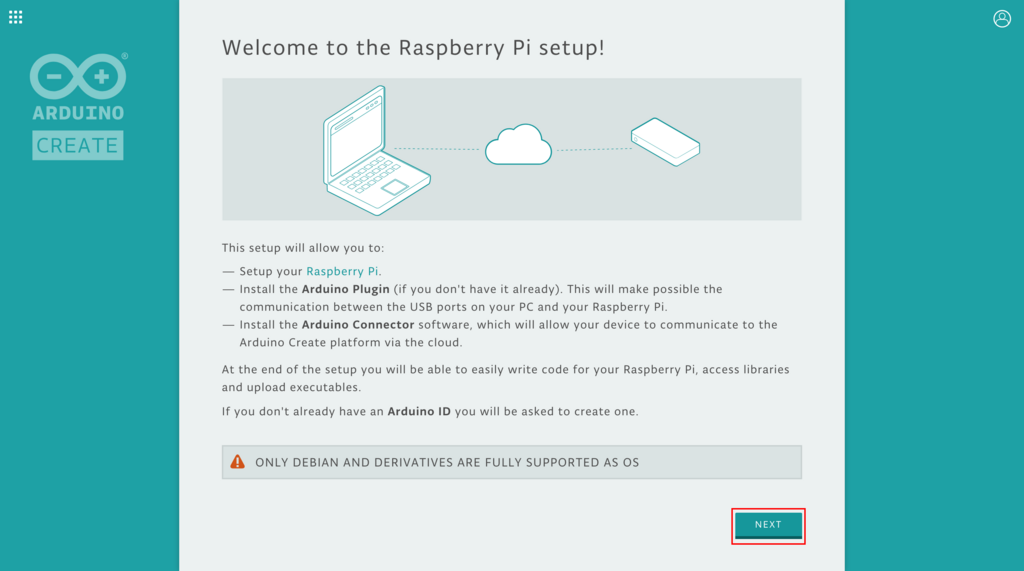
 セットアップの手順内で行われる内容の説明が表示されます。セットアップでは PC 側にまだ Arduino Plugin がインストールされていなければインストールし、 Raspberry Pi 側に Arduino Connector がインストールされます。 NEXT をクリックして先に進みます。

f:id:akanuma-hiroaki:20180321163646p:plain

 Raspberry Pi がオンラインになっていることを確認するように促す画面が表示されますので、オンラインになっていれば MY DEVICE IS READY をクリックします。

f:id:akanuma-hiroaki:20180321163703p:plain

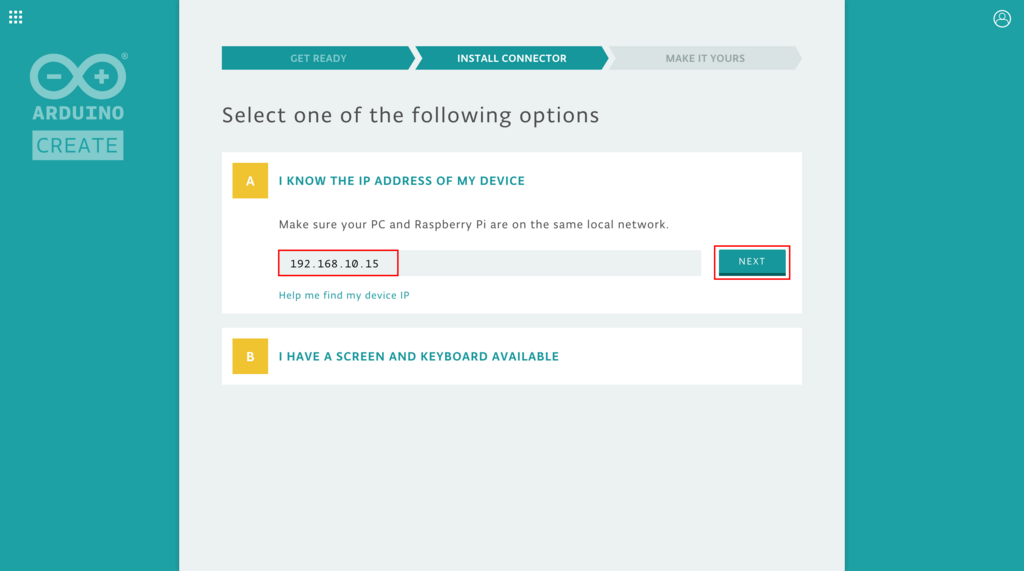
 セットアップの実行の仕方の選択肢として、 Raspberry Pi の IP アドレスがわかるか、 Raspberry Pi にモニタとキーボードが使えるようになっているかを選択します。今回はモニタとキーボードは繋いでいないですが、 IP アドレスはわかっているので、 I KNOW THE IP ADDRESS OF MY DEVICE を選択します。

f:id:akanuma-hiroaki:20180321201510p:plain

 すると IP アドレスの入力欄が表示されるので、 IP アドレスを入力して NEXT をクリックします。

f:id:akanuma-hiroaki:20180321201527p:plain

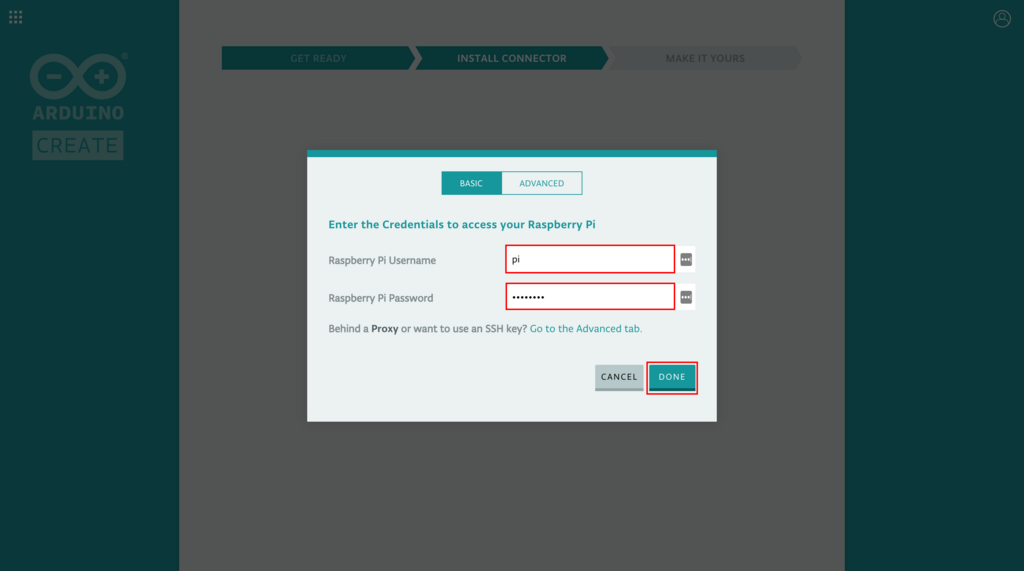
 Raspberry Pi にアクセスするためのアカウント情報が求められるので、フォームに入力して DONE をクリックします。

f:id:akanuma-hiroaki:20180321201543p:plain

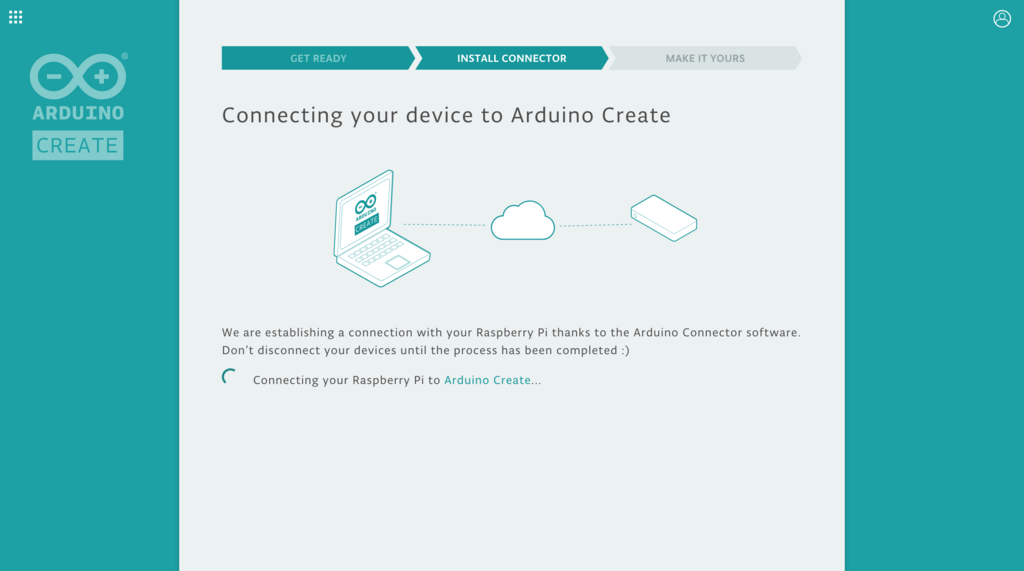
 セットアップが開始され、処理中は下記のような画面が表示されます。ここで Arduino Connector のインストールなどが行われます。処理が終わると画面は自動的に切り替わりますので、このまま待ちます。

f:id:akanuma-hiroaki:20180321201600p:plain

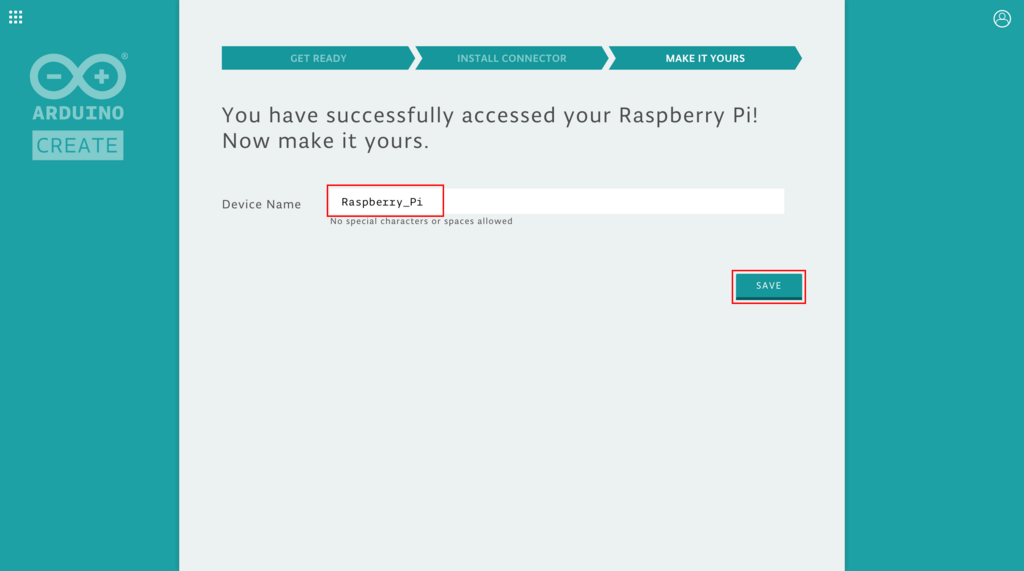
 セットアップが無事終了すると下記のように Arduino Cloud に登録するデバイス名の入力フォームが表示されますので、わかりやすい名前をつけて SAVE をクリックします。

f:id:akanuma-hiroaki:20180321201616p:plain

 これでひとまず登録は完了ですので、 GO TO MY DEVICES をクリックしてデバイス一覧画面に移動します。

f:id:akanuma-hiroaki:20180321201631p:plain

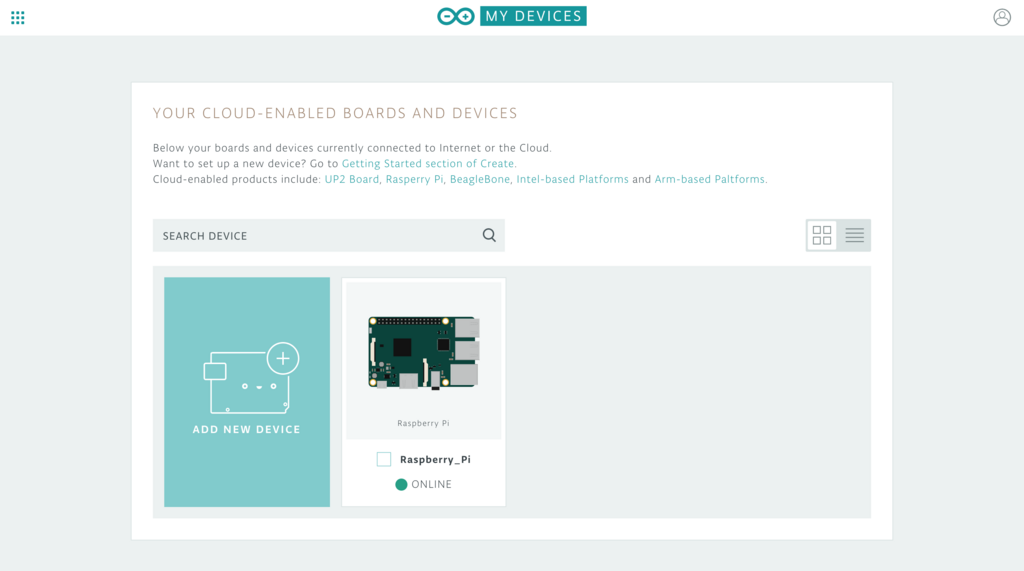
 デバイス一覧には登録した Raspberry Pi が表示され、ネットワークに接続されていれば ONLINE という表示になっています。

f:id:akanuma-hiroaki:20180321201648p:plain

 ここでデバイスを選択すると下記のようにデバイスの状態についてのダッシュボードが表示されます。

f:id:akanuma-hiroaki:20180321202818p:plain

 ちなみに登録した Raspberry Pi でホームディレクトリを見てみると、Arduino Connector 関連の下記のようなファイルが追加されています。

$ ls -ltr ~
合計 28368
〜〜〜抜粋〜〜〜
-rwxr-xr-x  1 pi   pi   11346716  35 15:31 arduino-connector
-rw-------  1 root root      227  321 08:32 certificate.key
-rw-------  1 root root     1099  321 08:32 certificate.pem
-rw-r-----  1 pi   root      203  321 08:32 arduino-connector.cfg
-rw-r--r--  1 pi   pi        445  321 08:32 arduino-connector.log

 ログにはインストール時のものと思われるログが記録されています。 MQTT のサーバとしては AWS IoT を使っているっぽいです。

$ cat arduino-connector.log 
Version: 1.0.94
Generate private key
Generate csr
Request certificate
Request mqtt url
Write conf to arduino-connector.cfg
Check successful mqtt connection
setupMQTT certificate.pem certificate.key akanuma:xxxxxxxx-xxxx-xxxx-xxxx-xxxxxxxxxxxx xxxxxxxxxxxxxx.iot.us-east-1.amazonaws.com
WARN: memstore.go:137: [store]    memorystore wiped
WARN: net.go:328: [net]      errorWatch stopped
WARN: net.go:318: [net]      logic stopped
Setup completed

 設定ファイルは下記のような内容で作成されていました。

$ cat arduino-connector.cfg 
id=akanuma:xxxxxxxx-xxxx-xxxx-xxxx-xxxxxxxxxxxx
url=xxxxxxxxxxxxxx.iot.us-east-1.amazonaws.com
http_proxy=
https_proxy=
all_proxy=
authurl=https://hydra.arduino.cc/
apiurl=https://api2.arduino.cc

スケッチの実行

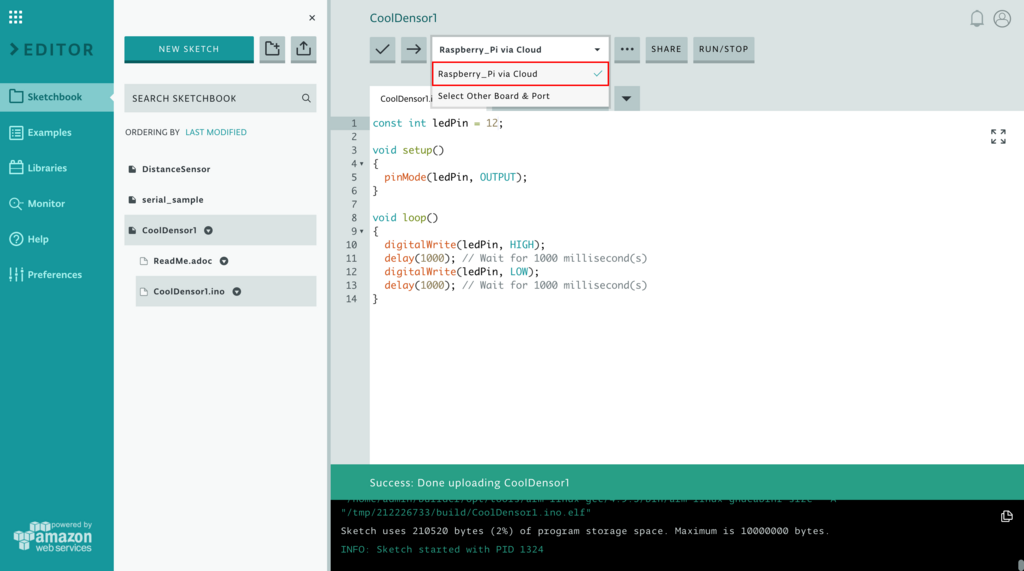
 Arduino Cloud にデバイスを登録すると、 Arduino Uno 等の Arduino ボードと同様に、 Web Editor からスケッチをフラッシュして実行させることができます。そのデバイスがオンラインであれば Web Editor の接続先ボードとして選択できるようになりますので選択します。

f:id:akanuma-hiroaki:20180322072428p:plain

 今回はとりあえず下記のような Lチカのスケッチで試してみます。

const int ledPin = 12; // GPIOピン番号ではなく物理ピン番号

void setup()
{
  pinMode(ledPin, OUTPUT);
}

void loop()
{
  digitalWrite(ledPin, HIGH);
  delay(1000); // Wait for 1000 millisecond(s)
  digitalWrite(ledPin, LOW);
  delay(1000); // Wait for 1000 millisecond(s)
}

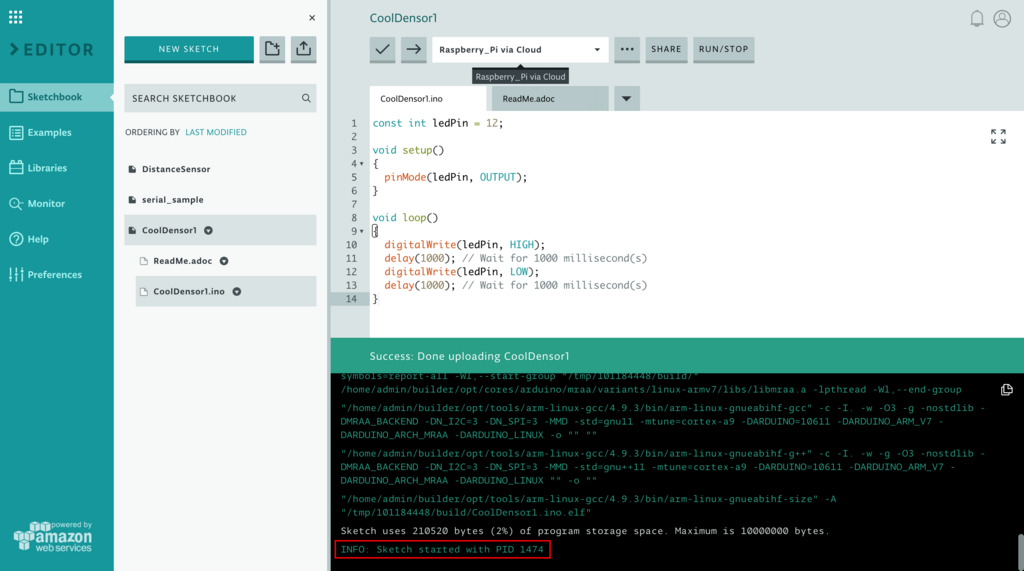
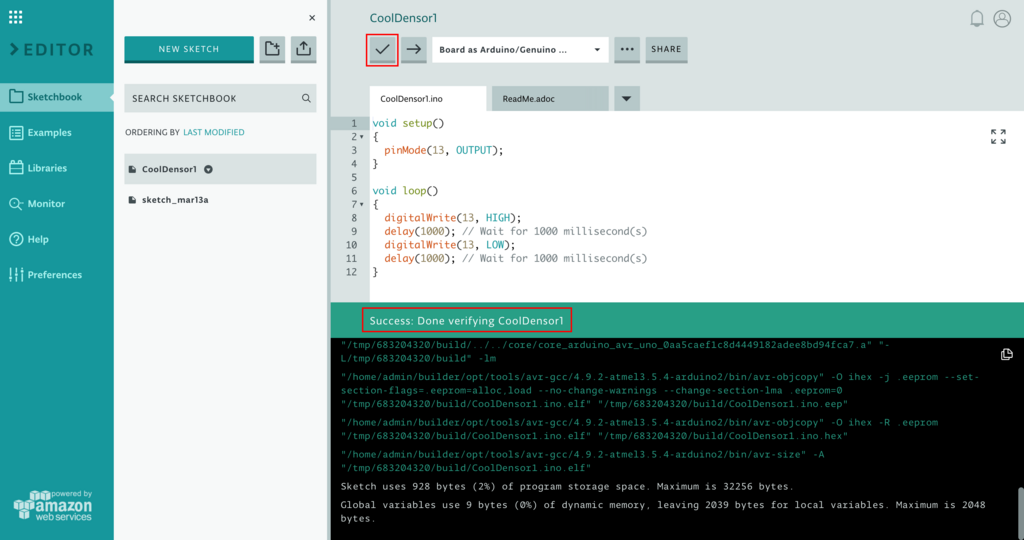
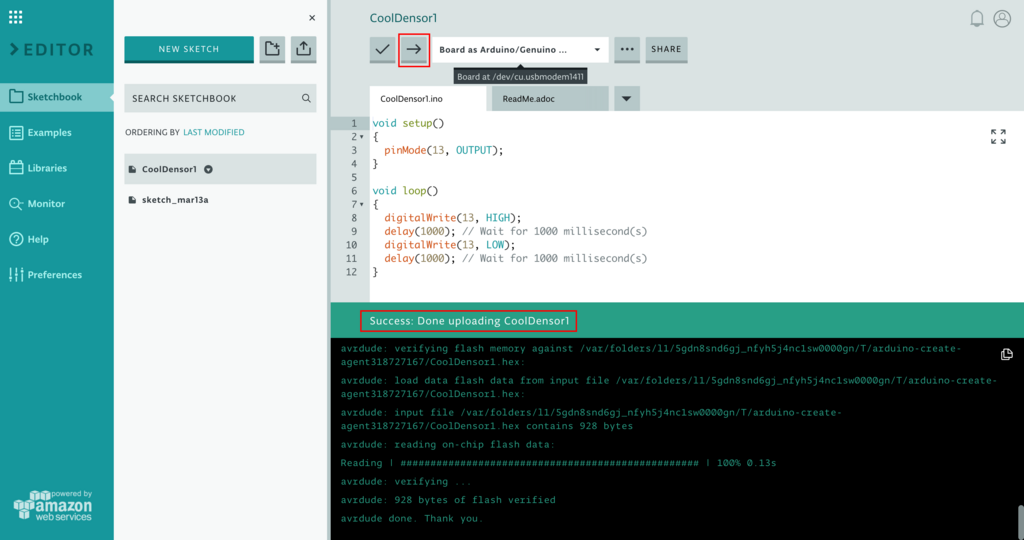
 上記コードを用意したら Arduinoボードの時と同様に、 Verify ボタンでコンパイル可能か確認して問題なければ Upload ボタンで Raspberry Pi にスケッチをアップロードして実行します。成功すると下記のように Web Editor のコンソールに Raspberry Pi で実行されているプロセスの ID が出力されます。

f:id:akanuma-hiroaki:20180322073650p:plain

 Raspberry Pi 上で確認してみると、確かにその PID でスケッチが実行されています。

$ ps aux | grep 1474 | grep -v grep
root      1474  0.1  0.2   4340  2520 pts/2    Ss+  22:35   0:00 /home/pi/sketches/CoolDensor1

 アップロードからLチカ実行の様子は下記動画のようになります。

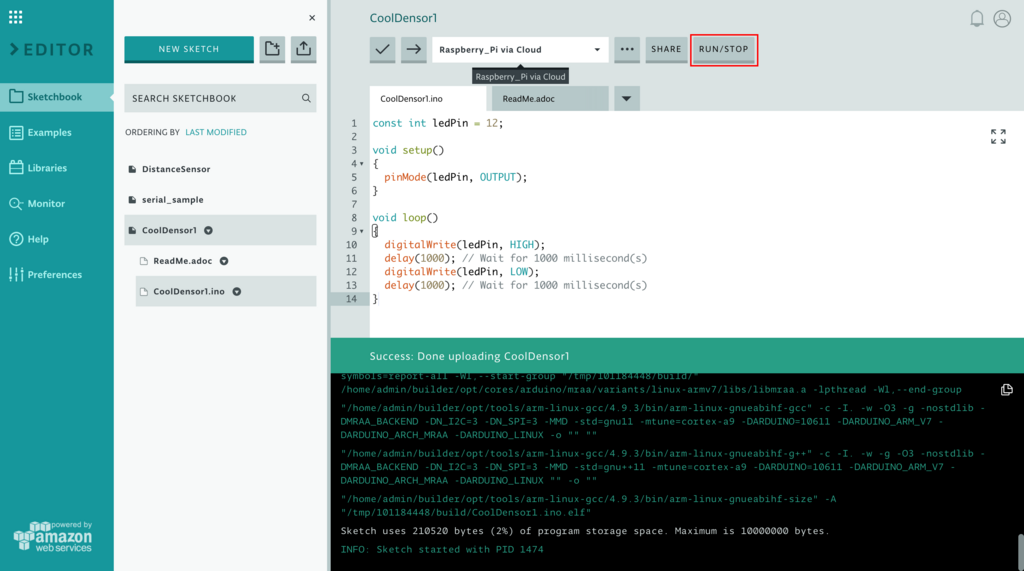
 さらにプロセスの実行/停止もWeb上から操作できます。 Web Editor の RUN/STOP ボタンをクリックします。

f:id:akanuma-hiroaki:20180322075604p:plain

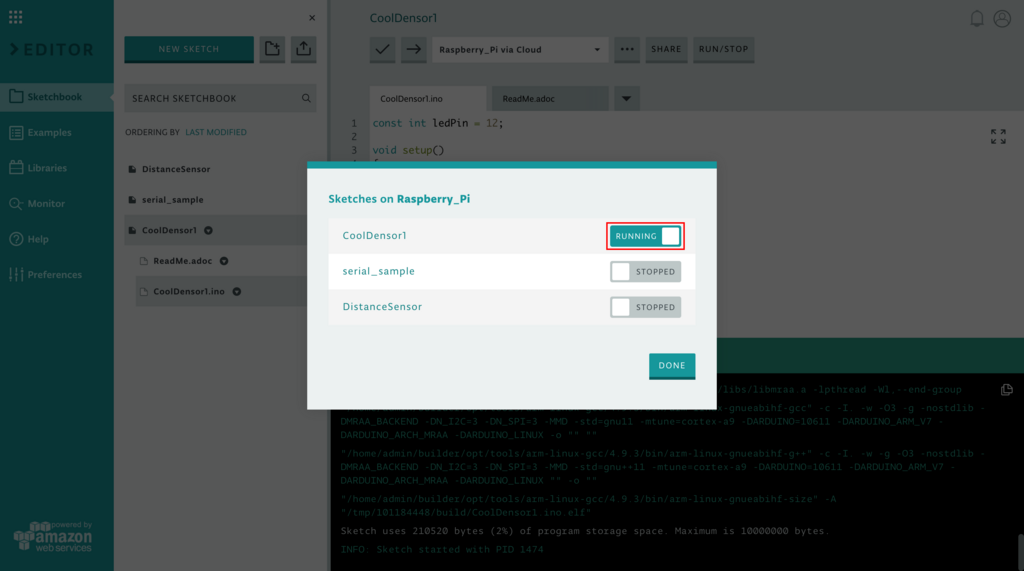
 すると登録済みのスケッチのリストと、各スケッチの実行状況がトグルボタンで表示されますので、このトグルを切り替えることでプロセスの実行/停止を行うことができます。

f:id:akanuma-hiroaki:20180322075620p:plain

 操作してみた様子は下記動画の通りです。トグルの切り替えでLチカの実行/停止を操作することができています。

まとめ

 Raspberry Pi 側では初期セットアップさえ終わっていれば、簡単に Arduino Cloud に登録できますし、登録してしまえば Raspberry Pi 側で直接操作することなく、他の Arduino ボードと同様に Web Editor から触ることができて便利ですね。 Arduino 以外にも mbed をはじめ、各社がクラウド環境でのプラットフォームを提供するようになってきていますが、それぞれできることが違っているので、デバイスを選定する場合はボード自体の機能だけでなく、プラットフォームの内容も含めて検討するのが良さそうです。

ESPr Developer 32 で WROOM-32 を Wi-Fi に繋いでみる

 前回 Seeeduino という Arduino Uno 互換ボードで Arduino に初めてさわってみたわけですが、 Arduino Uno は標準ではネットワークインタフェースを持っておらず、 Wi-Fi シールドも技適を通っているものを使うとなると選択肢は少なく、あっても結構高くついてしまうようでした。また、 ESP-WROOM-02 のような Wi-Fi モジュールを使おうと思うと、 Arduino Uno の 3.3V 出力では電流量が足りずに正しく動作しないようなので、それであれば Arduino Uno との組み合わせではなく単体でも Arduino 互換ボードとして動作し、 Wi-Fi だけでなく Bluetooth/BLE にも対応している ESP-WROOM-32 を使ってしまうのが良さそうということで、購入してみました。モジュールのサイトは下記になります。

www.espressif.com

 実際に使うにあたってはモジュール単体よりも開発ボードを買った方が色々とやりやすいので、今回はスイッチサイエンスで販売されている ESPr Developer 32 を購入しました。

www.switch-science.com

 ESP-WROOM-32 の開発ボードの選択肢としては他にも秋月電子で販売されている ESP32-DevKitC などもありますが、ESPr Developer 32 であれば突入電流対策が行われているということでしたので、値段的には ESP32-DevKitC よりも若干高いですが、 ESPr Developer 32 を選んでみました。

akizukidenshi.com

開発環境の準備から動作確認まで

 Seeeduino は Arduino Uno 互換ということで、 Arduino Web Editor を使ったのですが、 WROOM-32 は Web Editor では対応できないようだったので、 Arduino IDE を Mac にインストールして使用しました。インストール手順は下記リンク先で紹介されています。特に難しいことはないと思いますのでここでは詳細は割愛します。

Arduino - MacOSX

 次に、 Arduino IDE で WROOM-32 のファームウェアの開発ができるように、 Arduino core for ESP32 をインストールします。

github.com

$ mkdir -p ~/Documents/Arduino/hardware/espressif
$ cd ~/Documents/Arduino/hardware/espressif
$ git clone https://github.com/espressif/arduino-esp32.git esp32
$ cd esp32
$ git submodule update --init --recursive
$ cd tools
$ python get.py

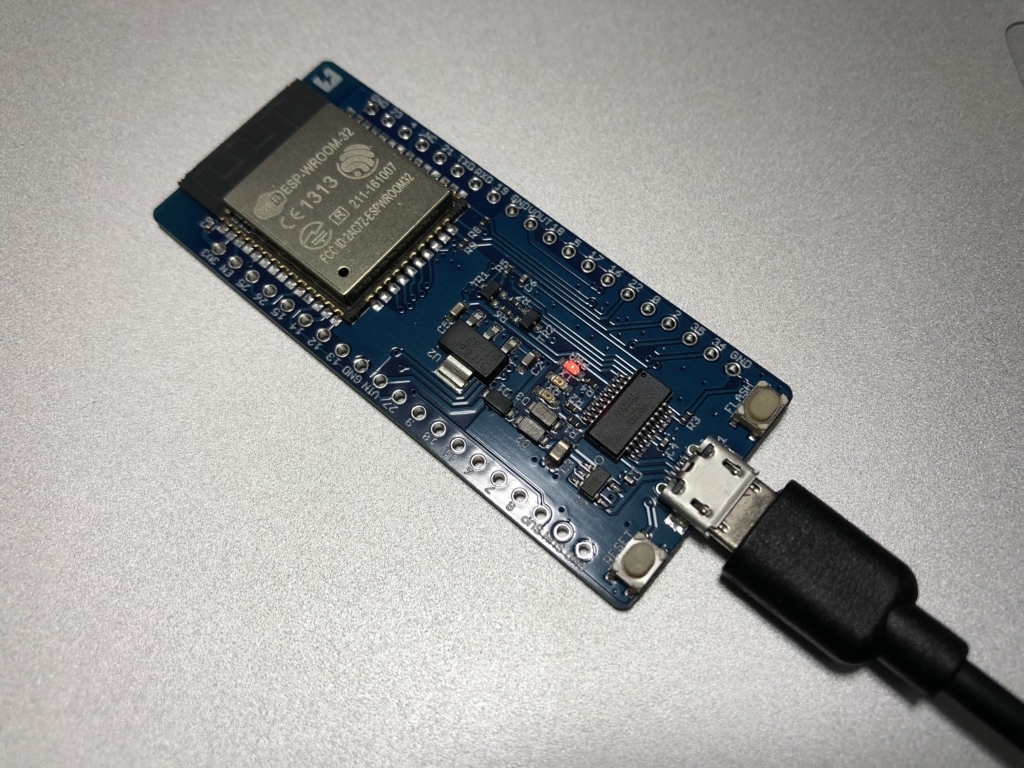
 インストールが終わったら、 Mac と ESPr Developer 32 を USB ケーブルで接続します。

f:id:akanuma-hiroaki:20180317154120j:plain

 そして Arduino IDE を起動します。起動したら Tools メニューの Board の選択肢から、 ESP32 Dev Module を選択します。

f:id:akanuma-hiroaki:20180317152923p:plain

 これでひとまず環境の準備はできましたので、とりあえず正しく ESPr Developer 32 にファームウェアが書き込めるか確認してみます。下記スケッチを Arduino IDE で作成します。シリアル接続してシリアルモニタに文字を出力するだけのコードです。

void setup() {
  Serial.begin(9600);
}

void loop() {
  Serial.println("Hello World from ESPr Developer 32 :)");
  delay(1000);
}

 コードを入力したらまずは IDE の Verify ボタンでビルドできるか確認します。下記のような感じでエラーなくビルドされれば成功です。 

Sketch uses 162273 bytes (12%) of program storage space. Maximum is 1310720 bytes.
Global variables use 11052 bytes (3%) of dynamic memory, leaving 283860 bytes for local variables. Maximum is 294912 bytes.

 それでは IDE の Update ボタンで ESPr Developer 32 に書き込みます。

Sketch uses 162273 bytes (12%) of program storage space. Maximum is 1310720 bytes.
Global variables use 11052 bytes (3%) of dynamic memory, leaving 283860 bytes for local variables. Maximum is 294912 bytes.
esptool.py v2.1
Connecting....
Chip is ESP32D0WDQ6 (revision 0)
Uploading stub...
Running stub...
Stub running...
Changing baud rate to 921600
Changed.
Configuring flash size...
Auto-detected Flash size: 4MB
Compressed 8192 bytes to 47...

Writing at 0x0000e000... (100 %)
Wrote 8192 bytes (47 compressed) at 0x0000e000 in 0.0 seconds (effective 4364.7 kbit/s)...
Hash of data verified.
Compressed 14128 bytes to 9196...

Writing at 0x00001000... (100 %)
Wrote 14128 bytes (9196 compressed) at 0x00001000 in 0.1 seconds (effective 1022.1 kbit/s)...
Hash of data verified.
Compressed 163424 bytes to 84070...

Writing at 0x00010000... (16 %)
Writing at 0x00014000... (33 %)
Writing at 0x00018000... (50 %)
Writing at 0x0001c000... (66 %)
Writing at 0x00020000... (83 %)
Writing at 0x00024000... (100 %)
Wrote 163424 bytes (84070 compressed) at 0x00010000 in 1.4 seconds (effective 929.0 kbit/s)...
Hash of data verified.
Compressed 3072 bytes to 122...

Writing at 0x00008000... (100 %)
Wrote 3072 bytes (122 compressed) at 0x00008000 in 0.0 seconds (effective 1712.6 kbit/s)...
Hash of data verified.

Leaving...
Hard resetting...

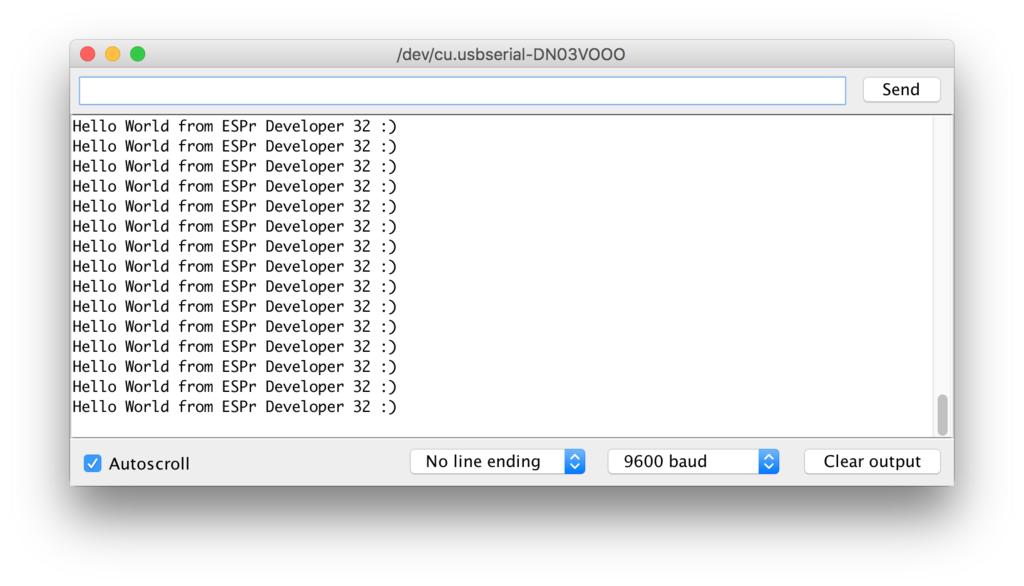
 書き込みが成功すると自動的にプログラムが実行され、シリアルモニタでは下記のように文字列の出力が繰り返されます。

f:id:akanuma-hiroaki:20180318121723p:plain

Wi-Fi 接続確認

 ひとまず動作確認ができたので、 Wi-Fi への接続も確認してみます。とりあえず Wi-Fi に接続して、Webサーバへのリクエストを投げてみます。接続先としては同じ LAN に接続している Mac で下記のように HTTP サーバを起動しておきます。

$ python -m SimpleHTTPServer                                                                                                                                                                                                          
Serving HTTP on 0.0.0.0 port 8000 ...

 ESPr Developer 32 で動かすコードは下記のようになります。 Wi-Fi への接続自体は WiFi.begin() で SSID とパスワードを指定するだけでOKで、あとは WiFi.status() で接続ステータスが WL_CONNECTED になれば接続完了です。 loop() の処理としては先ほど動かした HTTP サーバに GET リクエストを投げてレスポンスを表示しているだけの単純なものです。

#include <WiFi.h>
#include <HTTPClient.h>

const char SSID[] = "aterm-xxxxxx-g";
const char PASSWORD[] = "xxxxxxxxxxxxx";
const char URL[] = "http://192.168.10.5:8000/";

void setup() {
  Serial.begin(115200);
  while(!Serial);

  WiFi.begin(SSID, PASSWORD);
  Serial.printf("Connecting to the WiFi AP: %s ", SSID);

  while(WiFi.status() != WL_CONNECTED) {
    Serial.print(".");
    delay(500);
  }

  Serial.println(" connected.");
  Serial.print("IP address: ");
  Serial.println(WiFi.localIP());
}

void loop() {
  HTTPClient http;
  http.begin(URL);

  Serial.printf("Response: %d\n", http.GET());
  String body = http.getString();
  Serial.print("Response Body: ");
  Serial.println(body);

  delay(1000);
}

 これを Verify して問題なければ Upload で ESPr Developer 32 に書き込みます。書き込みが終わって起動すると、下記のようにシリアルモニタに出力され、 Wi-Fi へ接続して HTTP サーバからコンテンツを取得していることがわかります。

Connecting to the WiFi AP: aterm-xxxxxx-g ......... connected.
IP address: 192.168.10.10
Response: 200
Response Body: <!DOCTYPE html PUBLIC "-//W3C//DTD HTML 3.2 Final//EN"><html>
<title>Directory listing for /</title>
<body>
<h2>Directory listing for /</h2>
<hr>
<ul>
</ul>
<hr>
</body>
</html>

 HTTP サーバ側でも下記のようにリクエストを受信しているログが出力されます。

192.168.10.10 - - [17/Mar/2018 16:30:09] "GET / HTTP/1.1" 200 -
192.168.10.10 - - [17/Mar/2018 16:30:10] "GET / HTTP/1.1" 200 -

まとめ

 ネットワークインタフェースを搭載していないボードの場合、まずネットワークに接続できるようになるまでで結構苦労しそうですが、 ESPr Developer 32 のようなネットワークモジュールを積んだ開発ボードを使うことで簡単にネットワークに接続できてしまいます。値段的にも Arduino Uno やその互換ボードと比べても高くないですし、特に理由がなければ WROOM-32 などを最初から使ってしまう方が良さそうです。 ESPr Developer 32 にはピンヘッダがついていないので、今後自分ではんだ付けしてセンサー等との連携も試してみたいと思います。

Seeeduino(Arduino互換ボード)+ Tinkercad で Lチカ

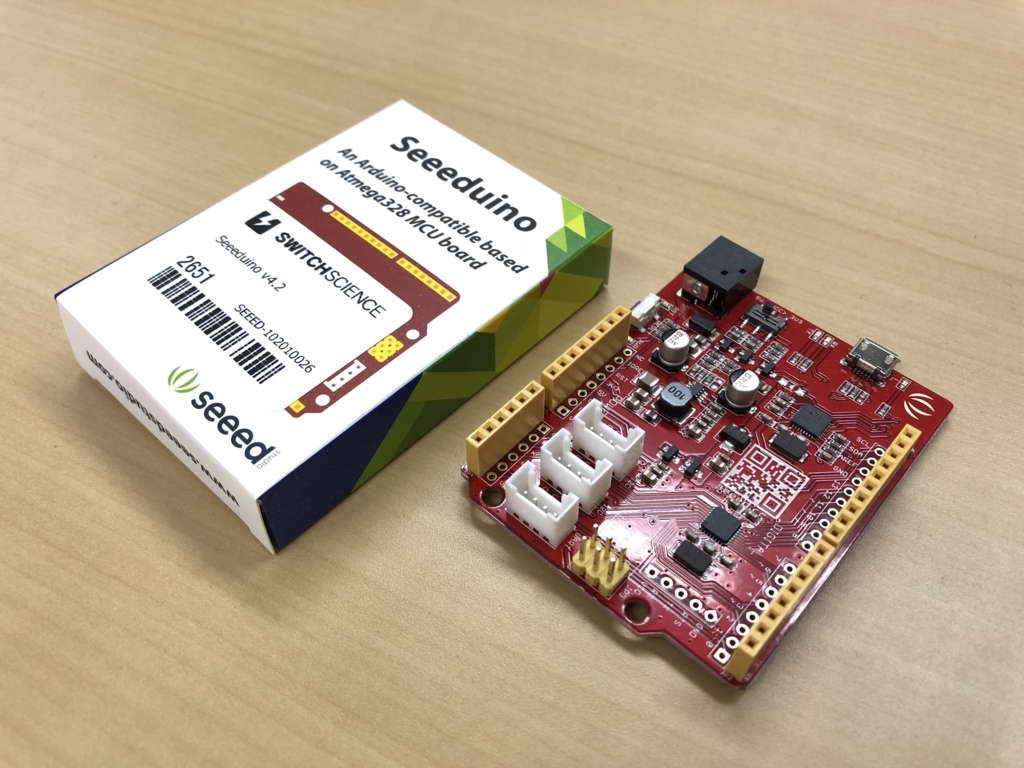
 今まで Arduino は触ったことがなかったのですが、 Arduino 互換ボードの Seeeduino を買ったのでとりあえず Lチカしてみました。

www.switch-science.com

 Seeeduino は Arduino 互換というだけでなく、 GROVEコネクタが搭載されていますので、 Arduino よりも手軽にいろんなデバイスが接続できそうです。

f:id:akanuma-hiroaki:20180313074204j:plain:w450

 注意点として、PCと接続するためのUSBケーブルが、 Arduino Uno は A - B のタイプですが、 Seeeduino では A - microB ですので、そこはお気をつけください。

まずは Tinkercad でシミュレーション

 早速回路を組みたくなるところですが、まずは Tinkercad でシミュレーションしてみたいと思います。 Tinkercad は電子回路の作成と Arduino でのコード実行をシミュレートできるツールで、以前会社のブログで紹介させていただきましたので詳細はそちらをご覧ください。

tech.unifa-e.com

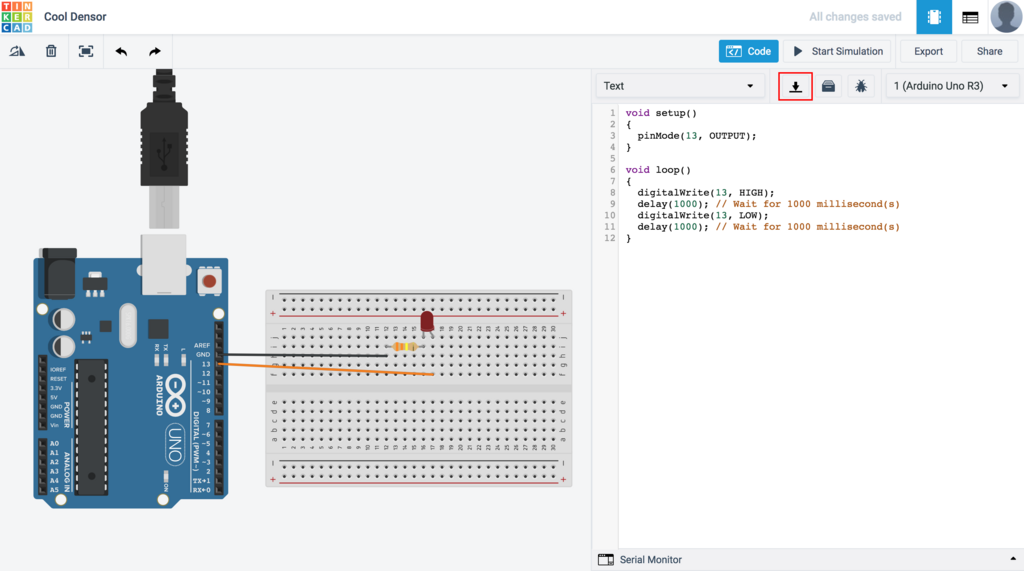
 Seeeduino は Tinkercad のパーツとしては用意されていないので、 Arduino を使っています。ブレッドボードに LED と抵抗(330Ω)を配置して、 Arduino に接続しています。コードはデフォルトで用意されている Lチカのコードそのままで、下記のようになります。これでシミュレーションを実行すると LED が点滅します。コードのダウンロードもできますので、あとで実機で動かすためにダウンロードしておきます。右上のダウンロードボタンをクリックすると、.ino形式のファイルとしてダウンロードすることができます。

f:id:akanuma-hiroaki:20180313082955p:plain:w450

Arduino Web Editor にコードをインポート

 Arduino ではプログラム(スケッチ)を開発するためのIDEが提供されています。

Arduino - Software

 IDE にはブラウザからアクセスしてオンラインで使える Arduino Web Editor と、MacやPCにインストールして使用する Arduino IDE があります。今回は Arduino Web Editor を使ってみます。

create.arduino.cc

 使用するにはアカウント登録が必要です。特に登録手順で難しいことはないのでここでは詳細は割愛します。

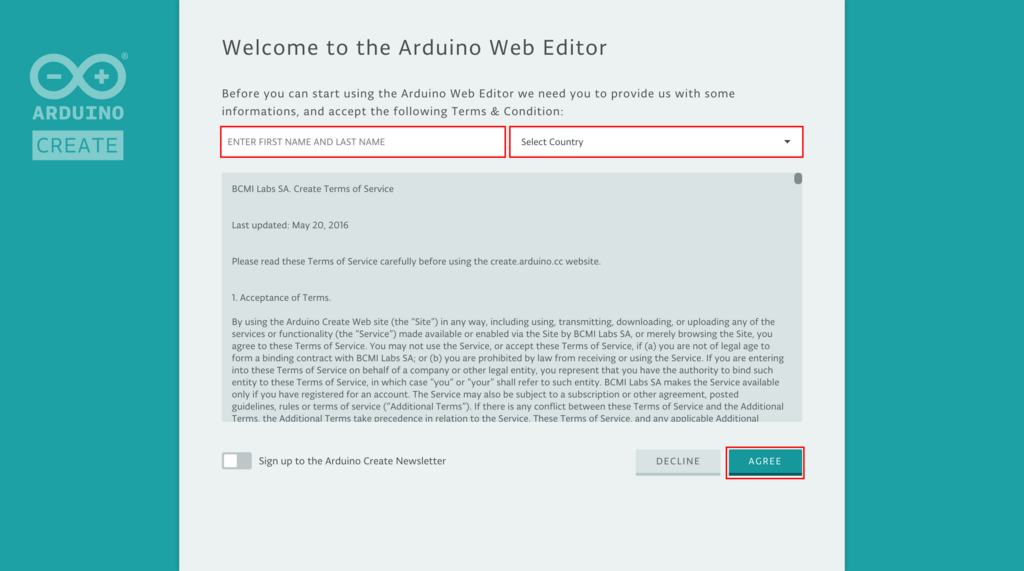
 Web Editor に初めてアクセスすると利用規約への同意が求められますので、名前と国を選んで NEXT をクリックします。

f:id:akanuma-hiroaki:20180313083730p:plain:w450

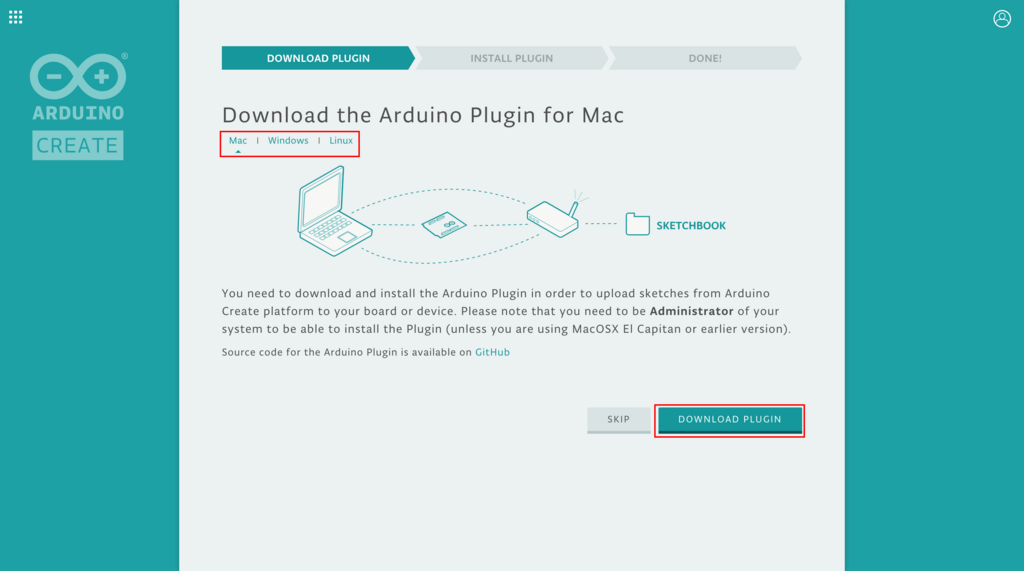
 Web Editor から実機にスケッチをフラッシュするにはプラグインをインストールする必要があり、その案内が表示されます。 NEXT をクリックして先へ進みます。

f:id:akanuma-hiroaki:20180313083747p:plain:w450

 左上で OS の種類を選択し、 DOWNLOAD PLUGIN ボタンをクリックするとインストーラがダウンロードされますので、 Mac であればダウンロードされた .dmg ファイルを実行し、案内に従ってインストールします。インストール自体は特に難しいことはないのでここでは割愛します。

f:id:akanuma-hiroaki:20180313083803p:plain:w450

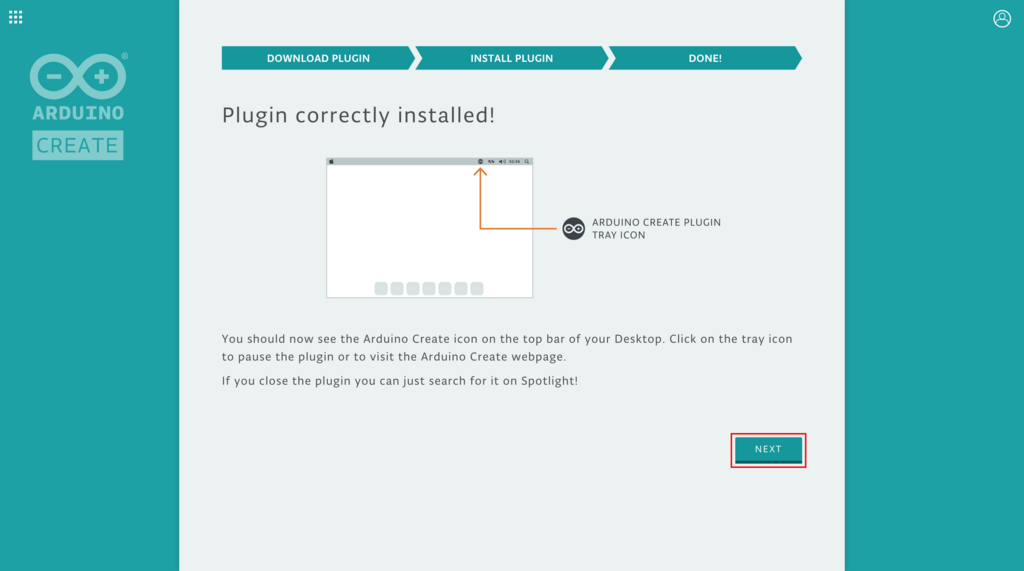
 インストールが終了するとブラウザでの表示が下記のように変わりますので、 NEXT をクリックします。

f:id:akanuma-hiroaki:20180313083856p:plain:w450

 機能説明を実行するか選べるようになってます。機能説明を見るなら YES! をクリックします。

f:id:akanuma-hiroaki:20180313083916p:plain:w450

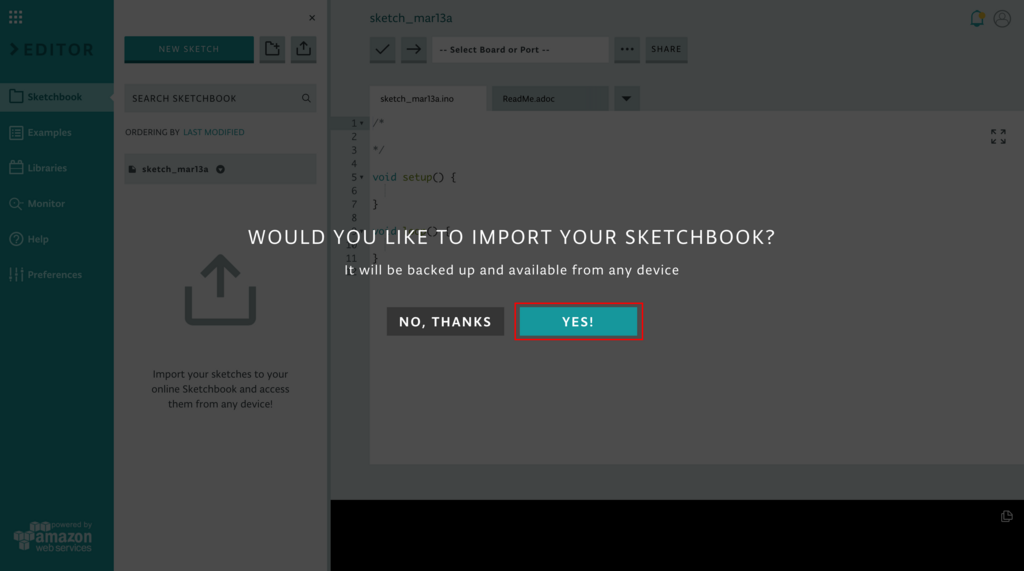
 一通り説明が終わると、下記のように手持ちのスケッチブックデータをインポートするか聞かれますので、 YES! をクリックします。

f:id:akanuma-hiroaki:20180313083936p:plain:w450

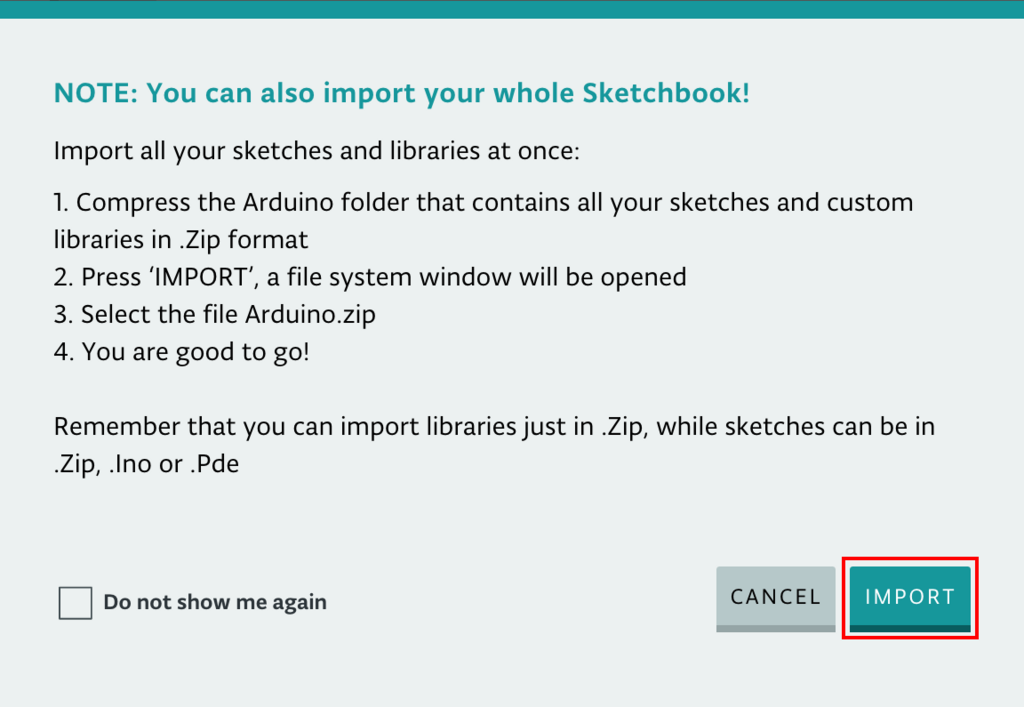
 アップロードできるのは .Zip .Ino .Pde 形式のいずれかという注意書きが表示されます。Tinkercad からダウンロードしたファイルは .Ino 形式ですので、 IMPORT をクリックしてファイルを選択してアップロードします。

f:id:akanuma-hiroaki:20180313083958p:plain:w450

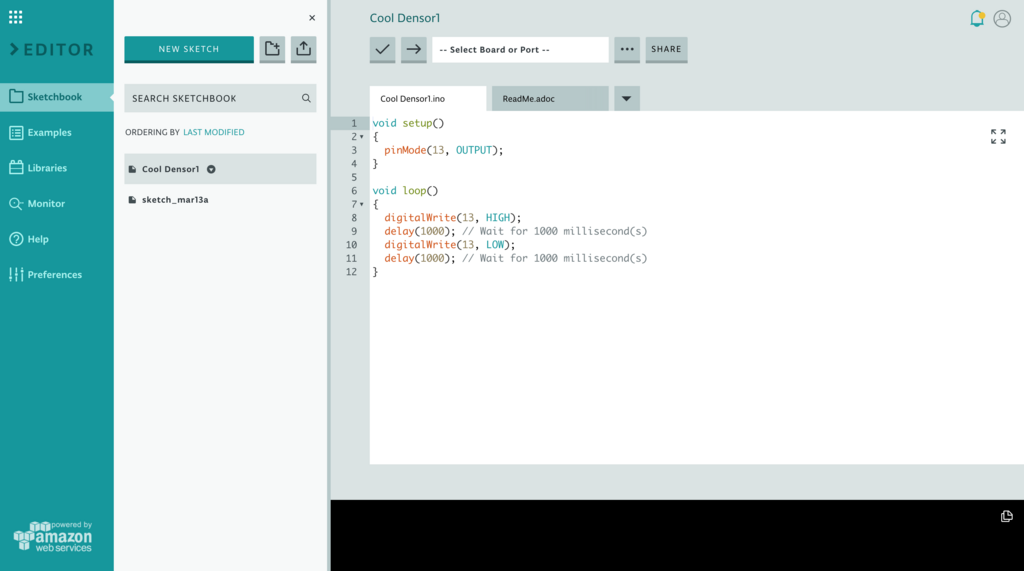
 これでエラーにならなければ無事アップロード完了ということで、下記のように Tinkercad からダウンロードしたコードが Web Editor にインポートされて表示されます。

f:id:akanuma-hiroaki:20180313084014p:plain:w450

回路作成と接続

 それでは実際に回路を作成します。 Tinkercad で作ったものと同様の回路を構成して、 USB で接続します。

f:id:akanuma-hiroaki:20180313084132j:plain:w450

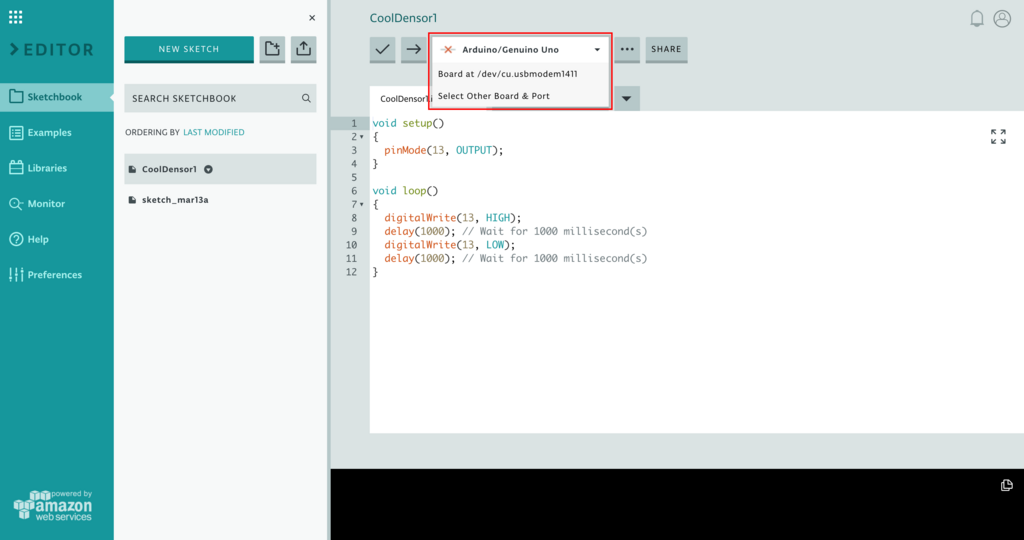
 Web Editor で、PCに接続しているボードとポートを選択します。プルダウンメニューから Board at 〜 もしくは Select Other Board & Port を選択します。

f:id:akanuma-hiroaki:20180313091600p:plain:w450

 Seeeduino は Arduino Uno 互換なので、 BOARDS から Arduino/Genuino Uno を選択します。 ポートは一台しか接続していなければ一つしか表示されないので、それを選択して、 OK をクリックします。

f:id:akanuma-hiroaki:20180313091616p:plain:w450

 画面上部の Verify ボタンを押して、ボードの選択が正しく行われているか確認します。 Success: Done verifying 〜 と表示されれば成功です。

f:id:akanuma-hiroaki:20180313091632p:plain:w450

動作確認

 それでは Upload ボタンを押して、ボードにスケッチをフラッシュします。 Success: Done uploading 〜 と表示されれば成功です。

f:id:akanuma-hiroaki:20180313091652p:plain:w450

 フラッシュ後は下記動画のようにLEDが点滅します。

まとめ

 Tinkercad で事前にシミュレーションすることで動作を確認した上で回路を組むことができますし、 Arduino Web Editor を使えばプラグインのインストール以外の環境構築も必要なく、手軽にプログラミングすることができました。 Seeeduino は価格的にも Arduino より安いですし、それでいて GROVE コネクタもついているので、色々と遊んでみたいと思います。

Voice Kit を Android Things で動かしてみる

f:id:akanuma-hiroaki:20180308074945p:plain:right

 Voice Kit は標準では Raspbian で動かしますが、 Android Things を使うこともできるということなので、試しに動かしてみました。 Voice Kit のページから Android Things のチュートリアルへのリンクが張られています。

*1


aiyprojects.withgoogle.com

 Android Things とはスマートフォンだけでなく IoT デバイスでも Android が動くように最適化されたもので、全てではないですが Android の API や SDK を使うことができます。逆に Android Things の API には各種センサーからデータを取得したり、ハードウェアを操作したりするための API が追加されていますので、 Android アプリ開発ができる方であれば同じスキルで IoT デバイスの開発ができそうです。ちなみに Android Things は現在まだ Developer Preview です。

developer.android.com

 Voice Kit を Android Things で動かすチュートリアルは下記で公開されています。

Android Things Assistant

Android Studio をインストール/アップデート

 Android アプリ開発には Android Studio を使いますが、 Android Things でも同様に Android Studio を使いますのでインストールします。 Android Things には Android Studio の 3.0 以上が必要なので、古いバージョンを使っている場合はアップデートします。私は 2系 だったのでアップデートしました。

developer.android.com

Android SDK をアップデート

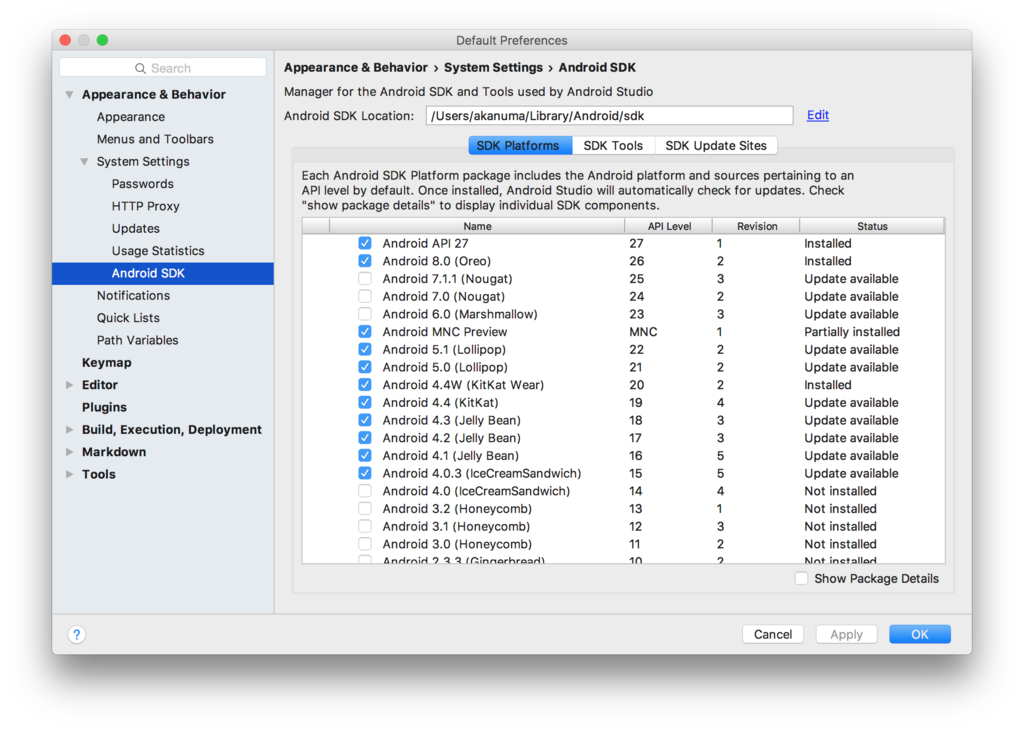
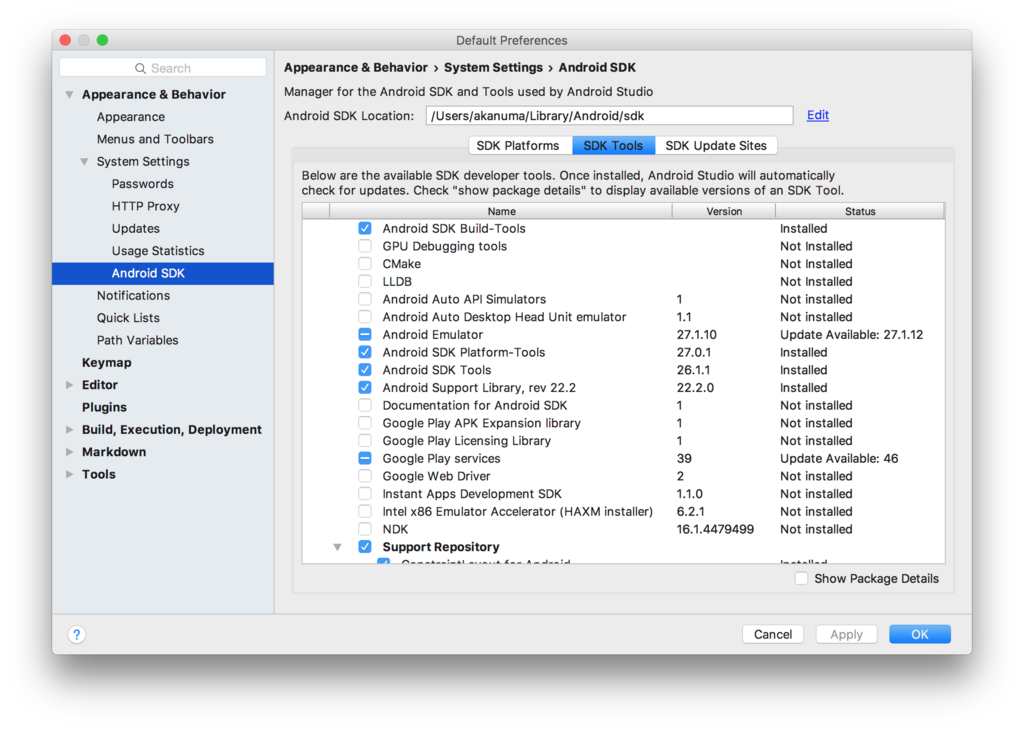
 SDK も古い場合にはアップデートが必要です。 SDK Tools は 25.0.3 以上、 SDK Platforms は Android 7.0(API24)以上が必要となりますので、 SDK Manager でアップデートします。

Update the IDE and SDK Tools | Android Studio

f:id:akanuma-hiroaki:20180306081242p:plain

f:id:akanuma-hiroaki:20180306081303p:plain

Android Things イメージの書き込み

 次に Android Things のイメージを microSDカードに書き込みます。 手順は下記にも公開されています。

Raspberry Pi 3 | Android Things

 Android Things ではイメージのダウンロードや書き込みを行ってくれるセットアップツールが用意されているので、まずはそちらをダウンロードするために Android Things コンソールにアクセスします。初めてアクセスした時は規約への同意を求められるので、チェックボックスにチェックを入れて CONTINUE をクリックします。

f:id:akanuma-hiroaki:20180306081903p:plain:w450

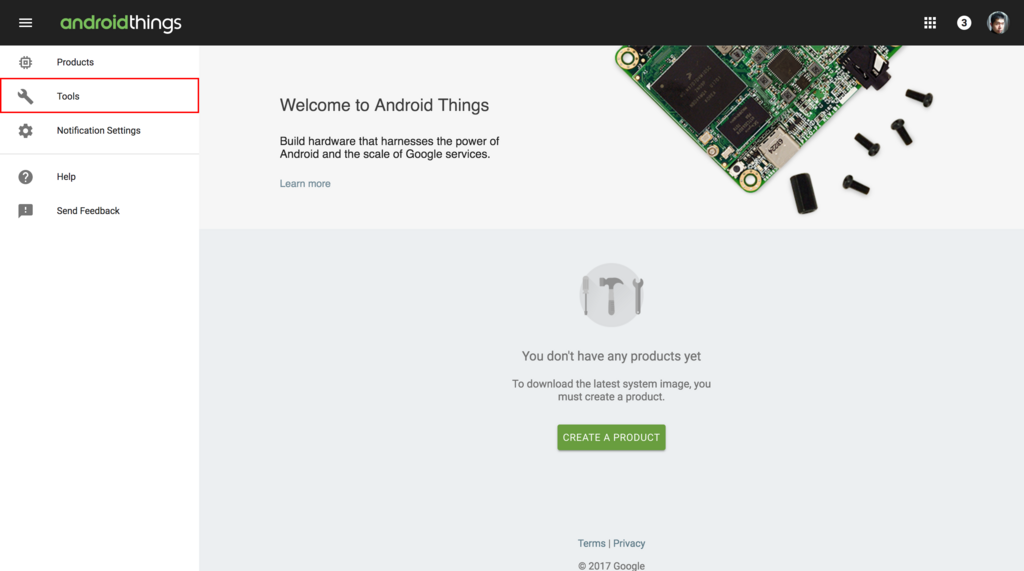
 コンソールが表示されたら左上のメニューから Tools をクリックします。

f:id:akanuma-hiroaki:20180306081918p:plain:w450

 Setup Utility の説明が表示されますので、 DOWNLOAD ボタンをクリックしてツールをダウンロードします。

f:id:akanuma-hiroaki:20180306081933p:plain:w450

 ダウンロードしたツールを解凍すると、下記のように各プラットフォーム向けのツールが用意されています。

$ ls -l Downloads/android-things-setup-utility/
total 40024
-rw-r--r--@ 1 akanuma  staff     1721 Jan 26 03:55 README.md
-rwxr-xr-x@ 1 akanuma  staff  6339237 Jan 26 03:54 android-things-setup-utility-linux
-rwxr-xr-x@ 1 akanuma  staff  7687540 Jan 26 03:54 android-things-setup-utility-macos
-rwxr-xr-x@ 1 akanuma  staff  6456832 Jan 26 03:54 android-things-setup-utility-windows.exe

 Macの場合は下記のようにファイル名末尾が macos になっているものを実行します。

$ sudo ~/Downloads/android-things-setup-utility/android-things-setup-utility-macos 

Android Things Setup Utility (version 1.0.18)
============================
This tool will help you install Android Things on your board and set up Wi-Fi.

 対話形式で設定を選択していきます。まずは新たに Android Things をインストールするか、既存の Android Things デバイスの Wi-Fi をセットアップするか聞かれるので、前者(1)を選択します。

What do you want to do?
1 - Install Android Things and optionally set up Wi-Fi
2 - Set up Wi-Fi on an existing Android Things device
1

 次にハードウェアの選択です。 Voice Kit の場合は Raspberry Pi なので、1 の Raspberry Pi 3 を選択します。すると必要なツールのダウンロードと解凍が行われます。

What hardware are you using?
1 - Raspberry Pi 3
2 - NXP Pico i.MX7D
3 - NXP Pico i.MX6UL
1
You chose Raspberry Pi 3.

Setting up required tools...
Fetching additional configuration...
Downloading platform tools...
5.45 MB/5.45 MB
Unzipping platform tools...
Finished setting up required tools.

 次にデフォルトのイメージかカスタムイメージを使うか聞かれます。初めて使う場合はデフォルトイメージを選択します。するとイメージのダウンロードと解凍が行われ、さらに SD カードにイメージを書き込むためのツールのダウンロードと解凍が行われます。

Do you want to use the default image or a custom image?
1 - Default image: Used for development purposes. No access to the Android
Things Console features such as metrics, crash reports, and OTA updates.
2 - Custom image: Provide your own image, enter the path to an image generated
and from the Android Things Console.
1
Downloading Android Things image...
274 MB/274 MB 
Unzipping image...

Downloading Etcher-cli, a tool to flash your SD card...
20.5 MB/20.5 MB
Unzipping Etcher-cli...

 ここまででイメージの準備ができました。SDカードを Mac のSDカードスロットに入れて Enter キーを押すように促されますので、イメージを書き込む microSD カードをスロットに入れて Enter を押します。

Plug the SD card into your computer. Press [Enter] when ready

Running Etcher-cli...

 ドライブの選択プロンプトが表示されます。複数の SD カードスロットがある場合は複数のドライブが表示されるかと思いますが、一つの場合はそのまま Enter を押します。

? Select drive /dev/disk2 (32.0 GB) - SD Card Reader

 選択したドライブの SD カードの内容は消去されますので、問題なければ Yes を入力して Enter します。すると実際に書き込みが行われます。

? This will erase the selected drive. Are you sure? Yes
Flashing [========================] 100% eta 0s  
Validating [========================] 100% eta 0s  
iot_rpi3.img was successfully written to SD Card Reader (/dev/disk2)
Checksum: c1891a15

If you have successfully installed Android Things on your SD card, you can now
put the SD card into the Raspberry Pi and power it up. Otherwise you can abort
and run the tool again.

 書き込みが終わると、続けて Wi-Fi のセットアップを行うか聞かれます。行う場合は y を選択します。

Would you like to set up Wi-Fi on this device? (y/n) y

 ここまで来たら Mac から microSD カードを抜いて Voice Kit に挿し、 LAN ケーブルで LAN に接続して起動します。起動したら Enter を押すと、 Mac から LAN 内の Android Things(Voice Kit)に接続し、 Wi-Fi のセットアップを続行します。

Please plug your Raspberry Pi to your router with an Ethernet cable, then press [Enter].


Attempting to connect to your Raspberry Pi at Android.local...
Connected to device through Ethernet.

 正しく接続されると接続先APの SSID とパスワードを聞かれるので入力します。Wi-Fi セットアップが成功すれば一通りセットアップは完了ですので、 Enter を押してセットアップツールを終了します。

Enter the Wi-Fi network name: xxxxxxxxxxxxxx
Enter the Wi-Fi network password (leave empty if no password): 
Connecting to Wi-Fi network xxxxxxxxxxxxxx...
Looking for device... This can take up to 3 minutes.
Device found.
Waiting...
Successfully connected to Wifi
Stopping adb server...
Stopped adb server...

Now that you’re set up, try sample projects in Android Studio or in the sample
repository here: https://developer.android.com/things/sdk/samples.html

To learn more about features like over-the-air updates, visit the Android Things
Console: https://partner.android.com/things/console

Press [Enter] to quit.

 セットアップが終了したら一度 Voice Kit を再起動しておくのが良いかと思います。

adb での接続

 adb で Voice Kit に接続します。 IP アドレス指定でも接続できますが、マルチキャストDNSで Android.local というホスト名でも接続することができるようになっています。

$ adb connect Android.local
connected to Android.local:5555

サンプルコードの取得

 チュートリアルではサンプルコードが提供されていますので、今回はとりあえずそれを動かして見ます。 github から git clone で取得します。

$ git clone https://github.com/googlecodelabs/androidthings-googleassistant.git
Cloning into 'androidthings-googleassistant'...
remote: Counting objects: 338, done.
remote: Total 338 (delta 0), reused 0 (delta 0), pack-reused 338
Receiving objects: 100% (338/338), 117.37 KiB | 0 bytes/s, done.
Resolving deltas: 100% (101/101), done.
Checking connectivity... done.

認証情報の取得

 Google Assistant の API を使うためには API の有効化と認証情報の取得が必要になります。チュートリアル内でも紹介されていますが、私が最初に Voice Kit を試した時のサンプルコード実行時にも同様のことを行なっていますのでご参照ください。 assistant.json というファイル名で認証情報を保存しておきます。

blog.akanumahiroaki.com

認証実行

 まずは認証用のツールを pip でインストールします。

$ pip install google-auth-oauthlib[tool]

 続いてツールを使って認証を行います。 --client-secrets オプションには先ほど保存した認証情報のファイルパスを指定します。

$ google-oauthlib-tool --client-secrets assistant.json \
>                        --credentials shared/src/main/res/raw/credentials.json \
>                        --scope https://www.googleapis.com/auth/assistant-sdk-prototype \
>                        --save --headless
Please visit this URL to authorize this application: https://accounts.google.com/o/oauth2/auth?response_type=code&client_id=XXXXXXXXXXXX-v9m9nb4bgdp58qk159cghm1ketnvin5t.apps.googleusercontent.com&redirect_uri=urn%3Aietf%3Awg%3Aoauth%3A2.0%3Aoob&scope=https%3A%2F%2Fwww.googleapis.com%2Fauth%2Fassistant-sdk-prototype&state=QBeuos2rtESJnJ9TEjX6sp1xaAFKaV&prompt=consent&access_type=offline

 表示されたURLにブラウザからアクセスし、表示される認証コードをコピーして入力します。正しく認証されれば credentials.json というファイルが作成されます。

Enter the authorization code: 4/AAAXXXXXXXXXXXXXXXXXXXXXXXXXXXXXXXXXXXXXXXXXXXXXXXXXXXX
credentials saved: shared/src/main/res/raw/credentials.json

サンプルコードの実行

 git clone したサンプルコード androidthings-googleassistant を Android Studio にインポートします。ライブラリの不足がなければ下記のように Gradle でのビルドが行われます。

21:20    Gradle sync started
21:21   Project setup started
21:21   Gradle sync finished in 45s 764ms
21:21   Executing tasks: [:shared:generateDebugSources, :shared:generateDebugAndroidTestSources, :shared:mockableAndroidJar, :step1-start-here:generateDebugSources, :step1-start-here:generateDebugAndroidTestSources, :step1-start-here:mockableAndroidJar, :step2-volume-control:generateDebugSources, :step2-volume-control:generateDebugAndroidTestSources, :step2-volume-control:mockableAndroidJar, :step3-conversational-state:generateDebugSources, :step3-conversational-state:generateDebugAndroidTestSources, :step3-conversational-state:mockableAndroidJar]
21:21   Gradle build finished in 22s 828ms

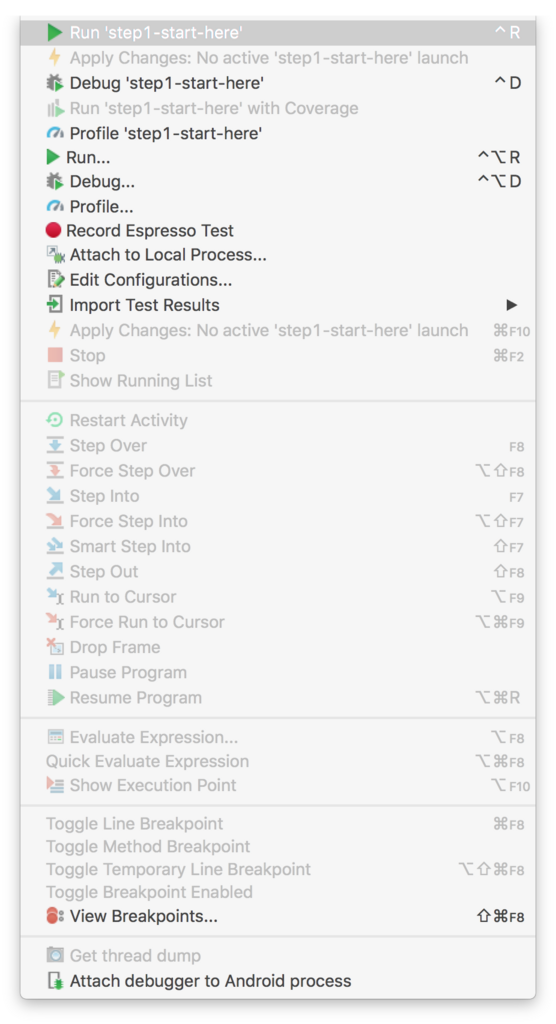
 ビルドが終わったらサンプルコードを実行してみます。 step1, 2, 3 が用意されていますが、今回はとりあえず step1 を実行してみます。 step1 は Google Assitant の基本的なデモです。 Android Studio の Run メニューから Run 'step1-start-here' を選択します。選択肢にないときは Run... から選択します。

f:id:akanuma-hiroaki:20180307083756p:plain:w300

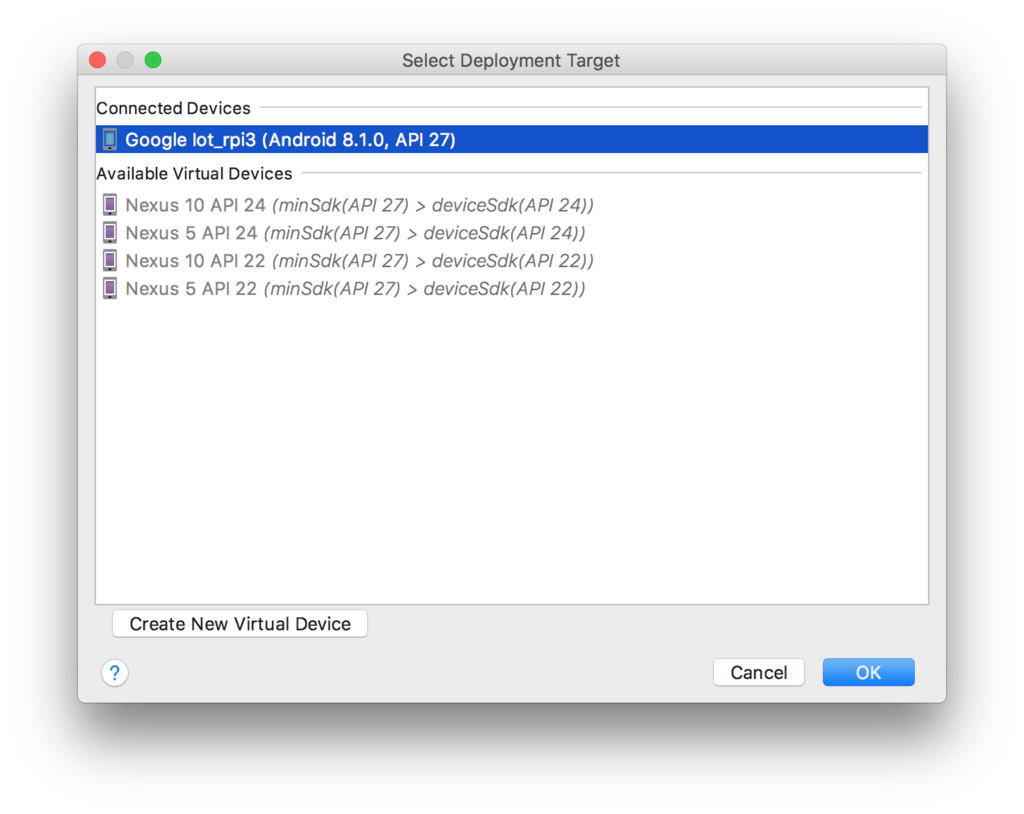
 対象のデバイスとして Voice Kit を選択します。デバイス名は Google Iot_rpi3 となっています。

f:id:akanuma-hiroaki:20180307083809p:plain

 私の場合は初回実行時は下記のようにエラーになってしまいました。

03/04 21:32:50: Launching step1-start-here
$ adb shell am start -n "com.example.androidthings.assistant/com.example.androidthings.assistant.AssistantActivity" -a android.intent.action.MAIN -c android.intent.category.LAUNCHER
Client not ready yet..Waiting for process to come online
Connected to process 4115 on device google-iot_rpi3-Android.local:5555
Capturing and displaying logcat messages from application. This behavior can be disabled in the "Logcat output" section of the "Debugger" settings page.
I/InstantRun: starting instant run server: is main process
I/AssistantActivity: starting assistant demo
D/AssistantActivity: enumerating devices
I/AssistantActivity: initializing DAC trigger
I/AssistantActivity: setting volume to: 15
D/AudioTrack: Client defaulted notificationFrames to 460 for frameCount 1380
E/AudioRecord: AudioFlinger could not create record track, status: -1
E/AudioRecord-JNI: Error creating AudioRecord instance: initialization check failed with status -1.
E/android.media.AudioRecord: Error code -20 when initializing native AudioRecord object.
D/AndroidRuntime: Shutting down VM
E/AndroidRuntime: FATAL EXCEPTION: main
                  Process: com.example.androidthings.assistant, PID: 4115
                  java.lang.RuntimeException: Unable to start activity ComponentInfo{com.example.androidthings.assistant/com.example.androidthings.assistant.AssistantActivity}: java.lang.UnsupportedOperationException: Cannot create AudioRecord
                      at android.app.ActivityThread.performLaunchActivity(ActivityThread.java:2778)
                      at android.app.ActivityThread.handleLaunchActivity(ActivityThread.java:2856)
                      at android.app.ActivityThread.-wrap11(Unknown Source:0)
                      at android.app.ActivityThread$H.handleMessage(ActivityThread.java:1589)
                      at android.os.Handler.dispatchMessage(Handler.java:106)
                      at android.os.Looper.loop(Looper.java:164)
                      at android.app.ActivityThread.main(ActivityThread.java:6494)
                      at java.lang.reflect.Method.invoke(Native Method)
                      at com.android.internal.os.RuntimeInit$MethodAndArgsCaller.run(RuntimeInit.java:438)
                      at com.android.internal.os.ZygoteInit.main(ZygoteInit.java:807)
                   Caused by: java.lang.UnsupportedOperationException: Cannot create AudioRecord
                      at android.media.AudioRecord$Builder.build(AudioRecord.java:626)
                      at com.example.androidthings.assistant.AssistantActivity.onCreate(AssistantActivity.java:342)
                      at android.app.Activity.performCreate(Activity.java:7000)
                      at android.app.Activity.performCreate(Activity.java:6991)
                      at android.app.Instrumentation.callActivityOnCreate(Instrumentation.java:1214)
                      at android.app.ActivityThread.performLaunchActivity(ActivityThread.java:2731)
                      at android.app.ActivityThread.handleLaunchActivity(ActivityThread.java:2856) 
                      at android.app.ActivityThread.-wrap11(Unknown Source:0) 
                      at android.app.ActivityThread$H.handleMessage(ActivityThread.java:1589) 
                      at android.os.Handler.dispatchMessage(Handler.java:106) 
                      at android.os.Looper.loop(Looper.java:164) 
                      at android.app.ActivityThread.main(ActivityThread.java:6494) 
                      at java.lang.reflect.Method.invoke(Native Method) 
                      at com.android.internal.os.RuntimeInit$MethodAndArgsCaller.run(RuntimeInit.java:438) 
                      at com.android.internal.os.ZygoteInit.main(ZygoteInit.java:807) 
I/Process: Sending signal. PID: 4115 SIG: 9
Application terminated.

 少し調べたところ、セットアップ後は一度 Voice Kit を再起動する必要があるようなので、再起動後に再度実行すると下記のようにエラーなく実行できました。

03/04 21:37:33: Launching step1-start-here
$ adb install-multiple -r -t /Users/akanuma/workspace/androidthings-googleassistant/step1-start-here/build/intermediates/split-apk/debug/dep/dependencies.apk /Users/akanuma/workspace/androidthings-googleassistant/step1-start-here/build/intermediates/split-apk/debug/slices/slice_1.apk /Users/akanuma/workspace/androidthings-googleassistant/step1-start-here/build/intermediates/split-apk/debug/slices/slice_7.apk /Users/akanuma/workspace/androidthings-googleassistant/step1-start-here/build/intermediates/split-apk/debug/slices/slice_6.apk /Users/akanuma/workspace/androidthings-googleassistant/step1-start-here/build/intermediates/split-apk/debug/slices/slice_8.apk /Users/akanuma/workspace/androidthings-googleassistant/step1-start-here/build/intermediates/split-apk/debug/slices/slice_9.apk /Users/akanuma/workspace/androidthings-googleassistant/step1-start-here/build/intermediates/split-apk/debug/slices/slice_4.apk /Users/akanuma/workspace/androidthings-googleassistant/step1-start-here/build/intermediates/split-apk/debug/slices/slice_5.apk /Users/akanuma/workspace/androidthings-googleassistant/step1-start-here/build/intermediates/split-apk/debug/slices/slice_0.apk /Users/akanuma/workspace/androidthings-googleassistant/step1-start-here/build/intermediates/split-apk/debug/slices/slice_3.apk /Users/akanuma/workspace/androidthings-googleassistant/step1-start-here/build/intermediates/split-apk/debug/slices/slice_2.apk /Users/akanuma/workspace/androidthings-googleassistant/step1-start-here/build/outputs/apk/debug/step1-start-here-debug.apk 
Split APKs installed
$ adb shell am start -n "com.example.androidthings.assistant/com.example.androidthings.assistant.AssistantActivity" -a android.intent.action.MAIN -c android.intent.category.LAUNCHER
Client not ready yet..Waiting for process to come online
Waiting for process to come online
Connected to process 1366 on device google-iot_rpi3-Android.local:5555
Capturing and displaying logcat messages from application. This behavior can be disabled in the "Logcat output" section of the "Debugger" settings page.
I/AssistantActivity: starting assistant demo
D/AssistantActivity: enumerating devices
I/AssistantActivity: initializing DAC trigger
I/AssistantActivity: setting volume to: 15
D/AudioTrack: Client defaulted notificationFrames to 460 for frameCount 1380
D/NetworkSecurityConfig: No Network Security Config specified, using platform default
D/vndksupport: Loading /vendor/lib/hw/android.hardware.graphics.mapper@2.0-impl.so from current namespace instead of sphal namespace.

 ここまで行けば Google Assistant を試すことができるようになっています。このサンプルでは Voice Kit のボタンを押している間は発話を受け付けてくれますので、ボタンを押したまま "What time is it now?" などと話してボタンを離すと、 Google Assistant が回答してくれます。

まとめ

 今回はとりあえずサンプルコードを一つ動かしてみただけですが、最初のセットアップさえ終わってしまえばコードを実行するときもスマートフォンアプリを開発するときと同じように Android Studio から動かすことができますので、 Android アプリ開発が得意な人には良さそうです。実際に作り込んでいった時にどこまで API が対応しているのかはまだわかってませんが、今後正式版になれば良い選択肢の一つになるかもしれません。

*1:Android ロボットは、Google が作成および提供している作品から複製または変更したものであり、Creative Commons 3.0 Attribution ライセンスに記載された条件に従って使用しています。

Voice Kit + Dialogflow で来客受付システム

 前回は Voice Kit と Web カメラで簡単な対話を行う処理を実装してみましたが、単語での回答に対してテキストマッチングするだけのものだったので、今回はもっと対話的な処理を行えるよう、 Dialogflow と組み合わせて会社の受付システムを想定したものを実装してみたいと思います。

 実装する処理としては、Webカメラで来客を検知したら、名前と社名、誰とのアポイントメントか、人数は何人かを聞いて、 Slack で画像をポストするというものです。

f:id:akanuma-hiroaki:20180303094131j:plain:w450

Dialogflow API 利用設定

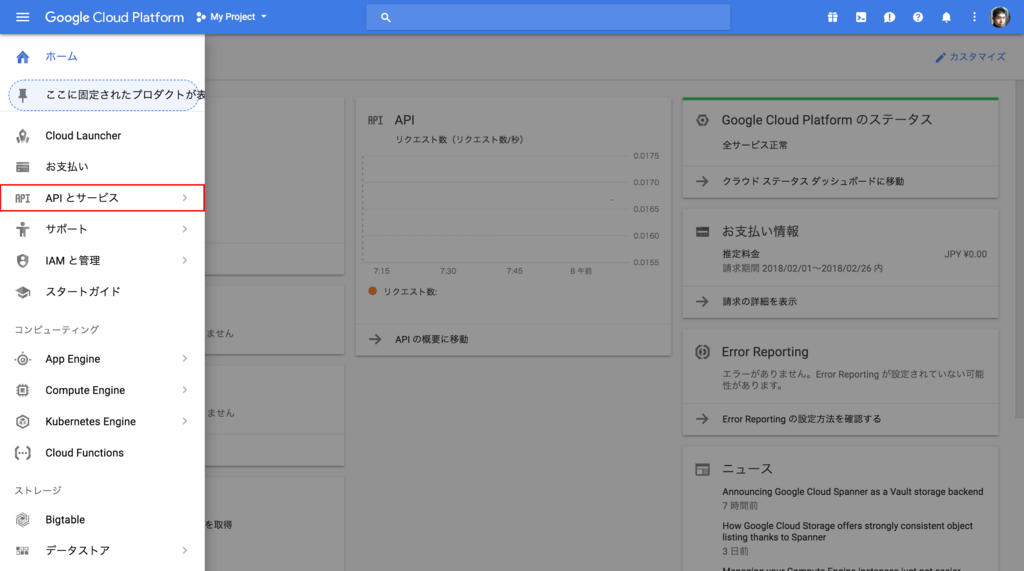
 Dialogflow の API を初めて使う時は、利用を許可するための設定が必要になります。 GCP のコンソールのメニューから APIとサービス をクリックします。
f:id:akanuma-hiroaki:20180302201705p:plain:w450

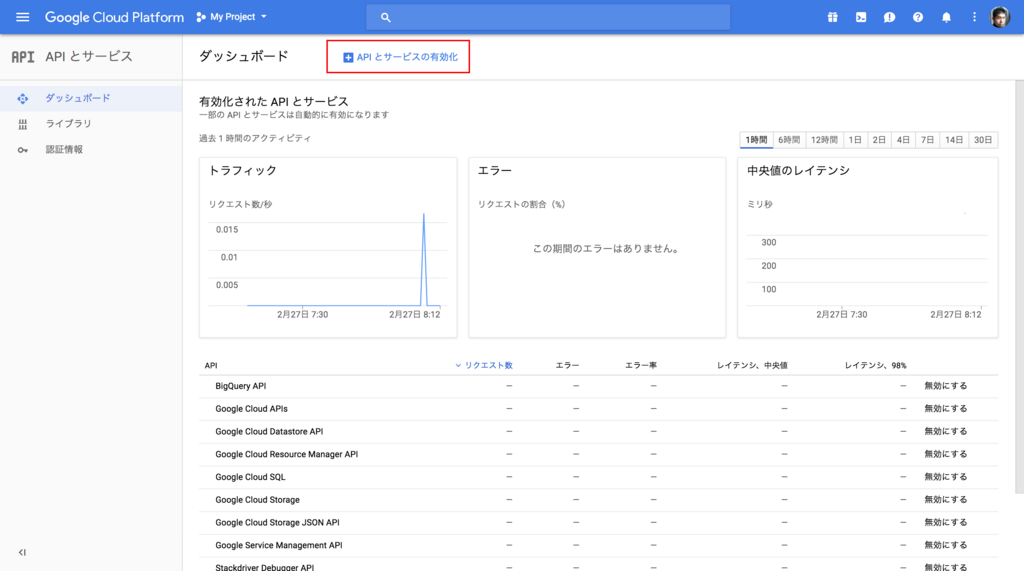
 次に画面上部の API とサービスの有効化 をクリックします。

f:id:akanuma-hiroaki:20180302201813p:plain:w450

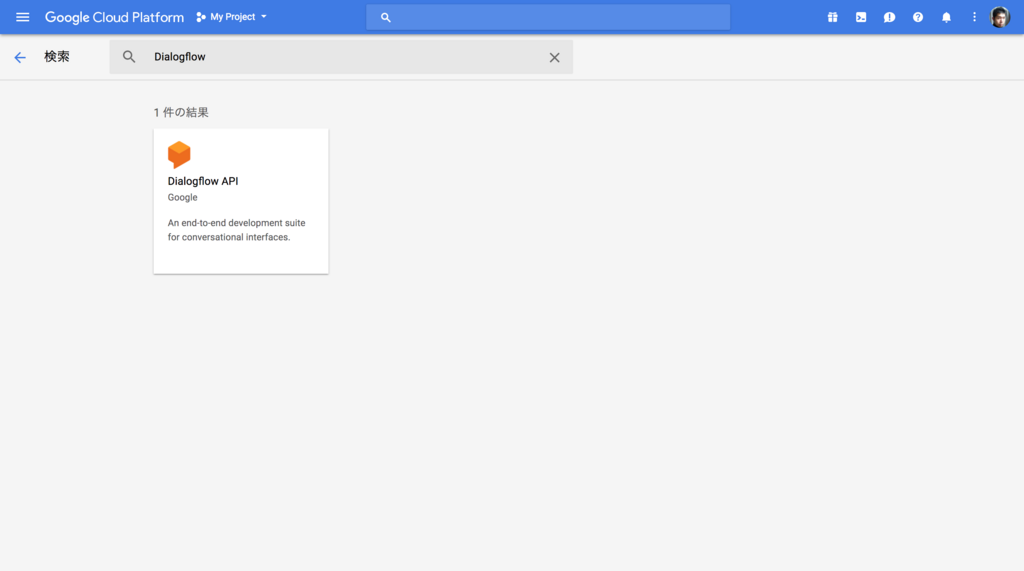
 API のリストの中から Dialogflow を検索してクリックします。
f:id:akanuma-hiroaki:20180302201830p:plain:w450

 API の詳細画面で 有効にする をクリックして API を有効化します。
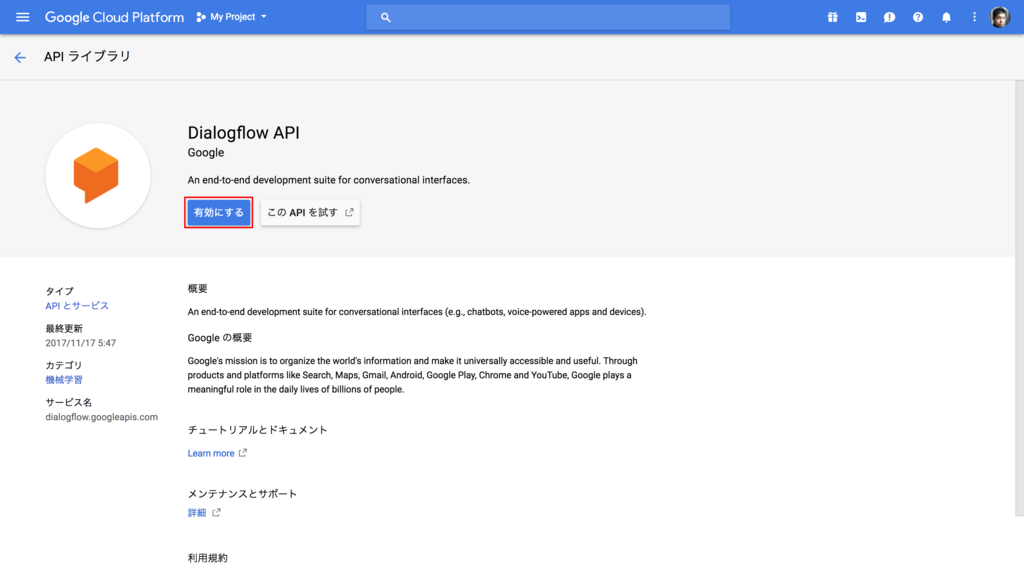
f:id:akanuma-hiroaki:20180302201848p:plain:w450

 次に認証キーを作成する必要がありますので、メニューから 認証情報 をクリックします。
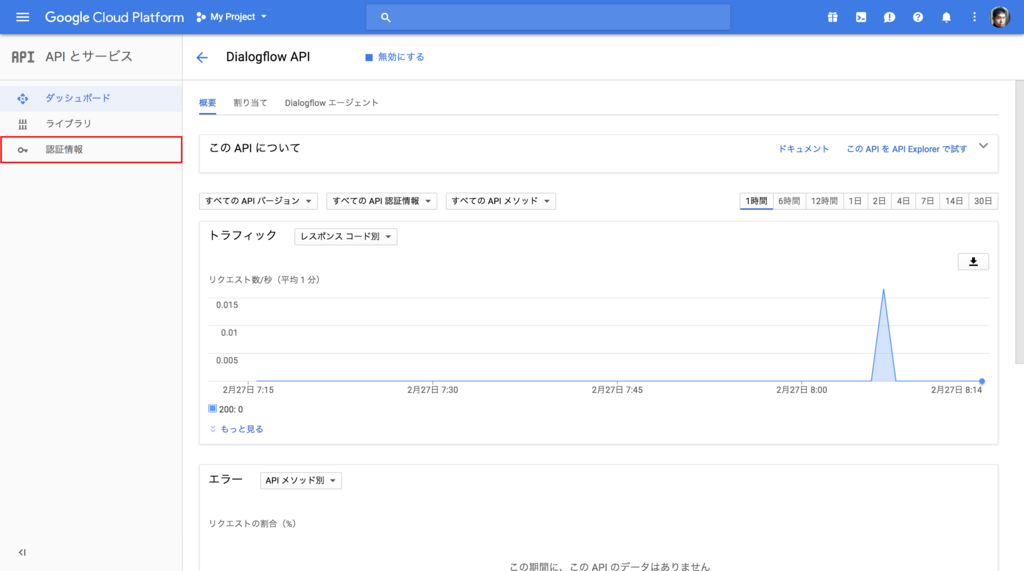
f:id:akanuma-hiroaki:20180302201907p:plain:w450

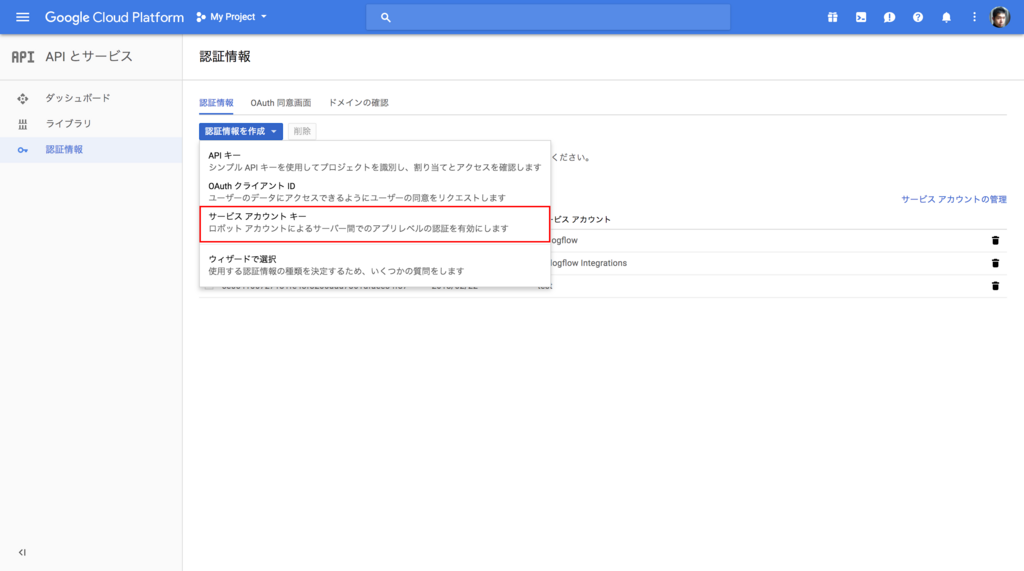
 認証情報を作成 プルダウンから、 サービスアカウントキー を選択します。

f:id:akanuma-hiroaki:20180302201926p:plain:w450

 下記のスクリーンショットのように情報を入力して 作成 をクリックします。すると認証情報の json ファイルがダウンロードされますので、ダウンロードして Voice Kit(Raspberry Pi)上に配置しておきます。
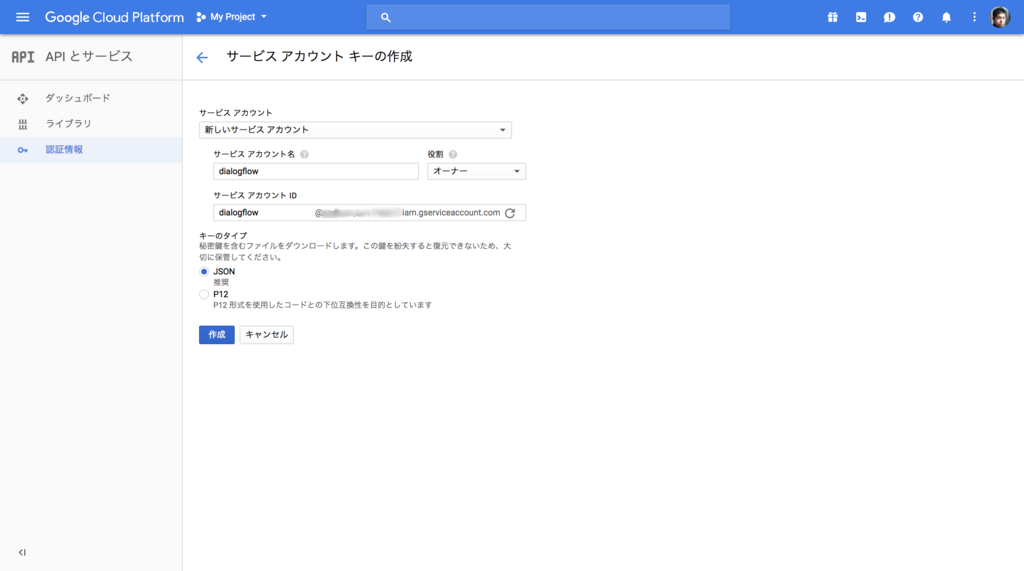
f:id:akanuma-hiroaki:20180302201944p:plain:w450

 以上で Dialogflow の API の有効化は完了です。

Dialogflow API の Python クライアント インストール

 今回は Dialogflow の API を Python スクリプトから使用します。 Python 用のクライアントが提供されていますので、こちらをインストールします。ちなみに Dialogflow の API には Version 1 と 2 があり、今回は 2 を使用します。

github.com

 ドキュメントはこちらにあります。

Dialogflow: Python Client — dialogflow 0.1.0 documentation

 AIY プロジェクトのスクリプト実行用のシェルを起動して、 pip でインストールします。

$ bin/AIY-projects-shell.sh 
$ pip3 install dialogflow

Dialogflow の Agent 作成

 それでは発話内容に対応して対話を行うための Dialogflow の設定をします。 Dialogflowコンソールから Agent を新規に作成します。作成した Agent の情報は下記のようになります。 API の Version は 2 を使うように設定しておきます。
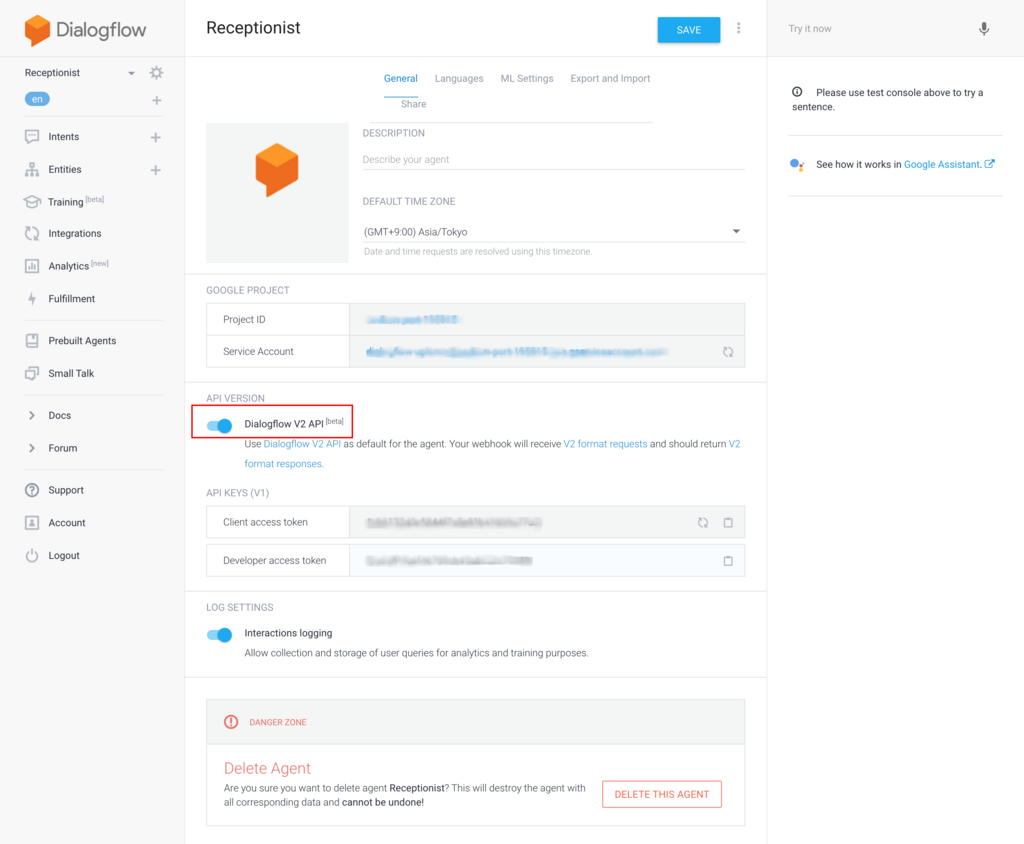
f:id:akanuma-hiroaki:20180302210159p:plain:w450

 次に各発話に対応する Intent を作成していきます。今回はひとまず最低限の内容を実装して動作させてみたいと思います。まずは WelcomeIntent は下記のように設定します。単純に来訪者に名前を言ってもらえるように促しているだけになります。
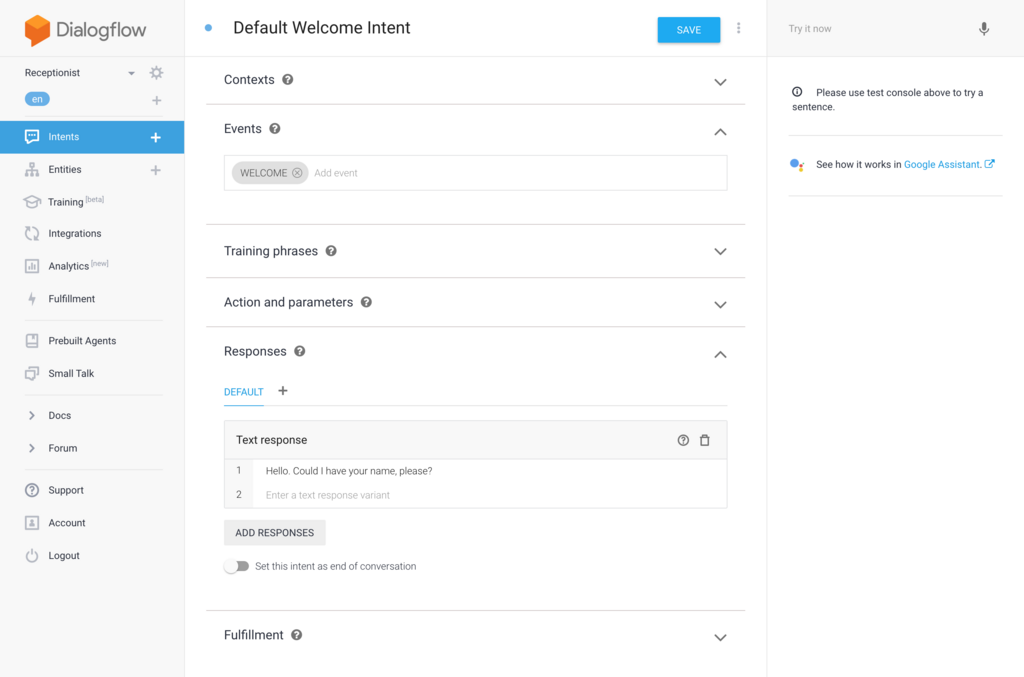
f:id:akanuma-hiroaki:20180302210308p:plain:w450

 名前と社名を言ってもらった場合に対応するための NameIntent を作成します。実際は様々なパターンの発話を考慮すべきですが、今回はとりあえず1パターンだけ用意してみます。ゲストの名前と会社名は対話後にも使用したいので Output Context にパラメータを追加して、他の Intent と共有されるようにしておきます。そしてレスポンスで誰とのアポイントメントなのかを言ってもらえるように促します。
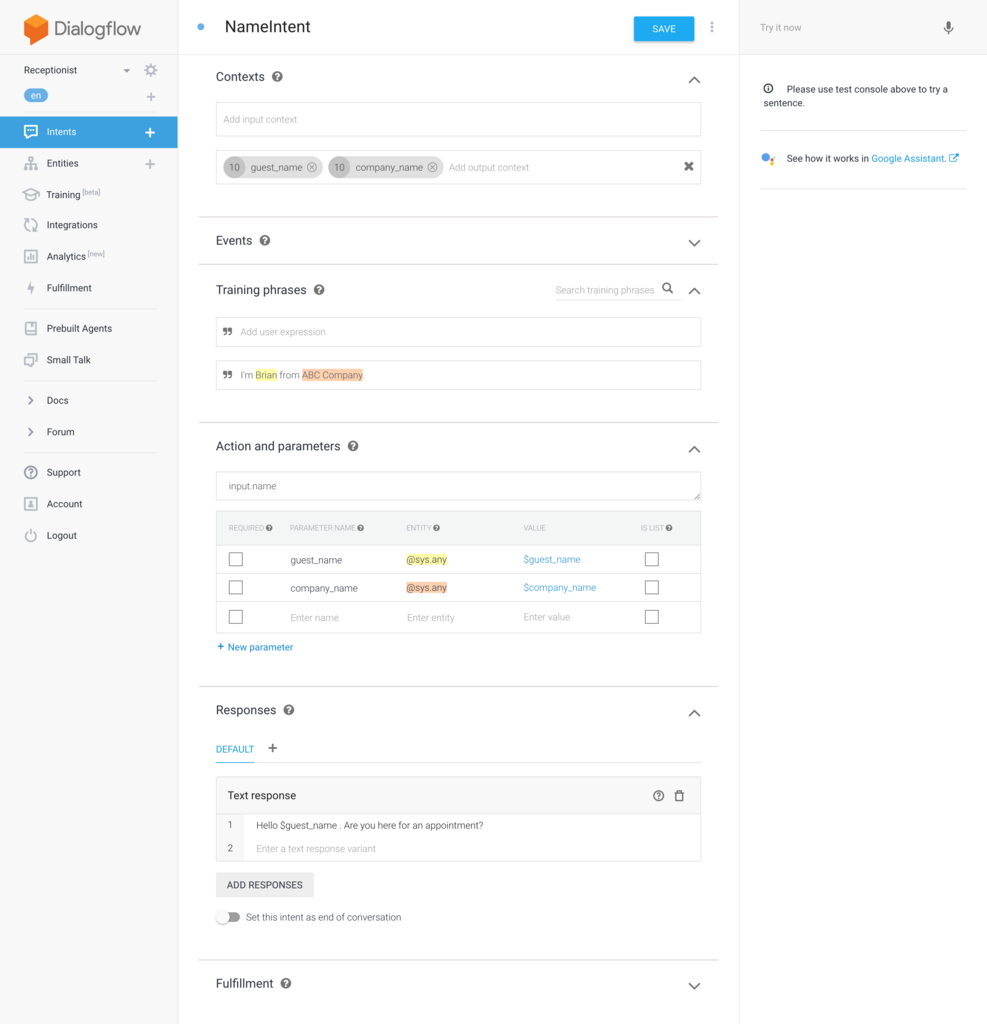
f:id:akanuma-hiroaki:20180302210326p:plain:w450

 誰とのアポイントメントなのかを言ってもらった場合に対応するための AppointmentIntent を作成します。こちらもとりあえず1パターンの発話だけ対応させておきます。 Output Context には訪問先の社員名を保存しておきます。
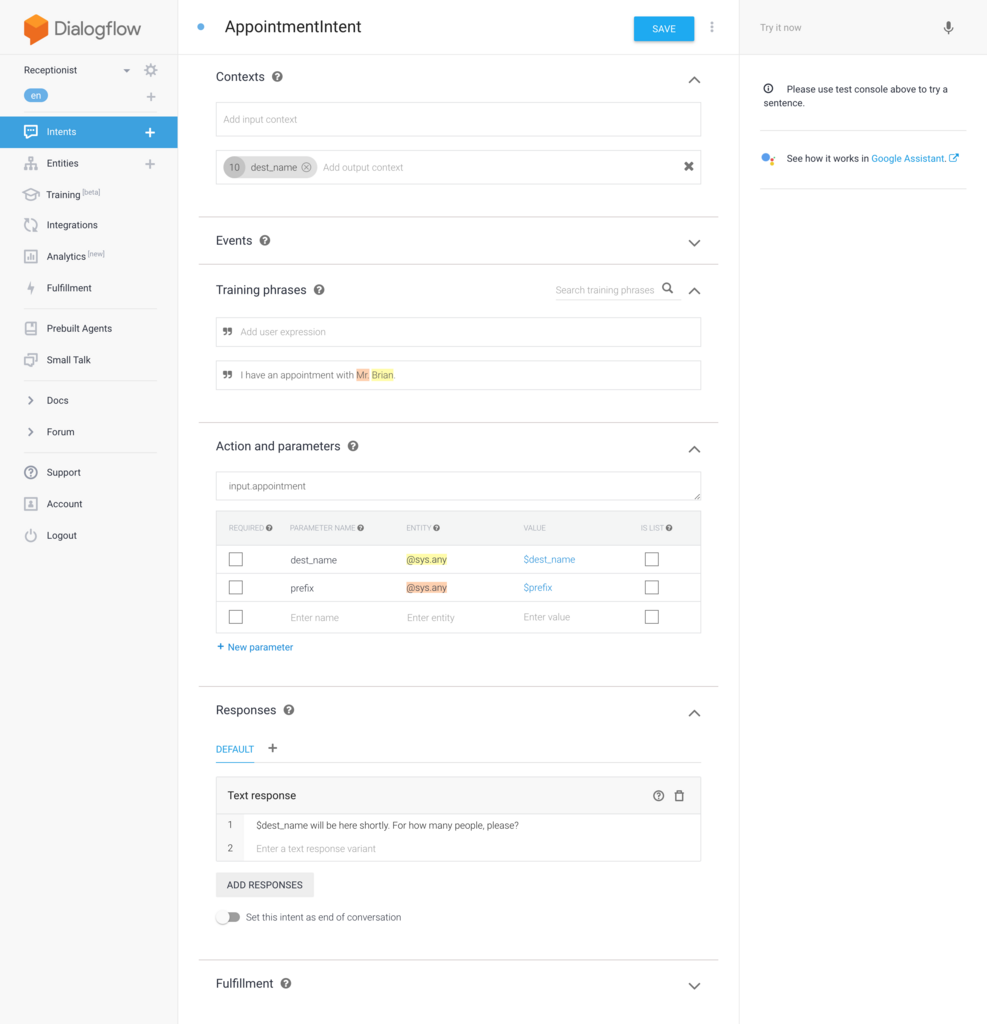
f:id:akanuma-hiroaki:20180302210346p:plain:w450

 最後に人数は何名かを言ってもらった場合の PeopleCountIntent を作成します。人数情報は Output Context に保存します。そしてこの Intent のレスポンスで対話は終了する想定なので、 Set this intent as end of confersation にチェックを入れておきます。
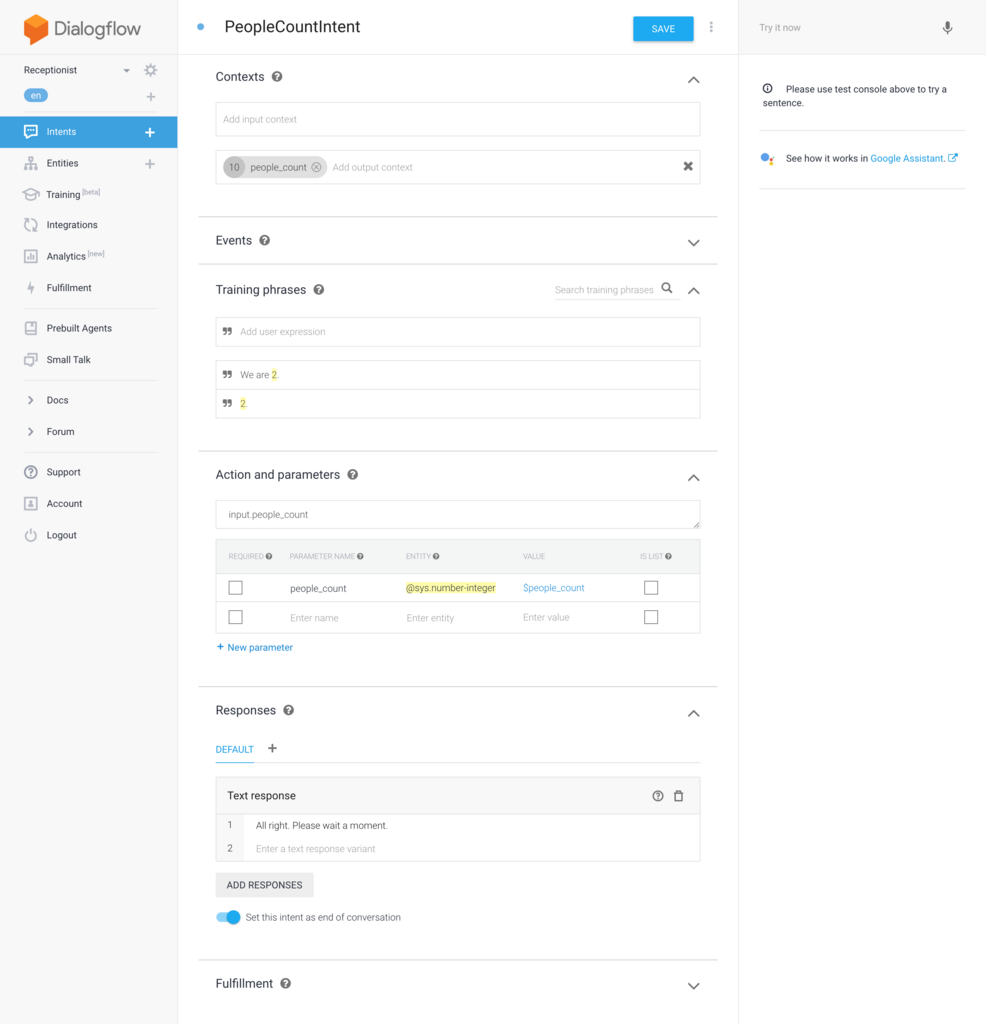
f:id:akanuma-hiroaki:20180302210408p:plain:w450

 以上が最低限の Intent の実装となります。

Voice Kit 上の Python スクリプトの実装

 上記で作成した Dialogflow の Agent に対応する Python スクリプトを実装します。まずはコード全体を掲載しておきます。

#!/usr/bin/env python3

import sys
import uuid
import cv2
import dialogflow
import aiy.audio
import aiy.cloudspeech
import aiy.voicehat
from slackclient import SlackClient

class Receptionist:
    def __init__(self):
        self.project_id = 'xxxxxx-xxxx-xxxxxx'
        self.client_access_token = 'xxxxxxxxxxxxxxxxxxxxxxxxxxxxxxxx'
        self.language_code = 'en'
        self.session_client = dialogflow.SessionsClient()
        self.final_intent_name = 'PeopleCountIntent'

        self.face_cascade = cv2.CascadeClassifier('/home/pi/AIY-projects-python/src/examples/voice/haarcascade_frontalface_default.xml')
        self.guest_image_file = 'guest.jpg'

        self.recognizer = aiy.cloudspeech.get_recognizer()
        aiy.audio.get_recorder().start()

        self.status_ui = aiy.voicehat.get_status_ui()

        slack_token = 'xxxx-xxxxxxxxxx-xxxxxxxxxx-xxxxxxxxxxx-xxxxxxxxxx'
        self.slack_client = SlackClient(slack_token)

    def send_welcome_request(self, session):
        event_input = dialogflow.types.EventInput(name = 'WELCOME', language_code = self.language_code)
        query_input = dialogflow.types.QueryInput(event = event_input)
        return self.send_request(session, query_input)

    def send_text_request(self, session, text):
        text_input = dialogflow.types.TextInput(text = text, language_code = self.language_code)
        query_input = dialogflow.types.QueryInput(text = text_input)
        return self.send_request(session, query_input)

    def send_request(self, session, query_input):
        response = self.session_client.detect_intent(session = session, query_input = query_input)

        print('=' * 20)
        print('Query text: {}'.format(response.query_result.query_text))
        print('Detected intent: {} (confidence: {})'.format(
            response.query_result.intent.display_name,
            response.query_result.intent_detection_confidence))
        print('Fulfillment text: {}'.format(response.query_result.fulfillment_text))
        print('-' * 20)

        return response

    def detect_face(self, cap):
        self.status_ui.status('ready')
        while(True):
            ret, frame = cap.read()
            gray = cv2.cvtColor(frame, cv2.COLOR_BGR2GRAY)
            faces = self.face_cascade.detectMultiScale(gray, 1.3, 5)
            for (x, y, w, h) in faces:
                frame = cv2.rectangle(frame, (x, y), (x+w, y+h), (255, 0, 0), 2)
            cv2.imshow('frame', frame)
            if cv2.waitKey(1) & 0xff == ord('q'):
                cap.release()
                cv2.destroyAllWindows()
                sys.exit(1)
            if len(faces) > 0:
                cv2.imwrite(self.guest_image_file, frame)
                break

    def post_to_slack(self, response):
        output_contexts = response.query_result.output_contexts[0]
        guest_name = output_contexts.parameters['guest_name']
        company_name = output_contexts.parameters['company_name']
        dest_name = output_contexts.parameters['dest_name']
        people_count = output_contexts.parameters['people_count']
        comment = '%s from %s is coming for %s with %d people.' % (guest_name, company_name, dest_name, int(people_count))

        with open(self.guest_image_file, 'rb') as guest_image:
            self.slack_client.api_call(
                'files.upload',
                channels = '#akanuma_private',
                file = guest_image,
                filetype = 'jpg',
                filename = self.guest_image_file,
                initial_comment = comment
            )


    def main(self):
        while(True):
            cap = cv2.VideoCapture(0)
            self.detect_face(cap)

            session_id = uuid.uuid4().hex
            session = self.session_client.session_path(self.project_id, session_id)
            response = self.send_welcome_request(session)
            aiy.audio.say(response.query_result.fulfillment_text)

            while(True):
                self.status_ui.status('listening')
                text = self.recognizer.recognize()
                if not text:
                    aiy.audio.say('Sorry, I did not hear you.')
                    continue

                print('You said: %s' % text)
                response = self.send_text_request(session, text)
                aiy.audio.say(response.query_result.fulfillment_text)

                if response.query_result.intent.display_name == self.final_intent_name:
                    break

            self.post_to_slack(response)

            cv2.waitKey(3000)
            cap.release()

if __name__ == '__main__':
    receptionist = Receptionist()
    receptionist.main()

 まずコンストラクタでは各種トークン情報の保持や Dialogflow クライアントのインスタンス、顔認識用の検出器のインスタンス、 Slack のクライアントのインスタンスの作成などをしています。本当は各種トークンはコード内にハードコードすべきではありませんが、今回はとりあえず簡単に試すためにハードコードしてしまっています。

def __init__(self):
    self.project_id = 'xxxxxx-xxxx-xxxxxx'
    self.client_access_token = 'xxxxxxxxxxxxxxxxxxxxxxxxxxxxxxxx'
    self.language_code = 'en'
    self.session_client = dialogflow.SessionsClient()
    self.final_intent_name = 'PeopleCountIntent'

    self.face_cascade = cv2.CascadeClassifier('/home/pi/AIY-projects-python/src/examples/voice/haarcascade_frontalface_default.xml')
    self.guest_image_file = 'guest.jpg'

    self.recognizer = aiy.cloudspeech.get_recognizer()
    aiy.audio.get_recorder().start()

    self.status_ui = aiy.voicehat.get_status_ui()

    slack_token = 'xxxx-xxxxxxxxxx-xxxxxxxxxx-xxxxxxxxxxx-xxxxxxxxxx'
    self.slack_client = SlackClient(slack_token)

 以降は main() メソッドの処理の順番に沿って説明します。まずは顔検出処理を実行し、受付にゲストが来て顔が検出されたらその時の画像を保存して、後続の処理に移ります。顔検出処理の内容については前回までとほぼ同様ですので、詳細は割愛します。

def detect_face(self, cap):
    self.status_ui.status('ready')
    while(True):
        ret, frame = cap.read()
        gray = cv2.cvtColor(frame, cv2.COLOR_BGR2GRAY)
        faces = self.face_cascade.detectMultiScale(gray, 1.3, 5)
        for (x, y, w, h) in faces:
            frame = cv2.rectangle(frame, (x, y), (x+w, y+h), (255, 0, 0), 2)
        cv2.imshow('frame', frame)
        if cv2.waitKey(1) & 0xff == ord('q'):
            cap.release()
            cv2.destroyAllWindows()
            sys.exit(1)
        if len(faces) > 0:
            cv2.imwrite(self.guest_image_file, frame)
            break

 顔が検出されたら対話処理を開始するために、 Dialogflow の WelcomeIntent へのリクエストを送信します。 WelcomeIntent のトリガーは他の Intent と違って発話ではないので、 WELCOME イベントで処理を開始するため、 EventInput のインスタンスを作成し、 QueryInput に渡します。

def send_welcome_request(self, session):
    event_input = dialogflow.types.EventInput(name = 'WELCOME', language_code = self.language_code)
    query_input = dialogflow.types.QueryInput(event = event_input)
    return self.send_request(session, query_input)

 そして Query の内容で Intent を判定する detect_intent() メソッドを実行してレスポンスを取得します。

def send_request(self, session, query_input):
    response = self.session_client.detect_intent(session = session, query_input = query_input)

 発話に応じたリクエストを投げる場合は EventInput の代わりに TextInput を使用します。それ以外の流れはイベントをトリガーする場合と同様です。

def send_text_request(self, session, text):
    text_input = dialogflow.types.TextInput(text = text, language_code = self.language_code)
    query_input = dialogflow.types.QueryInput(text = text_input)
    return self.send_request(session, query_input)

 発話に対応する処理は複数回になるため、ゲストからの発話を受け取ったら CloudSpeech API によってテキスト化し、 Dialogflow へのリクエスト送信、レスポンスとして受け取ったメッセージを発話するという流れをループで繰り返します。対話の終了判定は処理を返した Intent が最後の Intent (今回は PeopleCountIntent) だったらループを抜けるという処理にしています。対話の終了はレスポンスからもっとスマートに判断できないものかと思ったのですが、今回は判定方法がみつけられませんでした。

while(True):
    self.status_ui.status('listening')
    text = self.recognizer.recognize()
    if not text:
        aiy.audio.say('Sorry, I did not hear you.')
        continue

    print('You said: %s' % text)
    response = self.send_text_request(session, text)
    aiy.audio.say(response.query_result.fulfillment_text)

    if response.query_result.intent.display_name == self.final_intent_name:
        break

 対話が終了したらレスポンスに含まれる Output Context からゲストの名前、会社名、訪問先社員名、人数の情報を取得し、 Slack にポストするメッセージを作成します。そして顔検出時に保存しておいた画像をメッセージとともに Slack にアップロードします。

def post_to_slack(self, response):
    output_contexts = response.query_result.output_contexts[0]
    guest_name = output_contexts.parameters['guest_name']
    company_name = output_contexts.parameters['company_name']
    dest_name = output_contexts.parameters['dest_name']
    people_count = output_contexts.parameters['people_count']
    comment = '%s from %s is coming for %s with %d people.' % (guest_name, company_name, dest_name, int(people_count))

    with open(self.guest_image_file, 'rb') as guest_image:
        self.slack_client.api_call(
            'files.upload',
            channels = '#akanuma_private',
            file = guest_image,
            filetype = 'jpg',
            filename = self.guest_image_file,
            initial_comment = comment
        )

 Output Context についてはこちらに説明があります。

Types for Dialogflow API Client — dialogflow 0.1.0 documentation

 また、今回 Slack への Post にはこちらを使用しています。

github.com

スクリプトの実行

 ここまでで一通りの準備が終わったので、スクリプトを実行してみます。 GCP の API を使用するには認証を通す必要があります。認証については下記に説明があります。

Getting Started with Authentication  |  Documentation  |  Google Cloud Platform

 認証情報を含む json ファイルのパスを環境変数 GOOGLE_APPLICATION_CREDENTIALS に設定しておくことで認証情報が参照されますので、今回の冒頭でダウンロードした認証情報の json ファイルのパスを指定しておきます。

$ export GOOGLE_APPLICATION_CREDENTIALS="/home/pi/AIY-projects-python/src/examples/voice/service-account-file.json"

 そして下記のようにスクリプトを実行します。

$ src/examples/voice/receptionist.py

 実行した様子は下記の動画のようになります。ひとまず顔検出をトリガーにして想定した対話処理が行われているようです。

 また、 Slack には下記のように画像がアップロードされました。
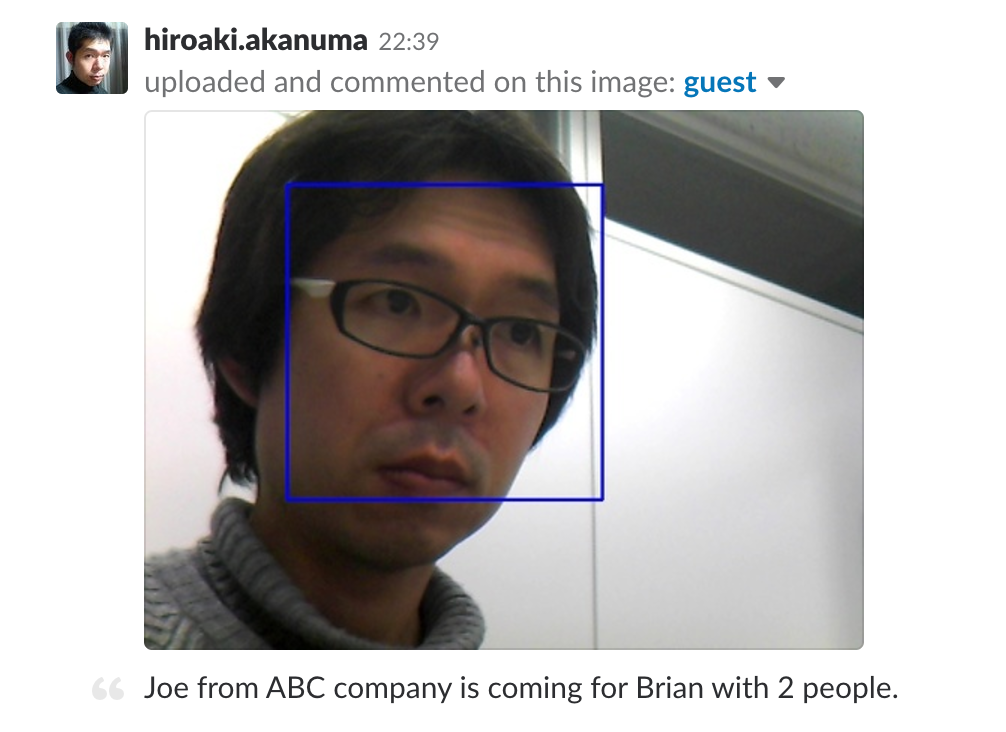
f:id:akanuma-hiroaki:20180303013028p:plain:w450

まとめ

 今回は Dialogflow 側は最低限の設定しかしていないので、ほぼ決まった形での発話にしか対応できていませんが、 Dialogflow 側を作り込むことで様々な発話に柔軟に対応して対話することができるようになるかと思います。Slack とも連携できたので実用度もそれなりにありそうな気はしていますが、考えてみるとだいたい同じようなことはスマートフォンアプリでもできてしまうように思いますので、実際にはやはり Voice Kit のベースの Raspberry Pi の GPIO 等を活かした他のセンサーデバイス等との連携によって差別化できるのかなと思いました。とりあえず実験的に色々触ってみるのは面白いので、もう少し作り込めたら実際に会社の受付で試してみられると良いなと思っています。
Voice Kit で顔認識をトリガーにして対話する

 前回は音声によるリクエストをトリガーにして、カメラ画像からの顔認識結果を返しましたが、今回は常に顔認識処理を続行し、顔が検出された場合はそれをトリガーにして簡単に対話する処理を実装してみたいと思います。

f:id:akanuma-hiroaki:20180219075032j:plain:w450

今回の実装内容

 今回の具体的な実装内容としては、ドリンクサービスコーナーでの簡単な受付処理を想定し、カメラで顔を検出した場合はユーザに飲みたいものを訪ね、ユーザの回答に対してメッセージを返すというものです。

 ちなみに今回は音声認識のインタフェースに Google Assistant ではなく Cloud Speech を使用しますので、下記サイトで紹介されているような事前のアカウントの準備が必要になります。内容については下記サイトを参照いただくこととしてここでの説明は割愛します。

aiyprojects.withgoogle.com

コード全体

 まずは今回実装したコードの全体を掲載しておきます。

#!/usr/bin/env python3

import sys
import cv2

import aiy.audio
import aiy.cloudspeech
import aiy.voicehat

class DrinkProvider:
    def __init__(self):
        self.face_cascade = cv2.CascadeClassifier('/home/pi/AIY-projects-python/src/examples/voice/haarcascade_frontalface_default.xml')

        self.menu_list = ['coffee', 'tea', 'milk', 'orange juice', 'beer']
        self.recognizer = aiy.cloudspeech.get_recognizer()
        for menu in self.menu_list:
            self.recognizer.expect_phrase(menu)
        aiy.audio.get_recorder().start()

        self.status_ui = aiy.voicehat.get_status_ui()

    def main(self):
        while(True):
            cap = cv2.VideoCapture(0)
            self.status_ui.status('ready')
            while(True):
                ret, frame = cap.read()
                gray = cv2.cvtColor(frame, cv2.COLOR_BGR2GRAY)
                faces = self.face_cascade.detectMultiScale(gray, 1.3, 5)
                for (x, y, w, h) in faces:
                    frame = cv2.rectangle(frame, (x, y), (x+w, y+h), (255, 0, 0), 2)
                cv2.imshow('frame', frame)
                if cv2.waitKey(1) & 0xff == ord('q'):
                    cap.release()
                    cv2.destroyAllWindows()
                    sys.exit(1)
                if len(faces) > 0:
                    break

            self.status_ui.status('listening')
            aiy.audio.say('Hi! What would you like to drink?')
            for i, menu in enumerate(self.menu_list):
                if i == len(self.menu_list) - 1:
                    aiy.audio.say('or')
                aiy.audio.say(menu)

            text = self.recognizer.recognize()
            if not text:
                aiy.audio.say('Sorry, I did not hear you.')
            elif text not in self.menu_list:
                print('You said: %s' % text)
                aiy.audio.say('Sorry, we can not provide it.')
            else:
                aiy.audio.say("Sure. We'll brought you a tasty %s. Please wait a sec!" % text)

            cv2.waitKey(3000)
            cap.release()

if __name__ == '__main__':
    provider = DrinkProvider()
    provider.main()

コンストラクタ

 コンストラクタではまず前回同様に OpenCV の検出器を初期化しています。

self.face_cascade = cv2.CascadeClassifier('/home/pi/AIY-projects-python/src/examples/voice/haarcascade_frontalface_default.xml')

 そしてユーザからの回答を受け付けるための準備です。今回はあらかじめ用意したメニューの中から希望のドリンクを選択してもらう形なので、選択肢をリストに保持しておきます。そして Cloud Speech の API を利用するための recoginzer を取得し、ユーザからの回答内容が認識されやすくなるよう、期待するフレーズを expect_phrase() メソッドで登録しておきます。

self.menu_list = ['coffee', 'tea', 'milk', 'orange juice', 'beer']
self.recognizer = aiy.cloudspeech.get_recognizer()
for menu in self.menu_list:
    self.recognizer.expect_phrase(menu)
aiy.audio.get_recorder().start()

 そして最後に状態に応じて筐体上部のボタンのLEDの点灯状態を変更するために、 status_ui を取得しておきます。

self.status_ui = aiy.voicehat.get_status_ui()

顔認識処理

 main() メソッドは全体を無限ループで繰り返していますが、その最初でもう一つ無限ループを用意し、カメラ画像から顔が検出されるまで顔認識処理を繰り返すようにします。顔認識処理の内容は前回までと同様で、キーボードから q が入力されたらカメラのリソースを解放してプログラムを終了するようにしています。筐体のLEDの状態は顔認識の無限ループに入る前に ready の状態にしておきます。

cap = cv2.VideoCapture(0)
self.status_ui.status('ready')
while(True):
    ret, frame = cap.read()
    gray = cv2.cvtColor(frame, cv2.COLOR_BGR2GRAY)
    faces = self.face_cascade.detectMultiScale(gray, 1.3, 5)
    for (x, y, w, h) in faces:
        frame = cv2.rectangle(frame, (x, y), (x+w, y+h), (255, 0, 0), 2)
    cv2.imshow('frame', frame)
    if cv2.waitKey(1) & 0xff == ord('q'):
        cap.release()
        cv2.destroyAllWindows()
        sys.exit(1)
    if len(faces) > 0:
        break

入力プロンプト

 カメラ画像から顔が検出されたらループを抜け、ユーザに回答を促すための発話を行います。選択肢としてメニューのリストの内容も読み上げ、リストの最後の要素とその前の要素の間では英語っぽく or を挟むようにしています。
self.status_ui.status('listening')
aiy.audio.say('Hi! What would you like to drink?')
for i, menu in enumerate(self.menu_list):
    if i == len(self.menu_list) - 1:
        aiy.audio.say('or')
    aiy.audio.say(menu)

音声認識処理

 入力を促す発話の後はユーザの回答を待ち受けます。 recognizer の recognize() メソッドで入力を受け付けてテキスト化します。回答がなかった場合や回答内容がメニューリストにない場合はエラー時の固定回答を返し、メニューリストに含まれるものが回答だった場合はそれを埋め込んだ形の回答を返して3秒待って処理を終了し、再び main() メソッド全体のループに戻ります。
text = self.recognizer.recognize()
if not text:
    aiy.audio.say('Sorry, I did not hear you.')
elif text not in self.menu_list:
    print('You said: %s' % text)
    aiy.audio.say('Sorry, we can not provide it.')
else:
    aiy.audio.say("Sure. We'll brought you a tasty %s. Please wait a sec!" % text)

cv2.waitKey(3000)
cap.release()

動作確認

 それではスクリプトを実行してみます。実行してみた様子は下記の動画の通りで、ひとまず期待した通りに動作しているようです。
まとめ

 今回は Google Assistant ではなく Cloud Speech を使ってシンプルな対話処理を実装してみました。hotword 以外をトリガーとした処理を組み合わせることで色々用途は広がりそうです。ただこれだと単語での回答に対してのシンプルな返答のみなので、次回は Dialogflow を使ってもっと対話的な処理を実装してみたいと思います。

AIY Voice Kit + Web カメラで顔認識(誰かそこにいる?)

 前回は Voice Kit + Web カメラで画像を表示しつつ、音声で写真を撮るということをやってみました。今回は Web カメラで撮っている画像の中に人がいるかどうかを顔認識によって判定してみたいと思います。

実装内容

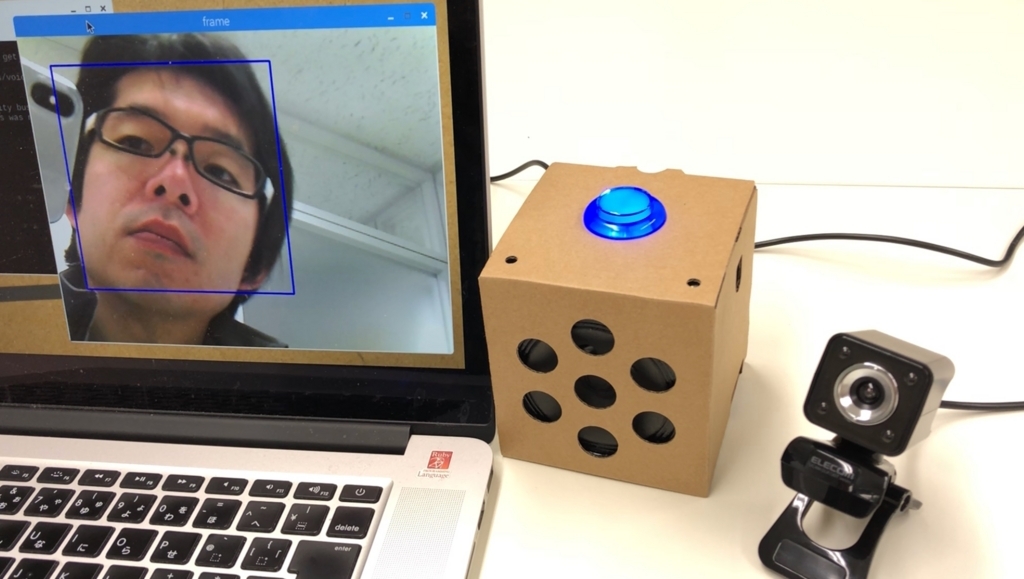
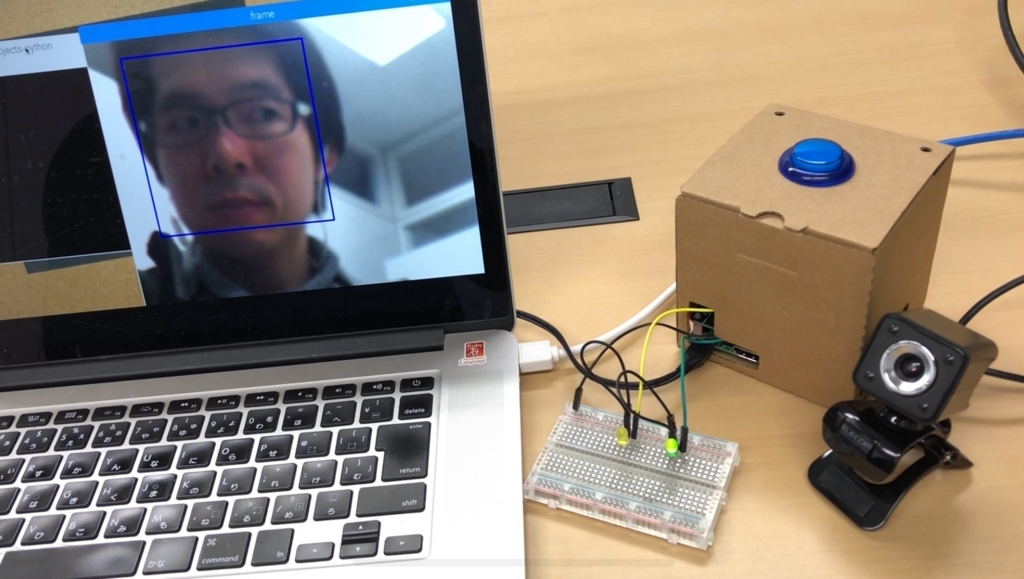
 今回の実装内容としては、スクリプトを実行すると Web カメラ画像の表示を開始し、 "OK Google, is anyone there?"(そこに誰かいる?)と発話すると、画像内に人の顔があるかを検出し、顔があった場合は "Yes, someone is there." と言って画像内で検出された顔を枠で囲み、緑色のLEDを点灯させます。顔がない場合は "No one is there." と言って黄色のLEDを点灯させます。

f:id:akanuma-hiroaki:20180211091346j:plain:w450

OpenCV で顔検出

 今回顔検出には OpenCV を使用します。下記チュートリアルを参考にしました。

Haar Cascadesを使った顔検出 — OpenCV-Python Tutorials 1 documentation

 OpenCV のインストールは前回までで実施済みで使えるようになっていますが、 検出器を使うために github からリポジトリを clone します。検出アルゴリズムについては上記チュートリアルで詳しく紹介されていますので、ここでは割愛します。

pi@raspberrypi:~ $ git clone https://github.com/opencv/opencv.git
Cloning into 'opencv'...
remote: Counting objects: 221908, done.
remote: Compressing objects: 100% (5/5), done.
remote: Total 221908 (delta 0), reused 0 (delta 0), pack-reused 221903
Receiving objects: 100% (221908/221908), 438.92 MiB | 1.57 MiB/s, done.
Resolving deltas: 100% (154066/154066), done.
Checking out files: 100% (5734/5734), done.

 検出器は opencv/data/haarcascades に格納されています。

pi@raspberrypi:~ $ ls -l opencv/data/haarcascades
合計 9568
-rw-r--r-- 1 pi pi  341406  26 07:59 haarcascade_eye.xml
-rw-r--r-- 1 pi pi  601661  26 07:59 haarcascade_eye_tree_eyeglasses.xml
-rwxr-xr-x 1 pi pi  411388  26 07:59 haarcascade_frontalcatface.xml
-rwxr-xr-x 1 pi pi  382918  26 07:59 haarcascade_frontalcatface_extended.xml
-rw-r--r-- 1 pi pi  676709  26 07:59 haarcascade_frontalface_alt.xml
-rw-r--r-- 1 pi pi  540616  26 07:59 haarcascade_frontalface_alt2.xml
-rw-r--r-- 1 pi pi 2689040  26 07:59 haarcascade_frontalface_alt_tree.xml
-rw-r--r-- 1 pi pi  930127  26 07:59 haarcascade_frontalface_default.xml
-rw-r--r-- 1 pi pi  476825  26 07:59 haarcascade_fullbody.xml
-rw-r--r-- 1 pi pi  195369  26 07:59 haarcascade_lefteye_2splits.xml
-rw-r--r-- 1 pi pi   47775  26 07:59 haarcascade_licence_plate_rus_16stages.xml
-rw-r--r-- 1 pi pi  395320  26 07:59 haarcascade_lowerbody.xml
-rw-r--r-- 1 pi pi  828514  26 07:59 haarcascade_profileface.xml
-rw-r--r-- 1 pi pi  196170  26 07:59 haarcascade_righteye_2splits.xml
-rw-r--r-- 1 pi pi   75482  26 07:59 haarcascade_russian_plate_number.xml
-rw-r--r-- 1 pi pi  188506  26 07:59 haarcascade_smile.xml
-rw-r--r-- 1 pi pi  785817  26 07:59 haarcascade_upperbody.xml

 今回はこの中から一番ベーシックな、 haarcascade_frontalface_default.xml を使用しますので、任意のディレクトリにコピーしておきます。

 それではコードを実装します。今回の主な変更としては、カメラ画像の表示を更新している無限ループの中に、下記の処理を追加しています。 "OK Google, is anyone there?" という発話を検知したら self.face_detection フラグを True にすることでこの処理が実行されます。

elif self.face_detection:
    faces = None
    for i in range(0, 30):
        ret, frame = cap.read()
        cv2.imshow('frame', frame)
        gray = cv2.cvtColor(frame, cv2.COLOR_BGR2GRAY)
        faces = self.face_cascade.detectMultiScale(gray, 1.3, 5)
        if len(faces) != 0:
            break
        cv2.waitKey(1)

    if len(faces) == 0:
        GPIO.output(MyAssistant.GPIO_LED_YELLOW, GPIO.HIGH)
        self.print_and_say('No one is there.')
    else:
        for (x, y, w, h) in faces:
            frame = cv2.rectangle(frame, (x, y), (x+w, y+h), (255, 0, 0), 2)
        cv2.imshow('frame', frame)
        GPIO.output(MyAssistant.GPIO_LED_GREEN, GPIO.HIGH)
        self.print_and_say('Yes, someone is there.')
        cv2.waitKey(5000)

    self.face_detection = False
    GPIO.output(MyAssistant.GPIO_LED_GREEN, GPIO.LOW)
    GPIO.output(MyAssistant.GPIO_LED_YELLOW, GPIO.LOW)

 顔検出処理はキャプチャした画像に対して detectMultiScale() メソッドを実行することで行いますが、一回の処理だけだと発話直後の1フレームに対してのみの検出になるので、少し幅を持たせるために30回処理を行い、その間に顔が検出されればそこに人がいるものとしています。また、グレースケール画像に対して行った方が早いようなので、カメラ画像をグレースケール画像に変換し手から detectMultiScale() メソッドを実行しています。

for i in range(0, 30):
    ret, frame = cap.read()
    cv2.imshow('frame', frame)
    gray = cv2.cvtColor(frame, cv2.COLOR_BGR2GRAY)
    faces = self.face_cascade.detectMultiScale(gray, 1.3, 5)
    if len(faces) != 0:
        break
    cv2.waitKey(1)

 そして顔が検出された場合は検出された部分を青い枠で囲って表示し、緑色のLEDを点灯させます。 cv2.rectangle() メソッドでは矩形の領域の2点の座標を引数に指定しますが、 detectMultiScale() メソッドの戻り値は1点の座標と横幅、高さなので、1点の座標に横幅と高さを加えたものをもう1点の座標として指定しています。

for (x, y, w, h) in faces:
    frame = cv2.rectangle(frame, (x, y), (x+w, y+h), (255, 0, 0), 2)
cv2.imshow('frame', frame)
GPIO.output(MyAssistant.GPIO_LED_GREEN, GPIO.HIGH)

 処理が終わったらフラグを False に戻して LED も消灯しておきます。

self.face_detection = False
GPIO.output(MyAssistant.GPIO_LED_GREEN, GPIO.LOW)
GPIO.output(MyAssistant.GPIO_LED_YELLOW, GPIO.LOW)

 上記コードを含むスクリプト全体を下記に記載しておきます。

#!/usr/bin/env python3

import sys
import time
import cv2
import threading
from datetime import datetime

import aiy.assistant.auth_helpers
import aiy.audio
import aiy.voicehat
from google.assistant.library import Assistant
from google.assistant.library.event import EventType

import RPi.GPIO as GPIO

class MyAssistant:
    GPIO_LED_GREEN = 2
    GPIO_LED_YELLOW = 3

    def __init__(self):
        self.credentials = aiy.assistant.auth_helpers.get_assistant_credentials()
        self.status_ui = aiy.voicehat.get_status_ui()

        GPIO.setmode(GPIO.BCM)
        GPIO.setup(MyAssistant.GPIO_LED_GREEN, GPIO.OUT)
        GPIO.setup(MyAssistant.GPIO_LED_YELLOW, GPIO.OUT)

        self._run_event_task = threading.Thread(target = self._run_event)
        self._show_video_task = threading.Thread(target = self._show_video)

        self.face_cascade = cv2.CascadeClassifier('/home/pi/AIY-projects-python/src/examples/voice/haarcascade_frontalface_default.xml')
        self.take_photo = False
        self.face_detection = False
        self.stop = False

    def print_and_say(self, text):
        print(text)
        aiy.audio.say(text)

    def start(self):
        self._show_video_task.start()
        self._run_event_task.start()

    def _show_video(self):
        cap = cv2.VideoCapture(0)

        while(True):
            ret, frame = cap.read()

            cv2.imshow('frame', frame)
            if self.take_photo:
                now = datetime.now()
                filename = 'capture_%s.jpg' % now.strftime('%Y%m%d_%H%M%S')

                if cv2.imwrite(filename, frame):
                    self.print_and_say('I took nice one.')
                    print('Captured Image: %s' % filename)
                    time.sleep(5)
                else:
                    self.print_and_say("I couldn't take a picture.")

                self.take_photo = False

            elif self.face_detection:
                faces = None
                for i in range(0, 30):
                    ret, frame = cap.read()
                    cv2.imshow('frame', frame)
                    gray = cv2.cvtColor(frame, cv2.COLOR_BGR2GRAY)
                    faces = self.face_cascade.detectMultiScale(gray, 1.3, 5)
                    if len(faces) != 0:
                        break
                    cv2.waitKey(1)

                if len(faces) == 0:
                    GPIO.output(MyAssistant.GPIO_LED_YELLOW, GPIO.HIGH)
                    self.print_and_say('No one is there.')
                else:
                    for (x, y, w, h) in faces:
                        frame = cv2.rectangle(frame, (x, y), (x+w, y+h), (255, 0, 0), 2)
                    cv2.imshow('frame', frame)
                    GPIO.output(MyAssistant.GPIO_LED_GREEN, GPIO.HIGH)
                    self.print_and_say('Yes, someone is there.')
                    cv2.waitKey(5000)

                self.face_detection = False
                GPIO.output(MyAssistant.GPIO_LED_GREEN, GPIO.LOW)
                GPIO.output(MyAssistant.GPIO_LED_YELLOW, GPIO.LOW)

            cv2.waitKey(1)

            if self.stop:
                break

        cap.release()
        cv2.destroyAllWindows()
        print('Stop showing video.')

    def _run_event(self):
        with Assistant(self.credentials) as assistant:
            self._assistant = assistant
            for event in assistant.start():
                self._process_event(event)

    def _process_event(self, event):
        if event.type == EventType.ON_START_FINISHED:
            self.status_ui.status('ready')
            aiy.audio.say("OK, I'm ready.")
            if sys.stdout.isatty():
                print('Say "OK, Google" then speak.')

        elif event.type == EventType.ON_RECOGNIZING_SPEECH_FINISHED and event.args:
            print('You said: %s' % event.args['text'])
            text = event.args['text'].lower()

            if text == 'take a picture':
                self._assistant.stop_conversation()
                GPIO.output(MyAssistant.GPIO_LED_GREEN, GPIO.LOW)
                GPIO.output(MyAssistant.GPIO_LED_YELLOW, GPIO.LOW)

                aiy.audio.say('OK, 3')
                GPIO.output(MyAssistant.GPIO_LED_GREEN, GPIO.HIGH)
                time.sleep(1)

                aiy.audio.say('2')
                GPIO.output(MyAssistant.GPIO_LED_GREEN, GPIO.LOW)
                GPIO.output(MyAssistant.GPIO_LED_YELLOW, GPIO.HIGH)
                time.sleep(1)

                aiy.audio.say('1')
                GPIO.output(MyAssistant.GPIO_LED_GREEN, GPIO.HIGH)
                time.sleep(1)

                self.take_photo = True

                GPIO.output(MyAssistant.GPIO_LED_GREEN, GPIO.LOW)
                GPIO.output(MyAssistant.GPIO_LED_YELLOW, GPIO.LOW)

            elif text == 'is anyone there':
                self._assistant.stop_conversation()
                self.face_detection = True

            elif text == 'goodbye':
                self.status_ui.status('stopping')
                self._assistant.stop_conversation()
                self.stop = True
                aiy.audio.say('Goodbye. See you again.')
                print('Stop processing event.')
                sys.exit()

        elif event.type == EventType.ON_CONVERSATION_TURN_STARTED:
            self.status_ui.status('listening')
        elif event.type == EventType.ON_END_OF_UTTERANCE:
            self.status_ui.status('thinking')
        elif event.type == EventType.ON_CONVERSATION_TURN_FINISHED:
            self.status_ui.status('ready')
        elif event.type == EventType.ON_ASSISTANT_ERROR and event.args and event.args['is_fatal']:
            sys.exit(1)

    def main(self):
        self.status_ui.status('starting')
        self.start()

if __name__ == '__main__':
    sample = MyAssistant()
    sample.main()

動作確認

 それでは動作確認をしてみます。下記の動画のようにだいたい想定した通りに動作してくれました。

まとめ

 今回は OpenCV を使うことで簡単に顔認識を行うことができました。調べてみると OpenCV 以外にも最近は dlib を使う方が精度が高くて良いようなのですが、 Raspberry Pi 3 Model B の環境で試した限りでは OpenCV と比べて処理が遅く、リアルタイムの顔認識には使えませんでした。ただパフォーマンスの改善についてはまだあまり調べられていないので、ビルドの仕方などによって改善する可能性はあるかと思います。顔認識では精度とパフォーマンスの両方が重要になってくると思いますので、もう少し dlib についても調べてみたいと思います。また、 OpenCV についても各検出器の処理内容や、元画像とグレースケール変換画像への処理によるパフォーマンスの違いなども気になるところではあるので、気が向いたら調べてみようと思います。